Salesforce Advanced
This page covers advanced options, advanced mapping functionality, and how to include headers in success/failure files using the Jitterbit Connect Salesforce Wizards.
Note
When opening an existing project that uses a previous Salesforce API version, you will be prompted to upgrade to the latest supported Salesforce API version. (An upgrade to a higher version implicitly includes all the features and objects of prior versions.)
The version of Salesforce REST API that is available depends on the Harmony Agent and Design Studio version you are using. See Prerequisites and Supported API Versions for more information.
Advanced Options
Advanced options are accessible after you create a Salesforce operation. You can view the available options in Design Studio following these steps:
- Create a Salesforce query, upsert, insert, update, delete, or bulk process operation using the appropriate Jitterbit Connect Salesforce Wizard.
- Complete the wizard and wait until all of the project items are created. You should be taken directly to the configured Salesforce connector.
- In the panel on the left, under Jitterbit Connect > Salesforce, expand to the connector and double-click to open the item.
- Within the window, click on Advanced Options to expand the additional settings. Settings are unique to each type of operation.
Batch Settings
For select Bulk Process connectors (Upsert, Insert, Update, Delete, and Hard Delete), the Advanced Options > Batch Settings let you configure a setting that limits the number of records returned or used in a batch:
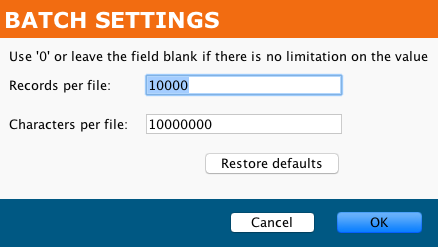
Use 0 or leave a field empty if there is no limitation on its value.
- Records per file: By default, 10000 (10,000 or 10K).
- Characters per file: By default, 10000000 (10,000,000 or 10M).
The Salesforce Query Wizard has a separate Advanced Options > Operation Options for setting batch size directly.
Chunking Settings
Chunking is not available for Salesforce Bulk Process connectors (instead, see the Batch Settings above). For a configured connector's Advanced Options > Chunking settings, you can configure:
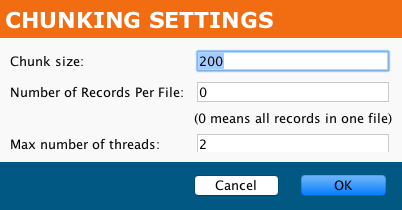
- Chunk size: By default, this is set at 200. It must be the range of 1 through 200.
- Number of Records Per File: By default, this is set at 0, which means all records in one file.
- Max number of threads: By default, this is set at 2.
These settings (and the source and target chunk nodes, if applicable) can also be set at the operation level; if so, the window of the configured connector needs to be closed and reopened to see those changes in these settings.
Operation-level chunking is not available for Salesforce Bulk Process operations (instead, see the Batch Settings above). For other Salesforce operations, these operation options are available, as shown for a Salesforce Query operation:

For Salesforce upsert, insert, update, and delete operations, by default chunking is enabled with a Chunk size of 200 and a Max number of threads of 2.
Additional information on these settings and chunking in general is covered in Chunking.
Date Options
For a configured connector's Advanced Options > Date Options, you can configure the Date Conversion Settings. This applies when mapping to Salesforce target fields with a date or date-time data type, as described under Map to Salesforce Date or Date-Time Fields later on this page.
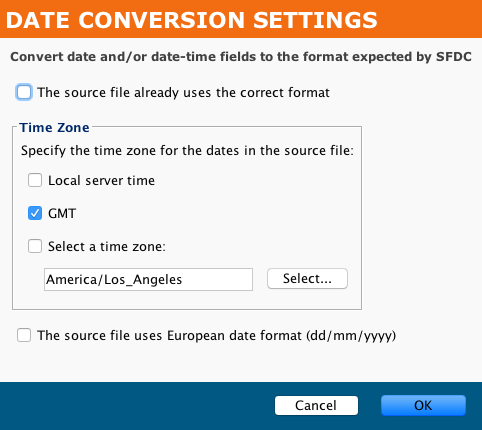
- The source file already use the correct format: If the data is in the format expected by Salesforce, you can disable this conversion by selecting this option. The remainder of the controls will become disabled.
- Time Zone: If the option above is not selected, you can specify information about the date and time fields in the source, and the data will be converted accordingly. Specify one of these time zone options for the
dateanddate-timefields:- Local server time: Select if date and date-time fields are local to the server running the agent.
- GMT: GMT is preselected as the default format.
- Select a time zone: If selected, specify a time zone from the dropdown menu.
- The source file uses European date format (dd/mm/yyyy): This can be specified in addition to a Time Zone.
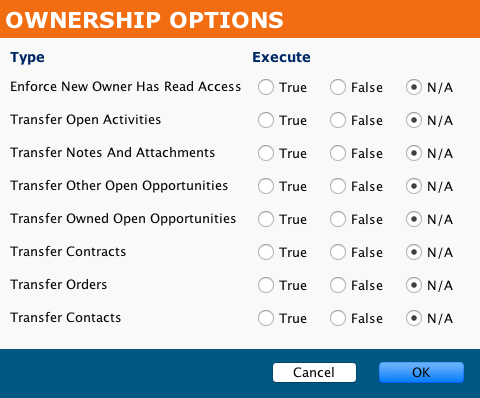
Ownership Options
For a configured connector's Advanced Options > Retry Policy, you can configure Salesforce Ownership rules:
Retry Policy
For a configured connector's Advanced Options > Retry Policy, you can configure:
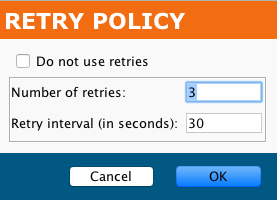
- Do not use retries: Select to not use retries and disable the remainder of this dialog
- Number of retries: By default, 3.
- Retry interval (in seconds): By default, 30 seconds.
Advanced Mapping Functionality
As part of the Jitterbit Connect Salesforce Wizards, when completing certain mappings, Design Studio automatically creates mapping scripts that are common for certain use cases. These apply when mapping to Salesforce date and date-time fields in a Salesforce upsert, insert, or update operation or bulk process of the same type, as well as when mapping a response from a Salesforce upsert, insert, update, or delete to another target.
Map to Salesforce Date or Date-Time Fields
This functionality applies when mapping from a specified source to a Salesforce target field that has a date or date-time data type within a Salesforce upsert, insert, or update operation or a Salesforce bulk process operation that is of the upsert, insert, or update type. The source is specified during completion of the Jitterbit Connect Salesforce Wizard.
As an aid to the user, while completing a transformation mapping, any date or date-time fields present in your source will be mapped with script logic that converts these fields to the format expected by Salesforce. The specific script logic that is added depends on the Date Conversion Settings as specified under the advanced Date Options described earlier on this page.
For example, assume that the source data is in the format of YYYY-MM-DD HH:MM:SS and the source time zone is GMT. In this case, the default settings apply:

With this example, when a source field (json$item.LastModifiedDate$) is mapped to a target date or date-time field (root$transaction.body$create$Account.LastModifiedDate$), script logic is automatically added to the target field. The added script uses the Jitterbit function GetUTCFormattedDateTime() and specifies its parameters using the source field, specified time zone ("UTC"), and boolean for the European date format (false).
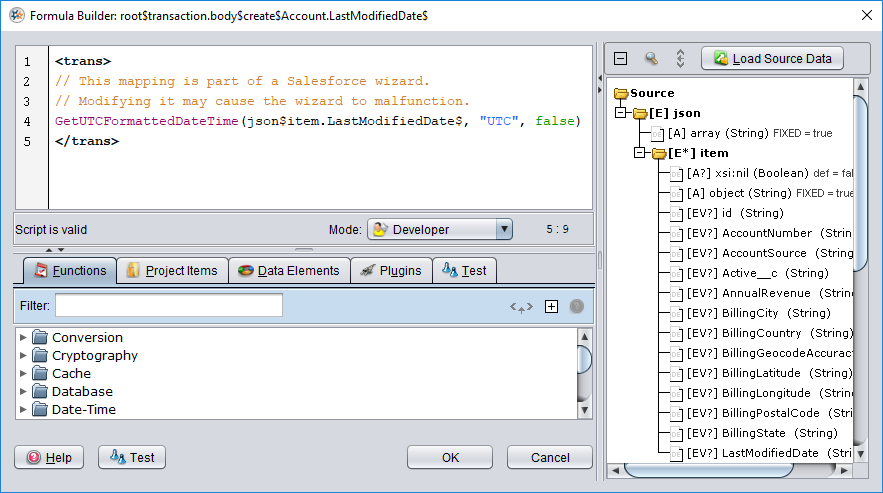
The specific script logic that is inserted depends on the user-provided Date Conversion Settings. It is important that the source data be in a format able to be converted with the logic inserted based on these settings. For example, if you try to map from a source field that does not contain a date or date-time, it will not be able to be converted with this logic.
Log Errors Returned from Salesforce
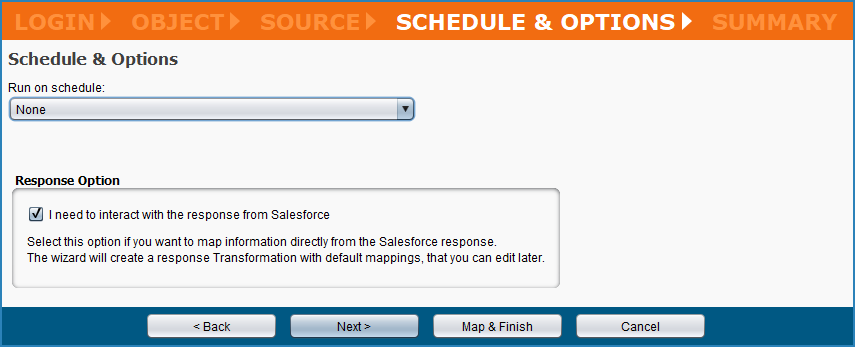
This functionality applies when mapping the response from Salesforce that is returned when, during creation of a Salesforce upsert, insert, update, or delete operation, on the Schedule & Options step, the Response Option checkbox for "I need to interact with the response from Salesforce" is selected. This option is selected by default.
As an aid to the user, when this option is selected, a second transformation is automatically added to the operation that generates a mapped script to capture any errors returned from Salesforce and write those errors to the operation log. The target of the transformation is a flat schema where the Salesforce error message is automatically mapped to a field containing a generated script to log the errors. In addition, for Salesforce upsert or update operations, the external key field is also recorded in the log.
For example, if this option is selected during creation of a Salesforce upsert operation, an operation similar to that shown below will be created. The operation includes both the initial, request transformation to perform the upsert, as well as a second, response transformation used to record the response from Salesforce:
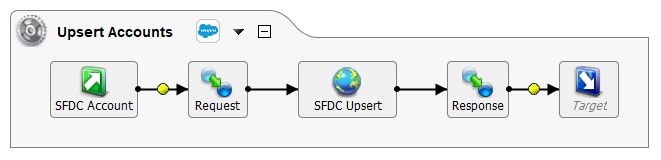
Upon opening the response transformation in this example, the target side shows a flat schema with a single field that is already mapped:
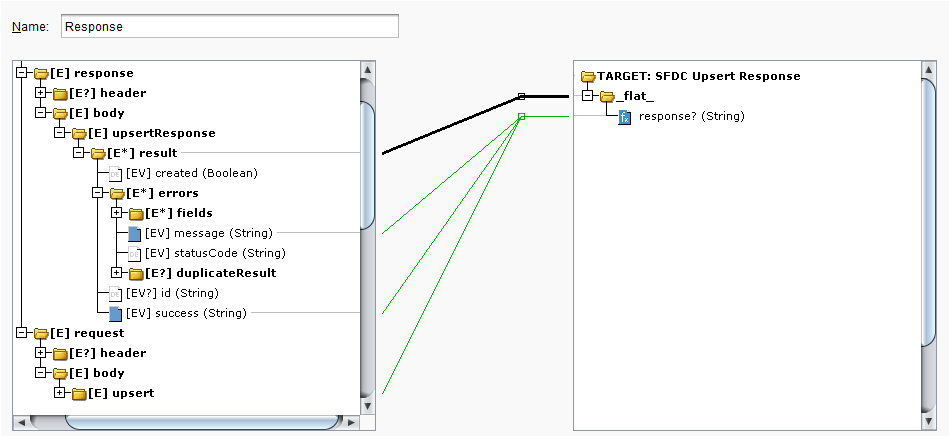
When you double-click on the response field, you can see that scripting logic has been added using fields from the Salesforce response along with several Jitterbit functions. The logic dictates that if the Salesforce success response (root$transaction.response$body$upsertResponse$result.success$) returns false, then the Salesforce error message (root$transaction.response$body$upsertResponse$result.errors#.message$) will be written to the operation log. As this is an upsert operation requiring an external ID to match records for the upsert, the external ID (root$transaction.request$body$upsert$Account#.Jitterbit_Account_ID__c$) is also reported back in the log.

If you later change which field is used as the external ID, the script will need to be updated with the new source object reference.
Note that for Salesforce insert and delete operations, which do not use an external ID field to match records, the external ID reference is excluded from the script. For such operations, the mapped script contains this logic, shortened to exclude the ID:
<trans>
// This mapping is part of a Salesforce wizard.
// Modifying it may cause the wizard to malfunction.
If(root$transaction.response$body$createResponse$result.success$ == false,
    WriteToOperationLog(
        SumString(root$transaction.response$body$createResponse$result.errors#.message$, ". ", false)
    )
)
</trans>
Include Headers in Success and Failure Files
You can include headers as success/failure files within a Salesforce upsert or update operation from a database source. You must be using a Private Agent that is version 8.24 or later to do this following the instructions below.
These steps show how to capture the header string from a database source and then write the header string at the beginning of a success or failure file:
- Set the Jitterbit Variable
jitterbit.sfdc.dbsource.sfheader - Set the Success and Failure File Options
- Set the Operation Options
Set the Jitterbit Variable jitterbit.sfdc.dbsource.sfheader
Note
Setting the global variable jitterbit.sfdc.dbsource.sfheader is required in order to prepend the header text to the record file.
-
Create a script to set
jitterbit.sfdc.dbsource.sfheadertotrue:<trans> $jitterbit.sfdc.dbsource.sfheader=true; </trans> -
Insert the script at the beginning of the update or upsert operation, as shown here for an upsert operation:

Set the Success and Failure File Options
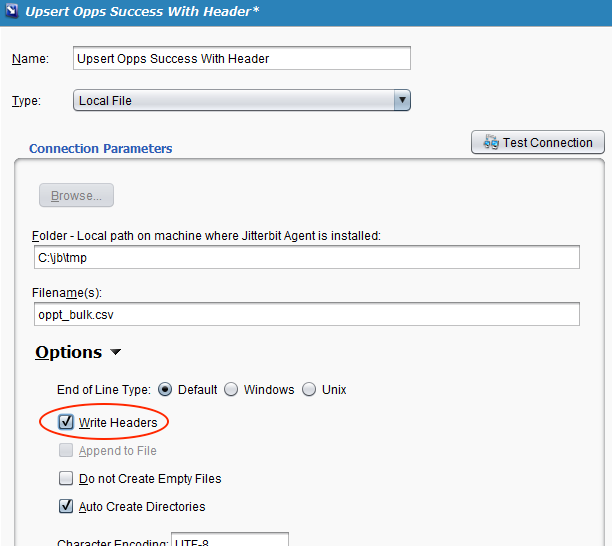
- Create a local file target to be used for the success records:
- Click on the target's Options and select the Write Headers checkbox.
- Save the target's configuration by clicking the Save icon.
- Repeat these steps to create a local file target to be used for the failure records.
This example shows a completed target intended for use with success records:
Set the Operation Options
-
Right-click on the operation or click on the dropdown arrow
 to select the Options menu item:
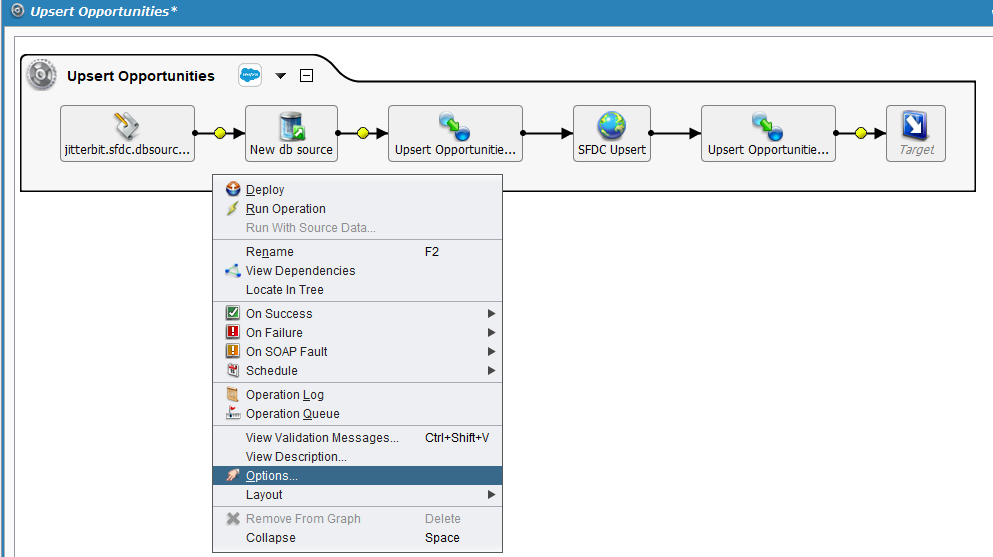
-
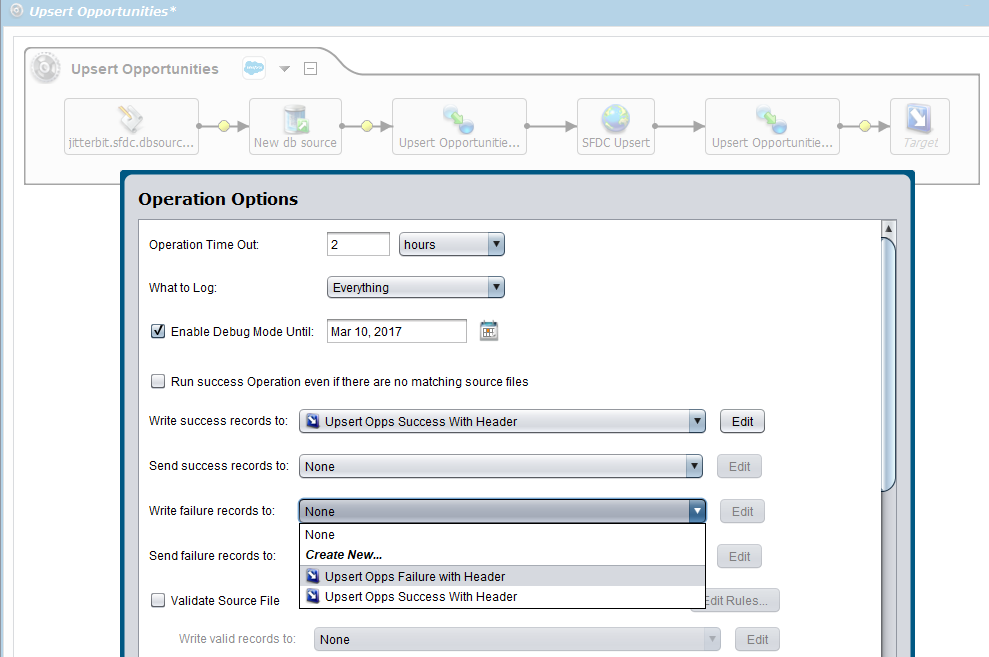
The Operation Options dialog lets you specify the writing of success and failure records:
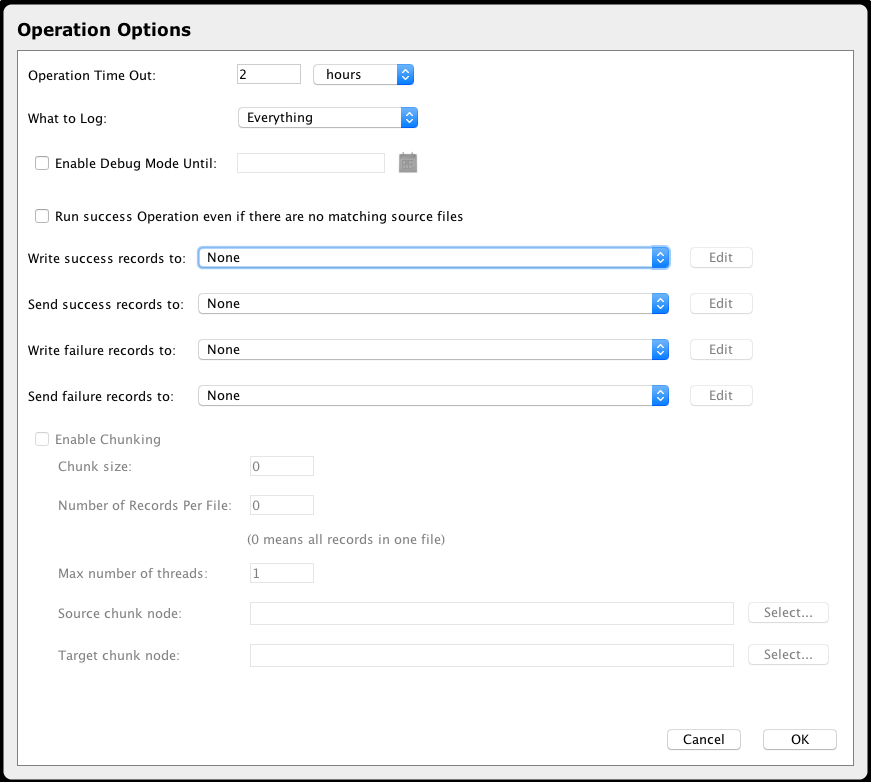
- Click the Write success records to dropdown, and select the appropriate target from the list or select Create New to create a new file-type target.
- Click the Write failure records to dropdown, and select the appropriate target from the list or select Create New to create a new file-type target.
Note
If you choose Create New, see Local File Target for instructions on creating new files.
-
Click OK and then click the Save icon to save the changes to the operation.
This example shows the writing of success records to the target created above and the setting of the writing of failure records to a different target: