Salesforce upsert wizard in Jitterbit Design Studio
Create a Salesforce upsert operation
This page described how to create a Salesforce Upsert operation using the Jitterbit Connect Salesforce Upsert Wizard.
The Salesforce Upsert activity allows you to update existing or insert new records in a connected Salesforce instance using Jitterbit. An "upsert" is essentially either an update or an insert operation, or both, depending on the data provided.
Note
A Salesforce upsert should include an ID field that maps to the selected External ID in Salesforce. If the ID field source record is populated with the Salesforce External ID, the record is updated in Salesforce. If the ID field is blank, a new record is inserted into Salesforce.
The wizard takes you through a series of screens, gathering the information it requires to create the operation in the current project.
Note
When opening an existing project that uses a previous Salesforce API version, you will be prompted to upgrade to the latest supported Salesforce API version. (An upgrade to a higher version implicitly includes all the features and objects of prior versions.)
The version of Salesforce REST API that is available depends on the Jitterbit agent and Design Studio version you are using. See Prerequisites and supported API versions for more information.
Start the wizard
-
Click the
 icon at the top of the screen to display the Jitterbit Connect dialog window:
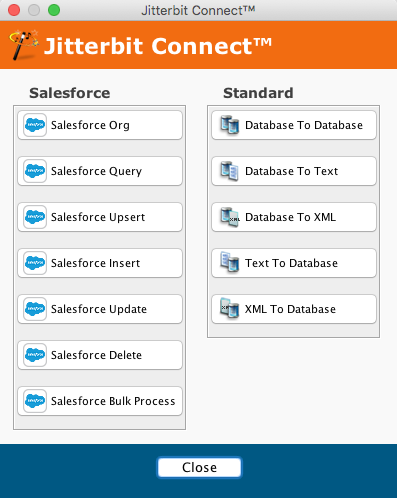
-
To start the wizard, click the Salesforce Upsert button in the Jitterbit Connect Wizard menu, which opens the wizard.
Salesforce login
-
If you have already created a Salesforce org login, connection details will appear in the Query wizard. You may wish to click the Test Salesforce Login button to check the connection.

-
If you have not yet created a Salesforce login, or you need to use different credentials, select Create New… from the dropdown menu below Select or create a Salesforce Org.
-
Note that any changes you make in this page of the wizard will be automatically saved to the Salesforce Org shown on the page. See the Salesforce org page for details.
-
On the Salesforce Login screen, click Next to move to the next screen. (If required, you can click the Back button to return to the previous screen in any of these screens.)
Select the Salesforce object
-
On the Object screen you specify the Salesforce Object and the External ID Field that the operation will use.
-
Simplify your view by typing the first few letters of an object's name in the Filter text entry box, or click the Objects to show dropdown menu and select from either Standard Common Objects, All Custom Objects, or All Objects.
-
Select the desired Salesforce Object:

Select an external ID field
- Click the Select Field… button to select an external ID field. In this example, the Account object and then the Id field were selected:
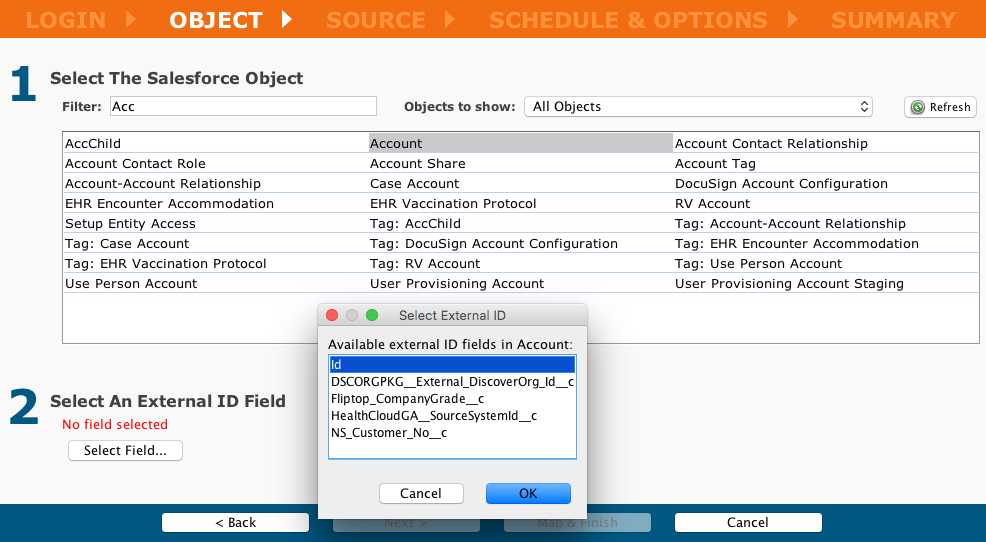
Warning
The field used as the external ID should have a unique value for each record. If you have multiple records with the same external ID value, an error response from Salesforce will be returned and the upsert will fail for the records with duplicate IDs.
- Click Next to move to the Source screen.
Define the source
Select where your source data comes from
The source is the location of the data to be used by the operation.
- If a File source (Local File, FTP Site, File Share, or Temporary Storage):
- What is the file type: text, XML, or JSON?
- What is the file format structure: CSV or delimited?
- What is the field format schema?
- Is validation of the source file contents required? (If your source is a flat text file, you can optionally add row and field validation.)
- If a Database source, what is the connection information and SQL to retrieve the data?
- If an LDAP source, what are the object classes, attributes, and search parameters to retrieve the data?
The screens presented vary depending on your answers to these questions.
If you prefer, you can instead add a source later in your development of the project. For details on the different sources, see the documentation on Sources.
Note
The screenshots shown may vary slightly from what is displayed when you use the wizard, as they are based on one of the wizards. The steps for configuring a source are the same for all Salesforce wizards.
Select one of:
- An existing Source Type from the dropdown menu (one of Local File, FTP Site, File Share, Temporary Storage, Database, HTTP, LDAP, or None); or
- Click the Select or Create New button to create a new Source of the currently selected type; or
- Choose None if you intend to provide explicit values for the data that do not come from other Sources.
Create a new source
To create a new Source, select the Create New… option from the dropdown menu. The New Source fields display. For example, when creating a new Local File Source, you will see fields similar to these:
Note
The type of source selected will determine the parameters to enter. See the documentation on Sources for details.
File sources
For file sources (Local File, FTP Site, File Share, or Temporary Storage), you need to specify or create a source and then specify or create a file format to use with that source. If the file suffix cannot be used to determine the file type, you will be prompted to confirm the file and the file type.
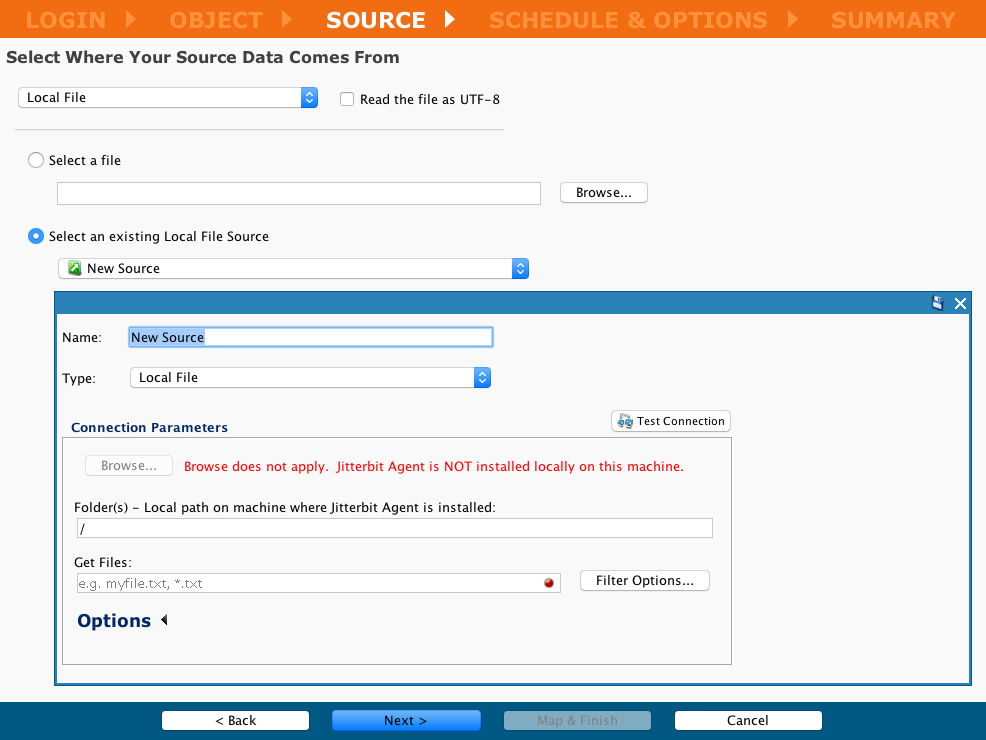
Local file
Note
If you are creating a local file source for the first time, you must first enable local file locations in each Jitterbit private agent configuration. (A Local File can be used only with private agents.)
-
Specifying a Local File as a source:

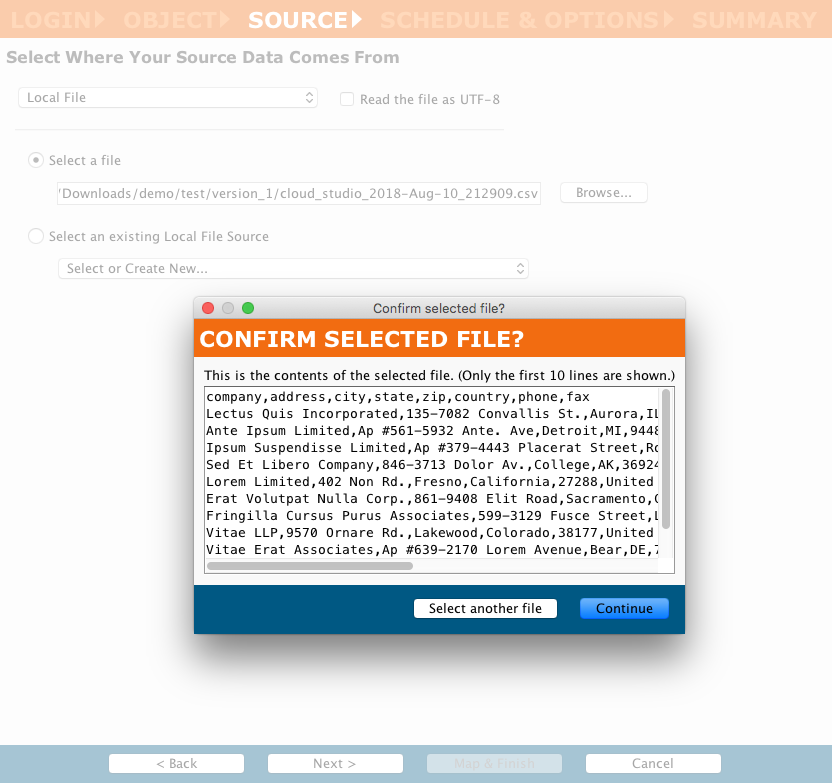
-
Confirming selected file after reviewing the first ten lines of the file:
FTP site, File Share, or Temporary Storage
-
Specifying an existing FTP Site as a source:

-
Click the Next button to move to the Confirm File Type screen.
Confirm file type
-
If the file type cannot be confirmed based on the filename suffix, you will be asked to confirm the type. Adjust as required:

-
If the filename can be confirmed based on the filename suffix, you will be asked to select the options for creating a file format:

-
If you select the Review File Format, the Next button to move to the Select File Format *screen. Otherwise, click the *Next button to move to Create a schedule and set options.
Select file format
-
You can either select an existing File Format or create a new one.
-
To select an existing File Format, select the name from the dropdown:

-
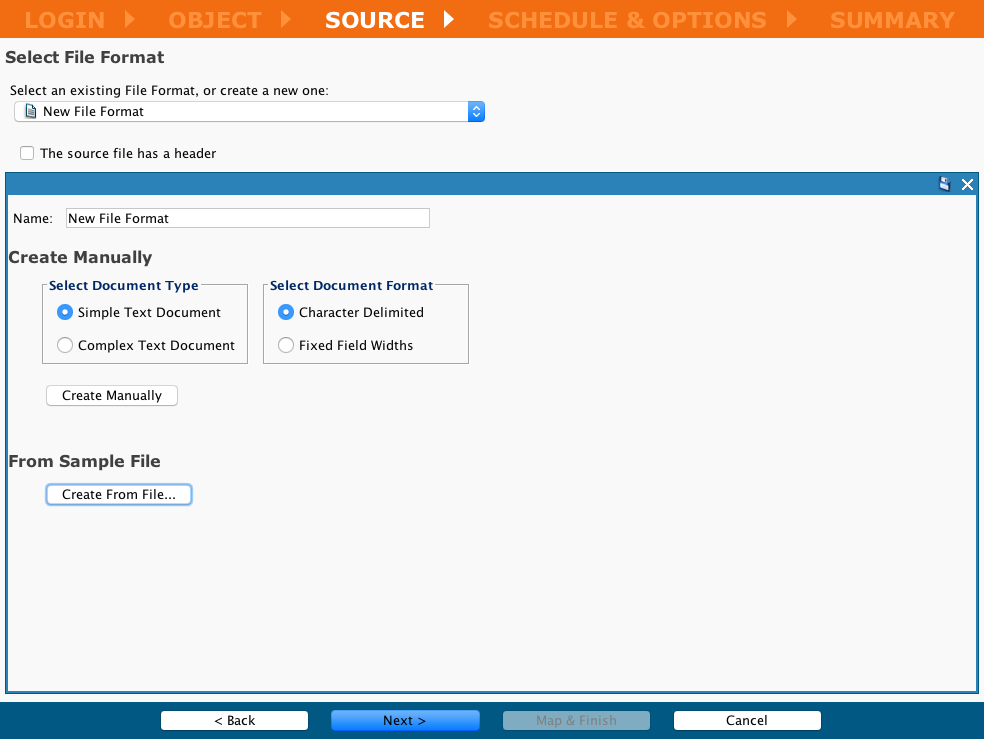
To create a new file format, select Create New from the dropdown menu, which expands the screen to display the File Format fields. The example below shows the creating of a new File Format for a simple Text Document definition:
-
Complete the field and controls:
- Name: Enter the name of the new file format
-
To Create Manually:
- Select Document Type: Specify the document type as either Simple or Complex
- Select Document Format: Specify as either Character Delimited or Fixed Field Widths
-
Create Manually: For details on creating the file format manually, see these instructions on Defining file formats
-
To create From Sample File:
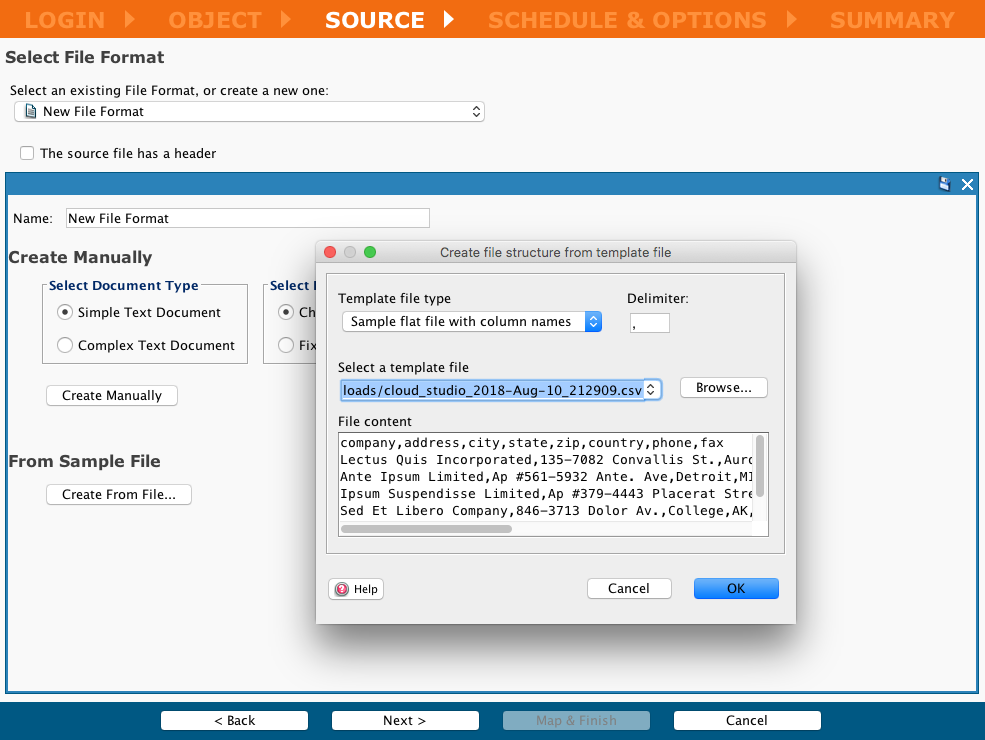
- Click Create From File to open a dialog to specify the file structure using a file as a template
-
-
In this example, the Create From File was clicked and a CSV file was specified to use as a template:
-
Complete the fields and controls:
- Template file type: Use the dropdown to select a template file type
- Delimiter: Defaults to a comma delimiter
- Select a template file: Select a template file from the dropdown, enter a path, or click the Browse button to navigate to a file to use as a template
- File content: An auto-populated window showing a preview of the file contents
-
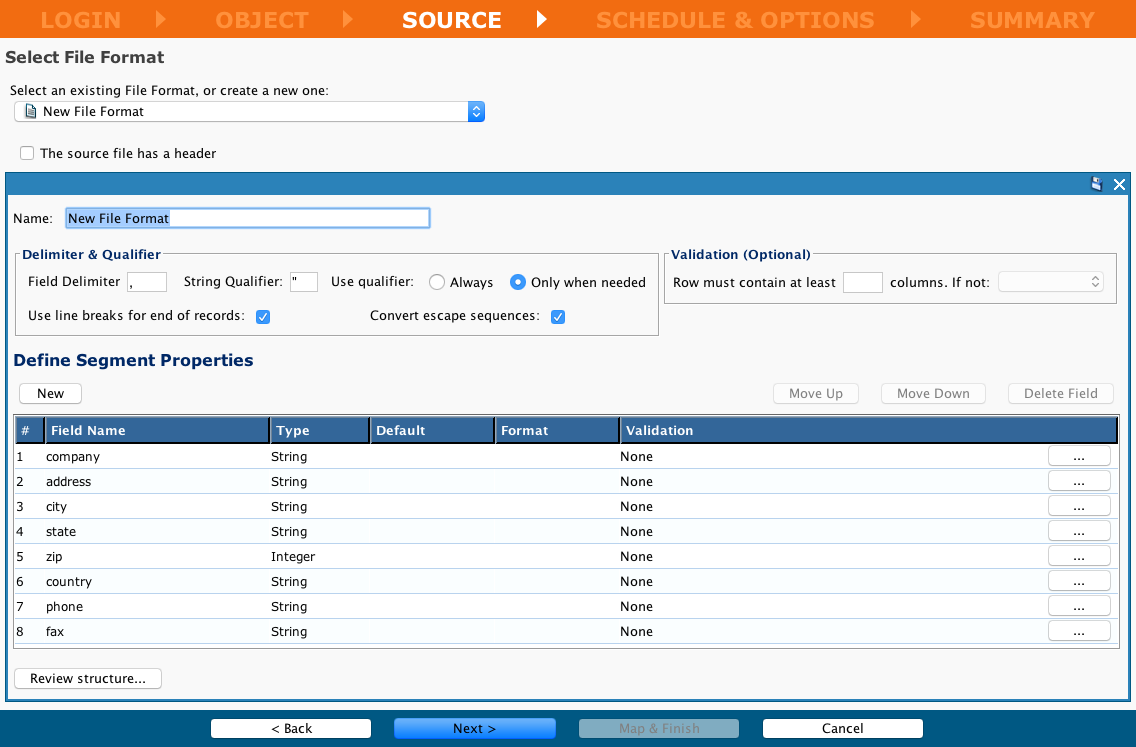
When you click OK, the Source screen changes to show the new File Format, with its Delimiter & Qualifier, Validation, and Segment Properties sections:
-
See Defining file formats for additional information, including row and field validation for simple (flat) text file formats.
Review the file format structure
-
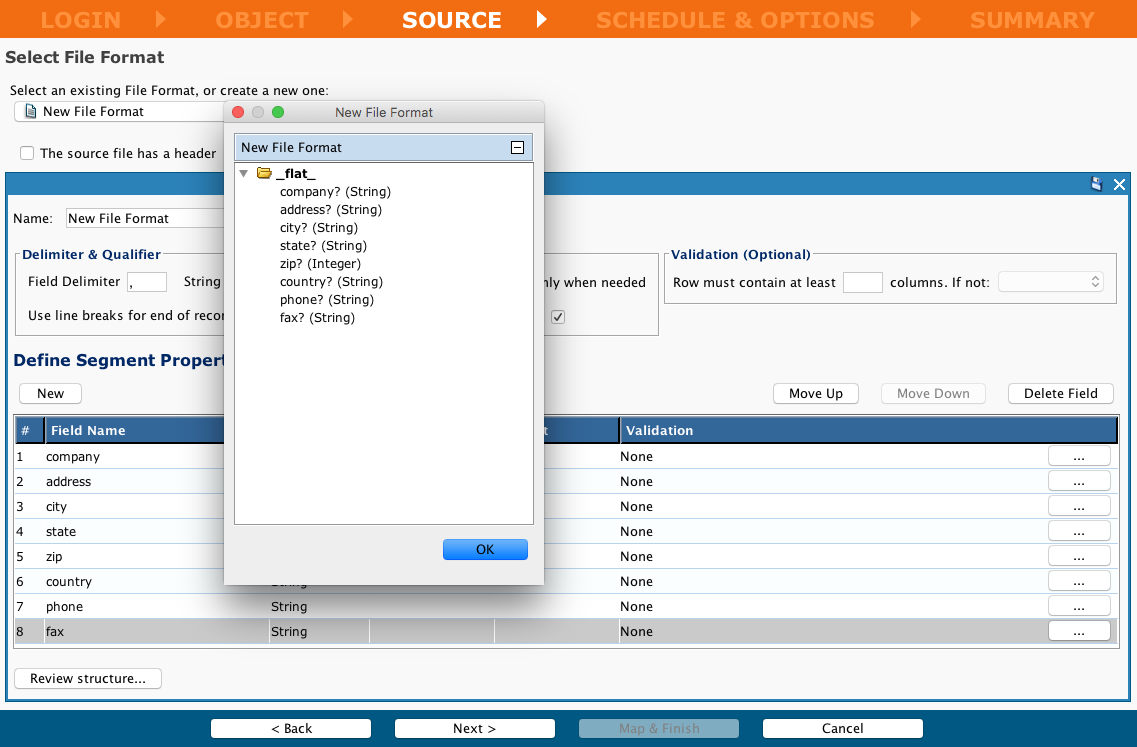
Click the Review Structure button in the lower left corner of the screen. A dialogue displays the fields you have selected for your upsert:
-
If the structure needs correction, edit the structure in the Define Segment Properties section before continuing.
- If all elements are correct, click Next to continue to move to Create a schedule and set options.
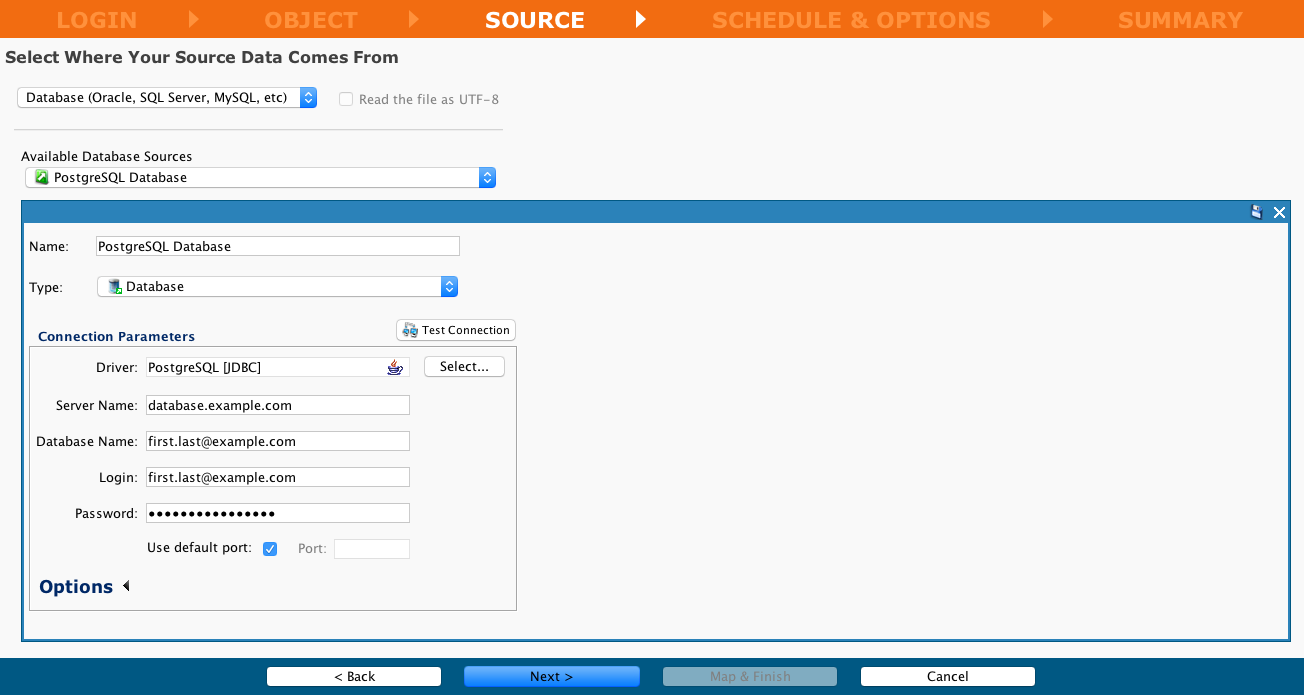
Database source
-
Specify the Database source you would like to use:
-
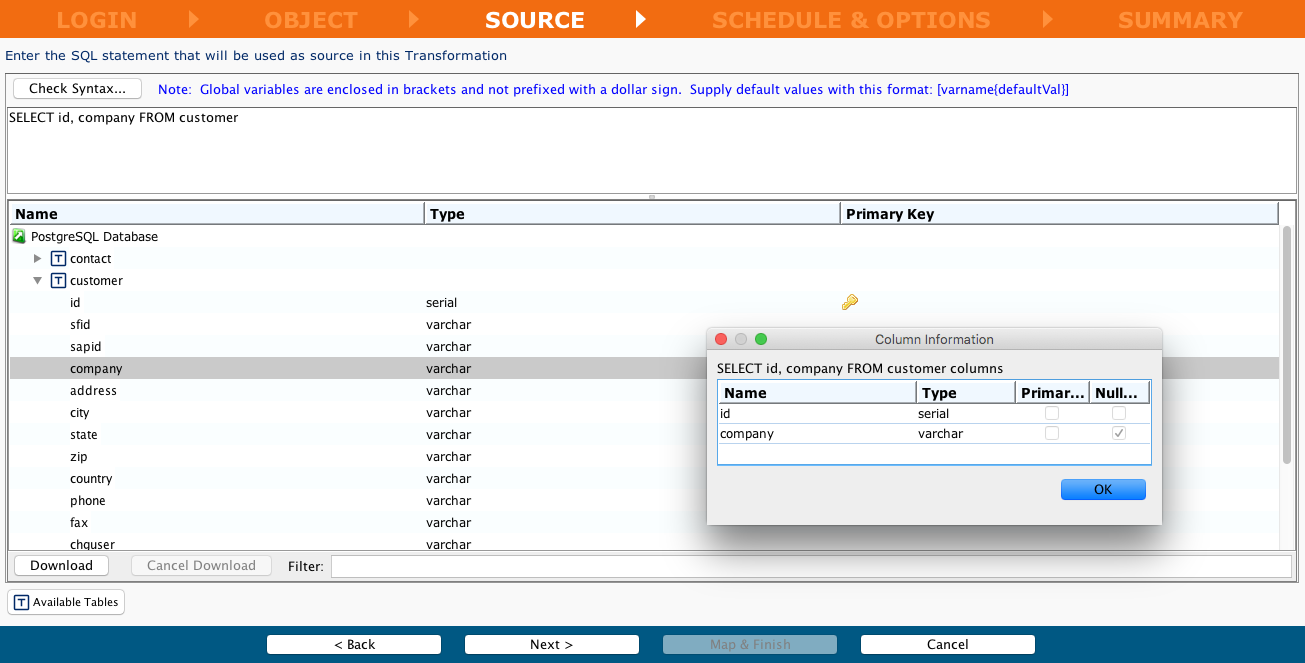
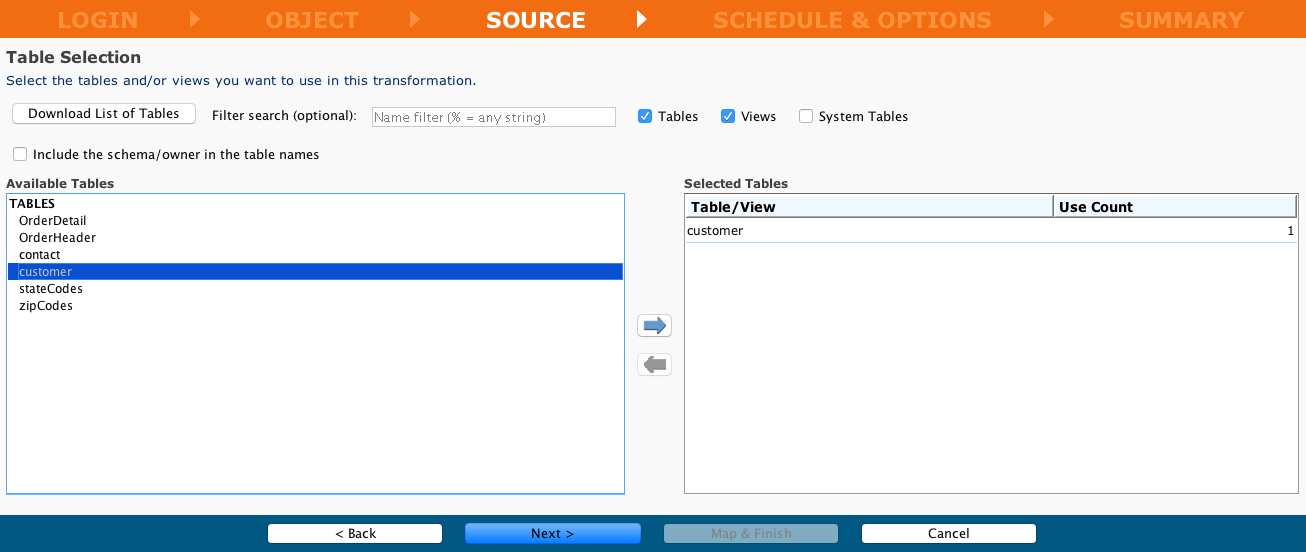
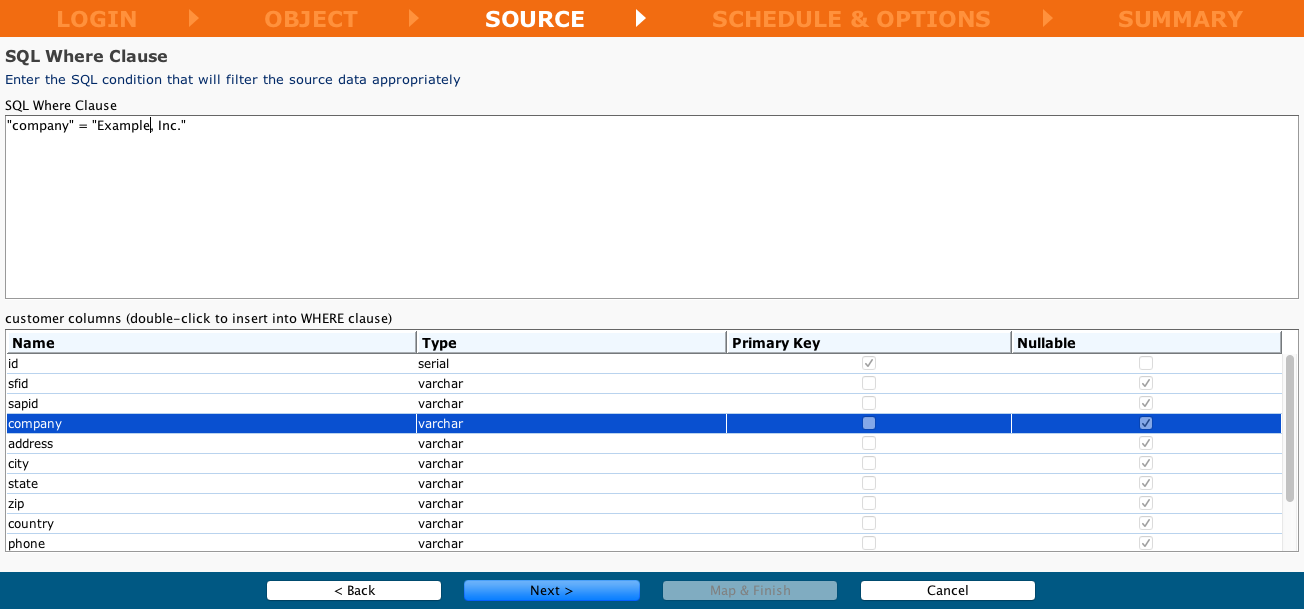
Choose to enter the required SQL either manually or using the wizard:

-
Manually entering the SQL statement and then using the Check Syntax button:
-
Using the wizard, specify the tables to use:
-
Using the wizard, specify the SQL Where clause to use:
-
When finished, click the Next button to move to Create a schedule and set options.
LDAP source
-
Specifying an LDAP Source:

-
Selecting the Object Class(es):
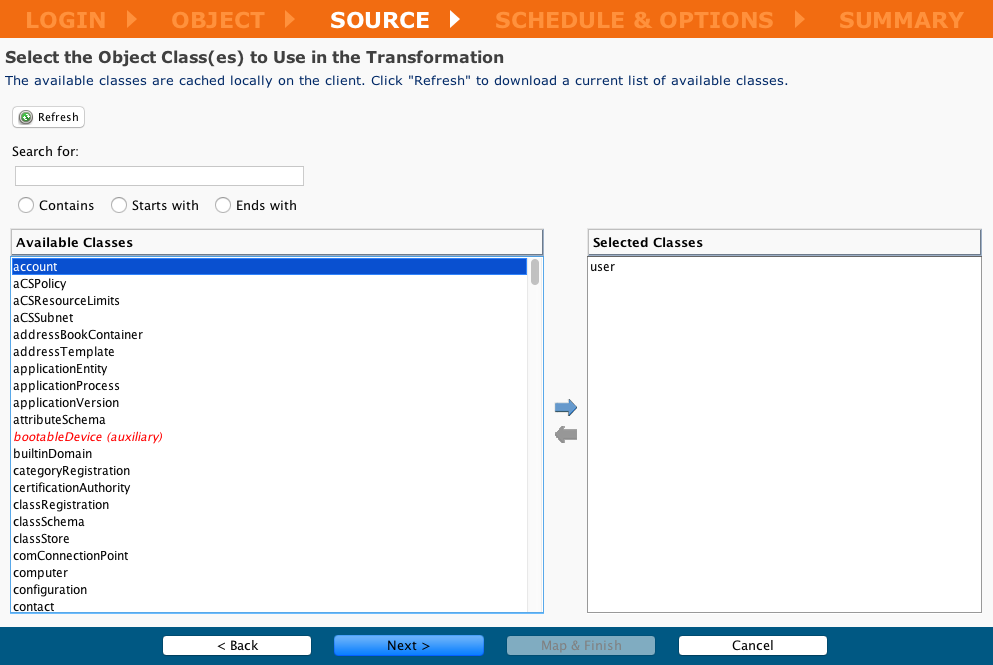
-
Selecting the Attributes:
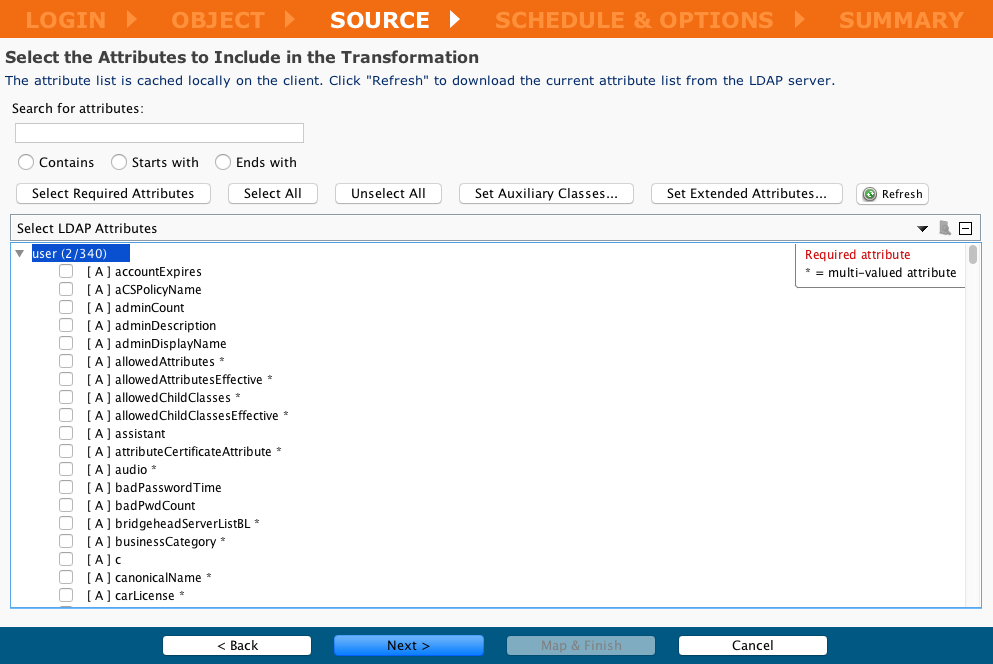
-
Defining the Search Parameters:
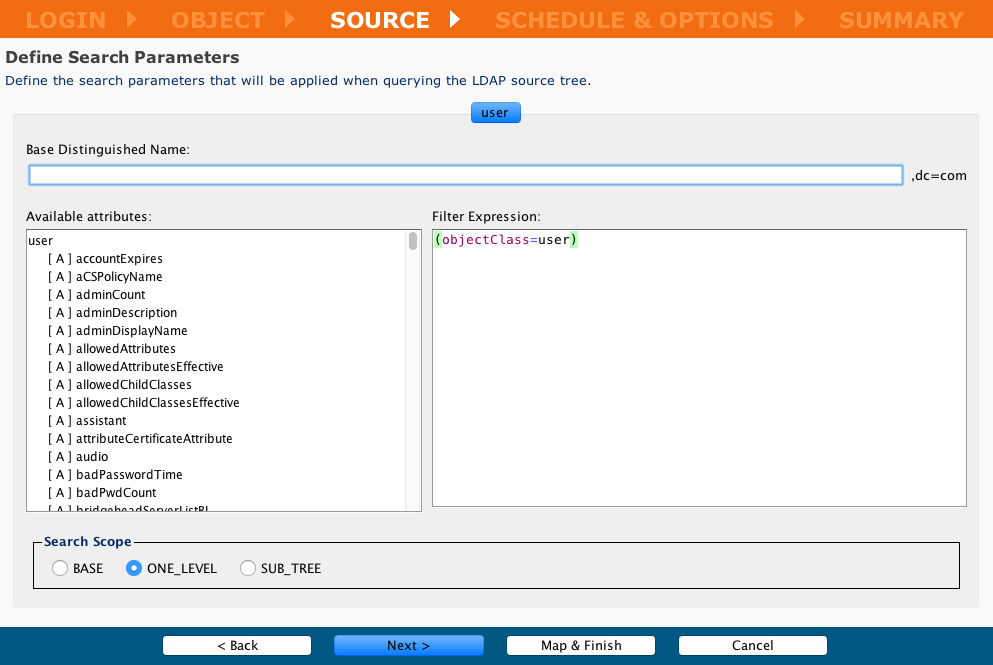
-
When finished, click the Next button to move to Create a schedule and set options.
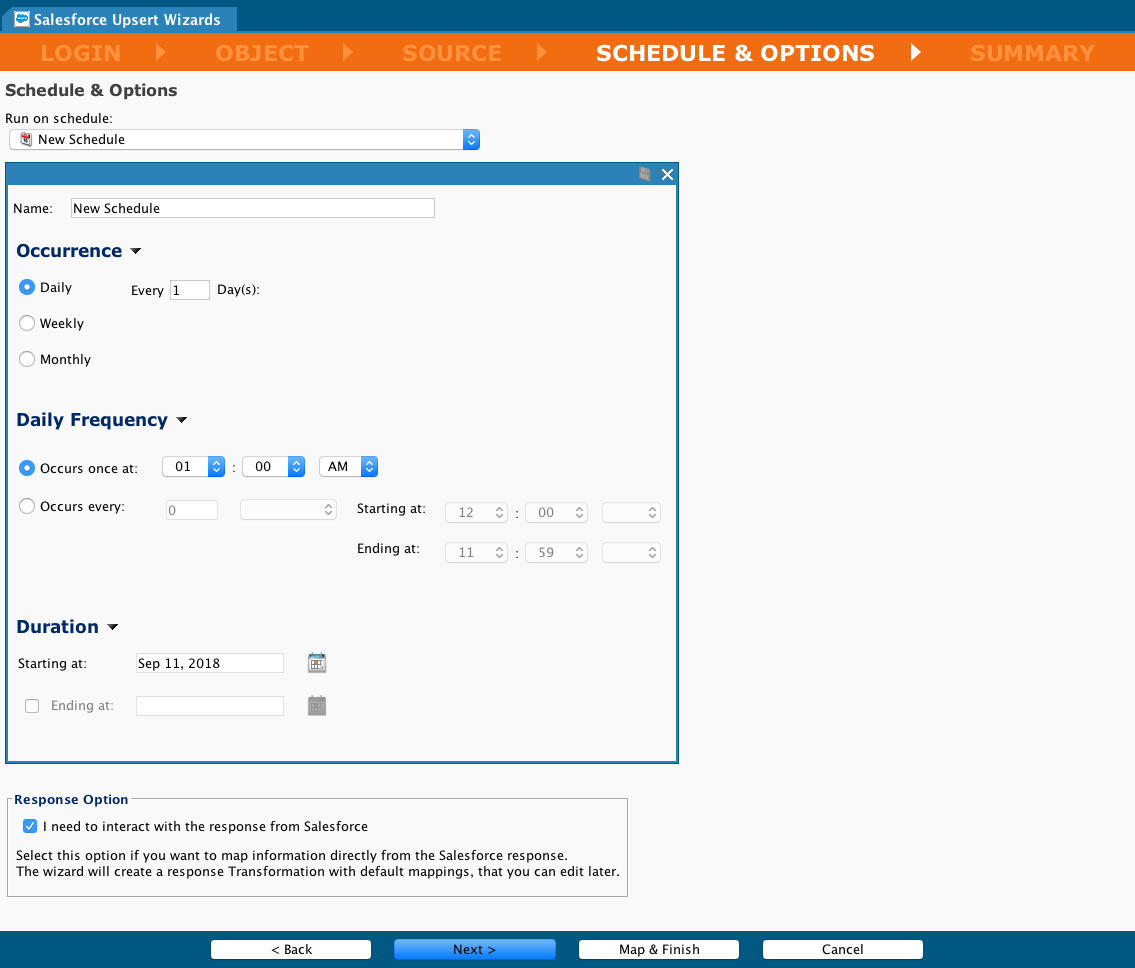
Create a schedule and set options
- Creating or setting a schedule is both optional and can be done at a later time. For more details on scheduling, see Create a schedule.
- You can edit an existing schedule by opening it in the Schedules folder of the Project Items panel and making any desired adjustments.
- You can use this wizard screen to either add scheduling to an unscheduled operation or open the operation under the Project Items Panel and make the appropriate adjustments.
- Set the Occurrence, Daily Frequency (hours or minutes) and Duration of the operation.
- When setting Duration, be aware that Starting at and Ending at dates in a schedule are inclusive.
-
To display these options, open the disclosure triangles besides Occurrence, Daily Frequency, and Duration.
-
Click the Response Option checkbox if you need to interact with the response from Salesforce and want to map information directly from that response:
-
When finished, click Next to move to the Summary screen.
Summary screen
On the Summary, you can edit the Name given to the wizard and specify whether to use the wizard's Automapper to map the data:
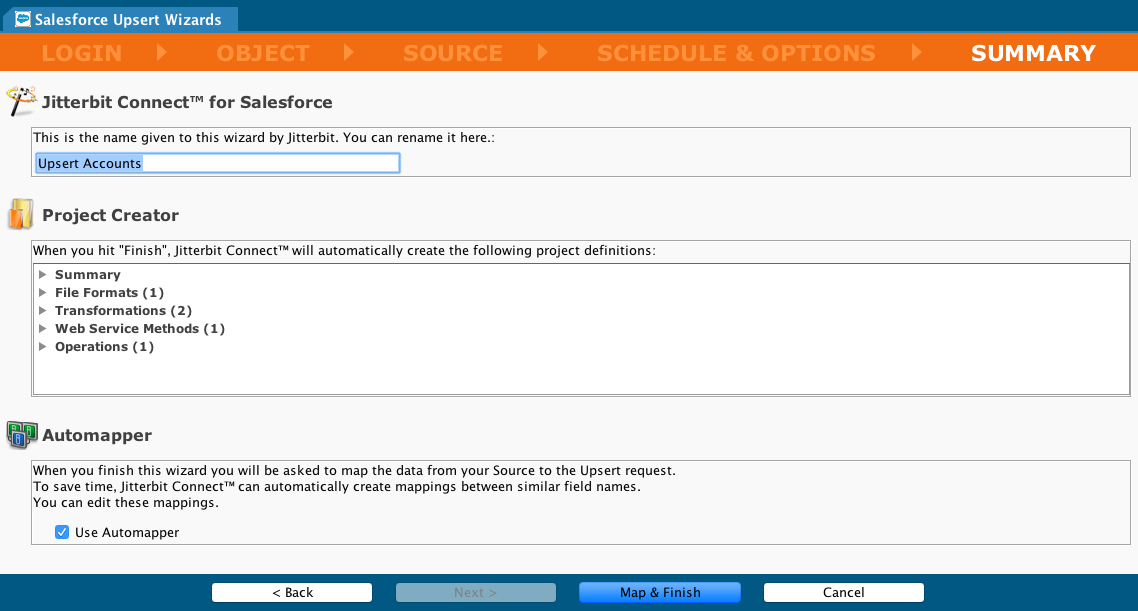
- Click Map & Finish to complete the wizard.
- If you need to create or approve a transformation mapping, you will be taken to that screen.
- Otherwise, the design items for your upsert will be created and become visible in the Project Items panel on the left side of the screen and you will be taken to the operation's Salesforce Upsert page.
Transformation mapping
If you chose Select an existing File Format (or created a new one) in the Target screen of the wizard, the transformation mapping appears in your work area.
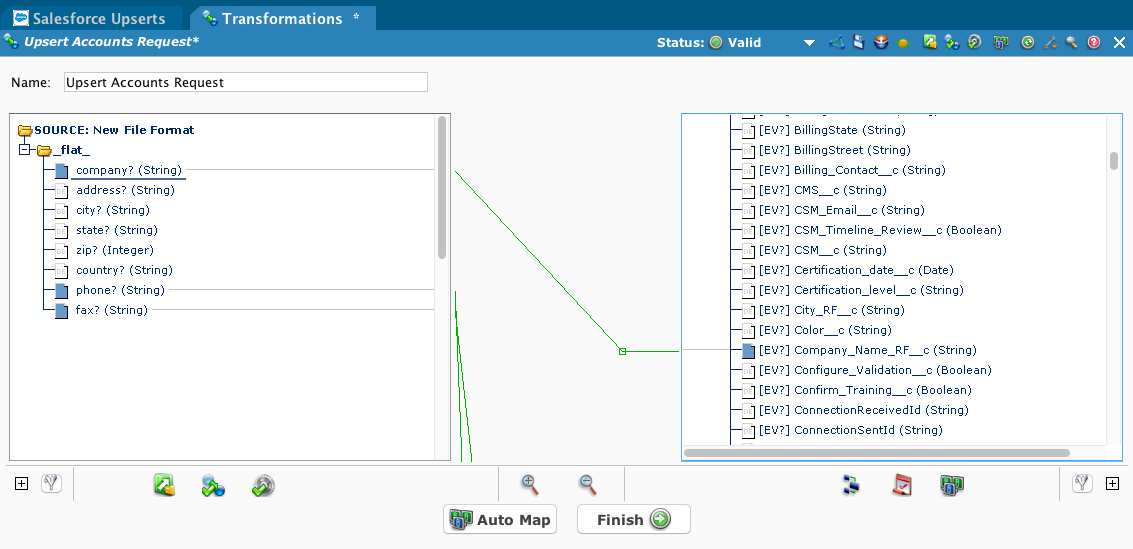
- If you specified the *Use Automapper *checkbox, most or all of the field mapping may be completed. Complete any manual mapping as appropriate.
- A mapping is shown as a line between items in the Source (left) and Target (right) columns.
- A green line indicates a valid mapping and is further indicated by the presence of a blue square next to each validly mapped item name.
- A red line indicates an invalid mapping.
- A yellow line indicates that a mapping is of questionable validity; however, the operation will attempt the transformation with that mapping.
- You can complete the mapping on the Transformation tab by dragging and dropping from the Source on the left to the Target on the right. When you do so, and a valid mapping is the result, a blue square will appear to the left of both the Source and Target items.
- To save your transformation, click the down arrow on the Status ribbon and select Save.
Complete the mapping as required and click Finish to complete the wizard and the creation of the design items.
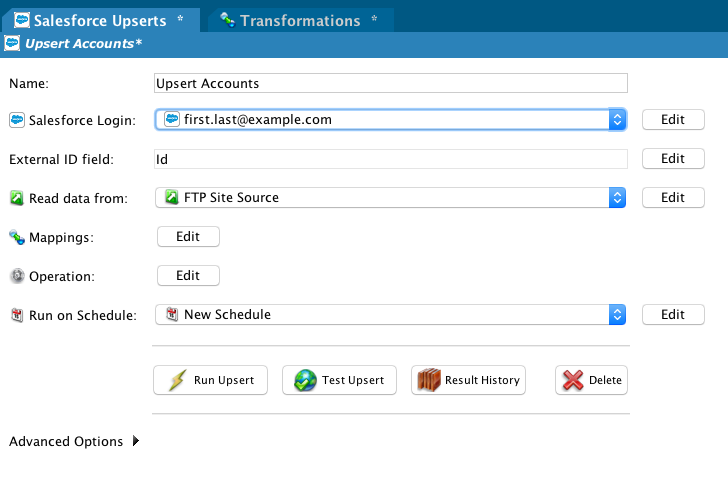
Completed Salesforce upsert
- Once completed, you will be taken to the summary screen for the new Salesforce Upsert.
- You can return to this summary page by finding its operation name under Jitterbit Connect in the Project Items panel.
- You can modify any of the design items in your project such as Salesforce Login, External ID field, Read data from, Mappings, Operation, and Run on Schedule by clicking their adjacent Edit button.
- The Run Upsert, Test Upsert, Result History, and Delete button functions are described below in Deploy the project and run the operation.
- Advanced Options include operation options such as chunking and field truncation. They are covered below in Advanced options.
Advanced options
These advanced options are available for a Salesforce Upsert:
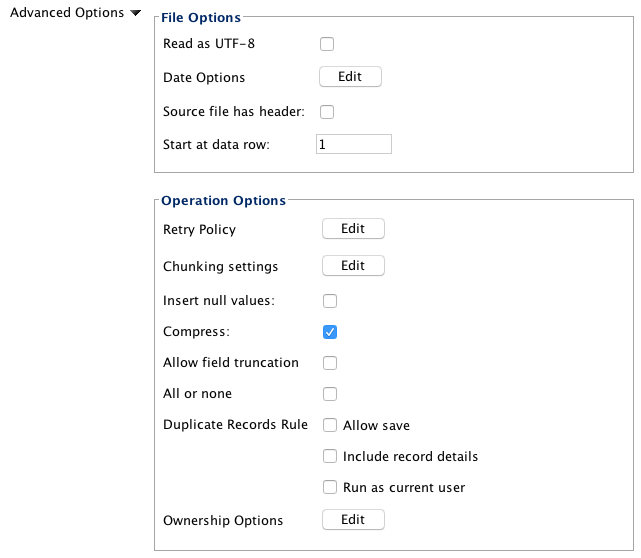
File options
- Read as UTF-8: Select to read the source file as UTF-8 character encoding.
- Date Options: Displays a dialog to set the date options for the source. See the Salesforce advanced page.
- Source file has a header: Select to indicate if there is a header and ignore it as not data.
- Start at data row: Gives the row number of the first row of the source file to be considered as data.
Operation options
- Retry Policy: Displays a dialog to set the retry policies. See the Salesforce advanced page.
- Chunking settings: Displays a dialog to set the chunking settings. By default, chunking is enabled with a chunk size of 200 and a maximum number of 2 threads. See the Salesforce advanced page.
- Insert null values: If selected, allows the insertion of null values into a record.
- Compress: By default, compression is turned on.
- Allow field truncation: If selected, if a value for certain Salesforce datatypes is too large, the value is truncated; otherwise, too large values raise an error instead.
- All or none: If selected, any failed records in a given chunk of records cause all changes for the chunk to be rolled back. Chunks that have no failed records will be committed even if a different chunk has failed records.
-
Duplicate Records Rules:
- Allow save: If selected, allows the saving of duplicate records, bypassing any Salesforce alerts.
- Include record details: If selected, returns fields and values for records detected as duplicates; otherwise, only record IDs are returned.
- Run as current user: If selected, the sharing rules for the current user are enforced.
-
Ownership Options: Displays a dialog to set the ownership options. See the Salesforce advanced page.
Additional operation options for writing success and failure records are described on the Salesforce advanced page.
Deploy the project and run the operation
Deploy the project
Deploying a project before running is not required as it will automatically be deployed if needed.
To deploy the project, either:
-
Click the Deploy icon on the toolbar; or
-
On the Project Items panel right-click on the Name of the project just created, and then left-click Deploy on the resulting dropdown menu; or
-
Right-click Operations at the top of the Project Items panel and then left-click Deploy on the resulting dropdown menu.
The project deploy process begins sending the project to Harmony, and a progress message appears.
-
To run the progress message in the background, click Run in Background.
-
To cancel the deploy process, click Cancel, which returns you to the previous screen.
The operation is now complete and deployed.
Run the operation
This image shows the buttons available on the Salesforce Wizard summary pages. The labels (such as Run Query or Run Insert) will vary depending on the wizard that you are using. The Result History button is not available on the Salesforce Queries summary page and the Test… button is not available on the Salesforce Bulk Processes summary page.

-
Press the appropriate Run… button to place the operation in the queue for execution.
- If the project has not already been deployed, or has been changed since the last deploy, it will automatically be deployed. See Create an operation for additional information on creating, deploying, and running operations.
- The Operation Monitor displays at the bottom of the screen tracking the status, time received, time started, and the time the operation completed processing.
- When the operation completes processing, the Result popup displays the time of completion, the status, the number of records that successfully processed, and the number of records that failed to process. The View success file and View failure file buttons are described below.
-
Press the Test… button to test the operation. This option is intended to test the operation only in an environment that is connected to a Salesforce Sandbox and should not be used in a production environment. Selecting Test Insert on the Salesforce Inserts summary page, for example, processes and inserts the first 200 records into the Salesforce Sandbox. Note: The Test… button is not available on the Salesforce Bulk Processes summary page.
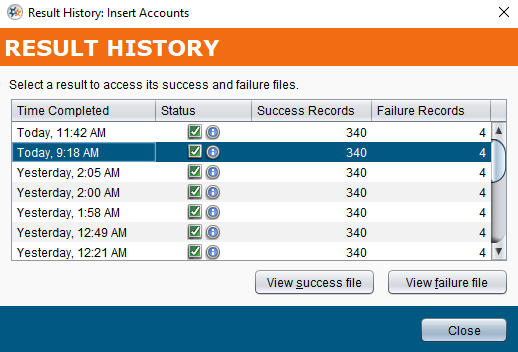
- Press the Result History button to display a popup list of recent activity including the time completed, status, the number of records processed successfully, and the number of records that failed to process. Select a result in the list to enable the View success file and View failure file buttons, which are described below. Note: The Result History button is not available on the Salesforce Queries summary page.
-
Press the Delete button to delete the operation from the project.
- The Confirm delete popup window displays. Click Delete to confirm and delete the operation.
-
The Delete Wizard Items? popup displays the associated operation components.
- Select Yes to delete the associated wizard objects in addition to the insert operation.
- If you select No, the wizard objects remain available within the project. NOTE: Only the insert operation is deleted.
- Selecting Cancel cancels the deletion of the insert operation and the associated wizard objects.
See Create an operation for additional information on creating, deploying, and running operations.
View success and failure files
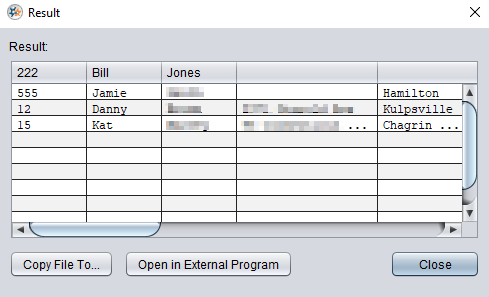
Viewing success and failure files is available if you are running operations on a private agent. The buttons View Success file and View failure file are available after you press the Run... button or the Result History button as described above and then select one of the results. This is an example of the Result History popup window, showing the buttons and a selected result:
-
View success file: If you are running the operation on a private agent, selecting the View success file button displays the first 100 records that successfully processed within a popup window.
-
View failure file: If you are running the operation on a private agent, selecting the View failure file button displays the first 100 records that failed to process within a popup window.
-
In this example, three records are shown:
-
Copy File To...: This button saves the success or failure records to a CSV file. The default file name is
salesforce.csv. -
Open External Program: This option is currently not available.
-
Note
The success and failure files are available for viewing from the private agent for 14 days by default. The files are automatically deleted from the private agent after 14 days by the Jitterbit File Cleanup Service. The number of days the files are saved can be changed by editing the jitterbit.conf file in the [ResultFiles] section (see Editing the configuration file). You can also change the success and failure file rules by Editing the Jitterbit file cleanup service rules for private agents.