Text to database wizard
Jitterbit ConnectTM provides a fast, easy route to data transformation. This is made possible through a wizard-based integration tool built directly into Jitterbit. The wizard executes for the user all of the complex, detailed operations of a transformation project. By stepping through the wizard, users can create an integration project without the need for coding. The screen conventions in this document are: Source is on the left, Target is on the right.
Create a text to database standard transformation
-
To use the Jitterbit Connect Wizard, from the main menu click Help and then Getting Started. The Getting Started tab appears in the right pane of your screen; OR
-
Click the
 icon at the top of the screen to display the Jitterbit Connect menu:
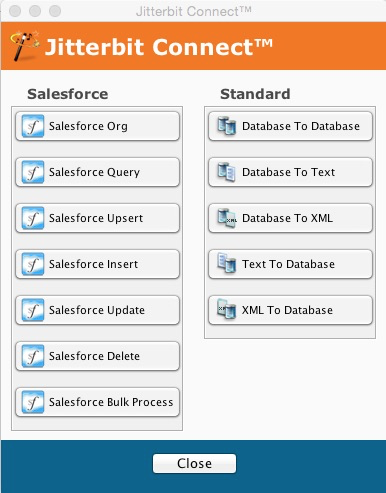
-
Start the wizard by clicking the Text To Database button in the Standard column in the Jitterbit Connect Wizard menu, which displays the Database Source Selection screen.
-
Begin creating your project with the wizard.
Create source selection

- To edit an existing source, select from the drop-down and click Edit and complete the fields. The screen expands to display the name and type of Text Source, and the Connection Parameters to be completed.

-
To create a new source, click the Create New button and complete the new source fields.
-
For details see Creating a new text definition.
After creating the text definition:
-
Test Connection: You may wish to test your connections before clicking Next. Clicking this button makes sure all your connections work. A dialog box appears confirming that the connection was successful. If the connection test is unsuccessful, go back and check your parameters. You may also contact the Jitterbit Help Desk.
-
Click OK to return to the Source screen.
-
Next: Click the Next button to display the Source File Selection screen.
-
Cancel: Clicking the Cancel button closes the Wizard and returns you to the Getting Started tab without saving your entries.
-
Click Back to return to the previous screen.
Create file source

-
To edit an existing File Source, select from the drop-down (e.g., XML Source, Text Source, Complex Text) and click Edit. The screen expands to display the name and type of XML Source, and the Connection Parameters to be completed.
-
To create a New File Share source, click the Create New button and complete the New Source fields.
-
Make sure Local file sources are enabled.
-
If your source is a flat text structure, you may optionally add a field-validation step. Go to Flat file field validation for details.
After completing your field entries:
-
Click OK to return to the Source screen.
-
Next: Click the Next button to display the Target Selection screen.
-
Cancel: Clicking the Cancel button closes the Wizard and returns you to the "Getting Started" tab without saving your entries.
-
Click Back to return to the previous screen.
Create database target selection

-
To edit an existing Database Target, select from the drop-down and click Edit. The screen expands to display the name and type of Database Target, and the Connection Parameters to be completed.
-
To create a New database target, click the Create New button and complete the New Target fields.
-
Click OK to return to the Target screen.
-
Next: Click the Next button to display the Target Table Selection screen.
-
Cancel: Clicking the Cancel button closes the Wizard and returns you to the Getting Started tab without saving your entries.
-
Click Back to return to the previous screen.
Create target table selection

-
Click the Download List of Tables button to download the list of available tables.
-
Optional:
-
You may enter a search string in the Filter Search window. Check the Table or View checkboxes to limit the objects to select.
-
You may select the checkbox for including the schema/owner.
-
Note
If you have not logged in to your database server at the beginning of the project, you will be prompted to do so when you click the Download List of Tables button.

Once the tables are downloaded, you can copy tables from the Available Tables column to the Selected Tables column.
-
Highlight the tables to be copied in the Available Tables column, and click the right arrow.
-
The selections are then copied to the Selected Tables column.
-
To remove tables from the Selected Tables column, highlight the tables to be copied in the Selected Tables column, and click the left arrow.
-
The selections are then moved back to the Available Tables column.
After completing your tables:
-
Click OK to return to the Target screen.
-
Next: click Next to display the Source Hierarchical Relationships screen.
-
Cancel: Clicking the Cancel button closes the Wizard and returns you to the Getting Started tab without saving your entries.
-
Click Back to return to the previous screen.
Create hierarchical relationships

- Click the Select Parent Table drop-down and make a selection.

- Click the Select Child Table drop-down and make a selection.

- Then click the Join Tables button. The Join Properties dialogue appears.

-
In the Link Keys section, dragand drop a selected item from parent column (OrderHeader in this example) to a child column (OrderDetail in this example) to link them. As an alternative, you may select an item in each column to activate the Link button, then click this button to link the items.
-
You may select a link between two columns to activate the Remove Linkbutton, then click that button to remove the link
-
Click the downarrow labeled Column Display Order to select Database (the default) or Alphabetical.
-
After completing the parent and child joining, select a radio button to identify the join type. The default is 1 to N.
-
Click OK to return to the Target Hierarchical Relationships screen, which displays your table tree showing the currently defined relationships; OR
-
Click Cancel to return to the Target Hierarchical Relationships screen without saving your entries.
-
Click Back to return to the previous screen.

-
Next: click Cancel to display the Insert/Update mode screen.
-
Cancel: clicking the Cancel button closes the Wizard and returns you to the Getting Started tab without saving your entries.
-
Click Back to return to the previous screen.
Select the insert/update mode

-
Select a radio button for the Insert/Update Mode. Depending on your selection, Insert and/or Update keys will display in the box below.
-
Auto-truncate char fields checkbox: This selection will automatically truncate fields as needed if the Target field is smaller than the Source field.
-
Optional: To display the Select the Primary Keys screen, select the Edit Selected Table button.

Note
This step is optional.
-
Select a primary key by clicking the checkbox in the Select column to the left of the name.
-
The Nullable checkbox is checked by default. Leave selected if you want a column to contain null data elements.
-
Click Unselect All to remove your selections. You may then make new selections.
-
Click OK to save your selections and return to the Insert/Update screen, which now displays your selections.
-
Click Cancel to discard your selections and return to the Insert/Update screen.

-
Next: Click Next to display the Summary screen.
-
Cancel: Click Cancel to return to the Target Hierarchical Relationships screen without saving your entries.
-
Click Back to return to the previous screen.
Review the summary of the operation

This step allows you to review the elements of your project before having Jitterbit automatically create all project definitions including operations, transformations, and web service calls.
Take a few moments to browse through all elements of the project.
-
If you need to make adjustments to your Database, click Back to return to the previous screen and make the necessary changes.
-
After reviewing your Database, click Finish. Both tabs open with the Transformations tab fully displayed, and the Transformation tab populates.
Note
If you have not already logged in to your local database server, you will be prompted to do so now.
Review the mapping
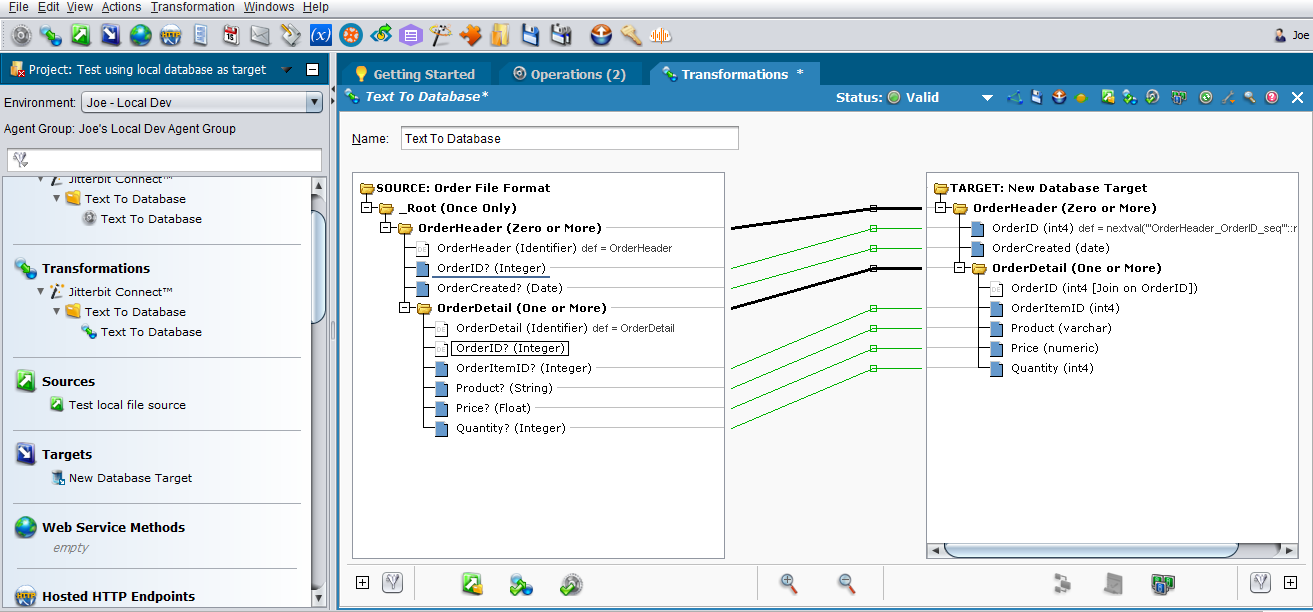
When you click Finish on the Summary screen, the Transformations tab opens in the workspace. You can also open it at any time by selecting the name of your Transformation in the hierarchical tree in the left pane and double-clicking.
Note
If you have chosen to do the mappings manually, the following screen appears:

-
For manual mapping, select an item in the left column and drag it to the appropriate item in the right column.
-
If you have left the Use Automapper checkbox checked, most or all of the fields are mapped for you.
-
Valid mapping is indicated by green lines between items in the Source and Target columns and, by the presence of a blue square next to each validly mapped item name.
-
A red line indicates invalid mapping.
-
A yellow line indicates that Jitterbit isn't sure if the mapping is valid, but will attempt the transformation with this mapping.
-
You can complete the mapping on the Transformations tab by dragging and dropping from Source on the left to Target on the right. When you do so, the Target item will take on the same name as the Source item, and a blue square will appear to the left of both Source item and Target item.
-
To save your transformation, click the down arrow on the Status ribbon and select Save.
-
To exit this screen, click the X on the far right of the tab.
-
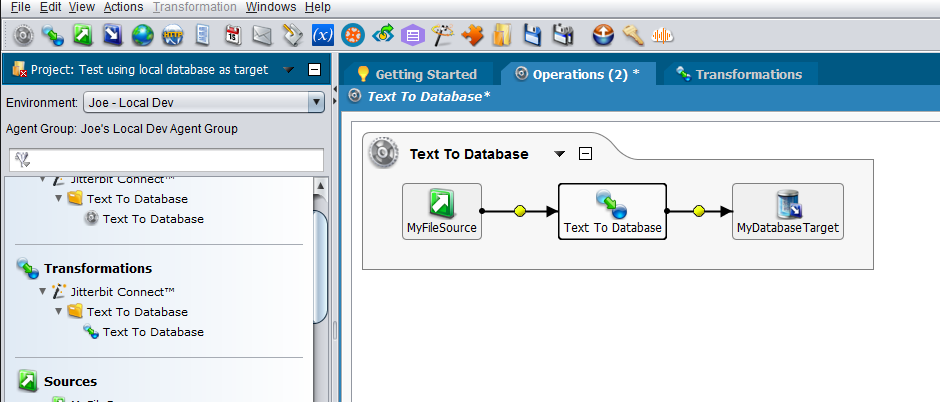
The text to database operation tab opens when you click Finish.
-
To view a graphic summary of the entire project, click the Operations tab, or right-click the Operation Name in the hierarchical tree in the left pane.
Deploy the project
-
In the hierarchical tree in the left pane under Transformations, right-click on the project just created to highlight it, and then left-click Deploy on the resulting drop-down; OR
-
Right-click Operations at the top of the hierarchical tree in the left pane and then left-click Deploy.
-
The Deploy process begins sending the data to the environment, and a progress message appears.
-
To run this progress message in the background, click the Run in Background button.
-
To cancel the Deploy process, click Cancel, which returns you to the previous screen.
This concludes the Create process. If you wish to export this project as a Jitterpak, go to Export as a Jitterpak.