Create an operation in Jitterbit Design Studio
Operations are used to collect all the information needed to define exactly what a particular integration process does and when it should start.
Operations can call one another based on conditions or events such as On Success or On Failure. Operations can be as simple as archiving a file from one location to another or as complex as a sequence of operations that connect to various systems, transform data between them, invoke web services, and expose themselves as web services for invocation by external systems.
This page walks through the process of creating, configuring, validating, and saving a new operation.
Note
Before you can create an operation, you must have completed the following:
- Projects are deployed to an Environment in Harmony. You will need to set up at least one Environment through the Management Console before you will be able to create an operation.
- Operations reside within a project. You will need to create a project before you can create an operation. Set up a project through Design Studio that uses your Environment. See Create a new project.
Begin a new operation
Within your project within Jitterbit Studio, there are several ways to start a new operation:
-
In the Getting Started tab, click the Create a New Integration button.
-
In the Project Explorer on the left, right-click on Operations and select New Operation.
-
In the top toolbar, click the Operation gear icon.
-
Go to File > New > New Operation.
Select an operation activity
After you begin a new operation, in the popup you will need to select the type of Operation Activity you want to create.
Core activity types
The first four activity types are the core activities available within Jitterbit:
-
Transformation - Manipulate or change data as it passes from a source to a target system. Transformation is the default operation type. See Transformations for steps to create different kinds of transformations.
-
Script - Run a sequence of scripts without sources, targets, or transformations. See Scripts.
-
Archive - Move files from one location to another. No transformation or manipulation of the file occurs between the source and target systems. You only need to select a file source and a file target.
-
Web Service Call - Used to simplify SOAP-based web service calls, with the option to use a request transformation between the source and web service call, and/or a response transformation between the web service call and the target. See Call a web service.
Other activity types
Beyond the core activity types, other available activity types include:
-
Hosted Web Service - Used in addition to a web service call with one transformation to process the web service request and another to process the response. See Create a hosted web service.
-
API Entity Operation - Set up a Jitterbit entity from a database or SAP, with the option to set up custom mappings using request and response transformations. The API entity operation uses the Jitterbit API Platform to expose data in real-time. See Create a Jitterbit entity, Create an API entity operation, OData service configuration, and API Manager for details on API configuration.
-
XSLT Operation - Used to apply an XSLT stylesheet to a file as it passes from the source to the target.
Finally, each of Jitterbit's Connectors have associated operation activities using those connectors:
Configure the operation
Your new empty operation should now appear in its own New Operation tab in the right pane of the window. You can double-click on the words "New Operation" within the operation to rename the operation.
Operation components
The following images show the default components of the operation for each core activity type: Transformation, Script, Archive, and Web Service Call:
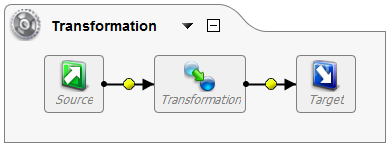
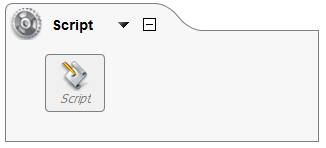
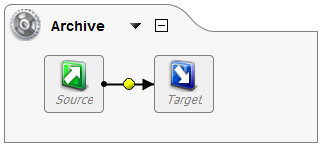
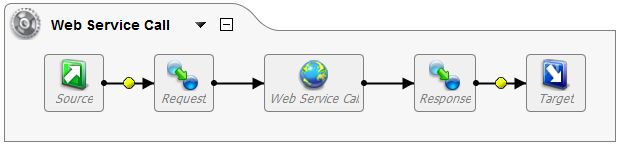
You will need to further configure each component in your operation. To do this, you can either double-click each component in the operation, or click and drag components that are already set up from the Project Explorer onto the specific component in the Operations tab.
For more information on setting up the operation components for the core activity types, refer to the following:
Operation actions and configuration
You can also access a menu from the Operations tab by either clicking the down arrow next to your operation name, or by right-clicking anywhere on the background of the operation. The menu includes the following operation actions and configurable options.
Note
A subset of these options is also available by double-clicking the name of your operation on the graph; however this menu provides the full list of options.
- Deploy - Deploys the operation to your Environment.
- Run Operation - Places the operation in the queue for execution.
- Run With Source Data - This option is currently disabled.
- Rename - Opens edit mode to change the title of the operation.
- View Dependencies - Shows other components in your project that your operation is dependent on, or that are dependent on your operation. This option is useful to check if you need to delete a component from an operation but are unable to because it has dependencies.
- Locate In Tree - Highlights the operation in the Project Explorer. May be useful as a reference point if you have a large project with many items.
- On Success - Sets up a new operation or email to trigger upon successful execution of the operation.
- On Failure - Sets up a new operation or email to trigger upon failed execution of the operation.
- Schedule - Sets up a schedule for when your operation runs. See Schedules for configuration options.
- Operation Log - Shows logs for your operation. May be useful for troubleshooting efforts. See Review an operation log for more details.
- Operation Queue - Allows management of the operations currently in the execution queue. For more detail see Check pending operations.
- View Validation Messages - Shows any messages for invalid operations. This option will be disabled if your operation is valid. Otherwise, check here for any messages about why the operation could not validate.
- View Description - Opens a box to view or add a description for your operation.
- Options - Opens a window where you can specify further configuration options such as timeout, what to log, debug mode, and chunking. See Operation options for detailed information on each parameter.
- Layout - Resets the operation graph layout or allows you to change the node coordinates to have more control over the layout.
- Remove From Graph - Removes a selected node from the operation graph.
- Collapse - Collapses the operation by hiding the operation components.
Validate the operation
If the status in the upper right of your Operations tab reads Valid then your operation has already been validated.
If the status reads Invalid, you can check any validation errors under View > Project Validation. This will display the Validation tab below your operation screen. From there you can select items in the tree to see any validation problems.
Save the operation
Finally, click the Save button in the top right of the Operations tab. The name of your newly saved operation will appear under the Operations part of the Project Explorer.