Create a database source
Introduction
A Database source provides read access to databases using JDBC or ODBC drivers.
Create a database source
You can choose to create a new Database source on its own, or within an existing operation. For more information on how sources work within operations, see Creating an operation.
Create a new database source as a standalone source
Within your project in Jitterbit Design Studio, you create a new Database source by any of:
-
Go to File > New > New Source; or
-
In the tree on the left, right-click on Sources and select New Source; or
-
In the top toolbar, click the green source icon
 .
.
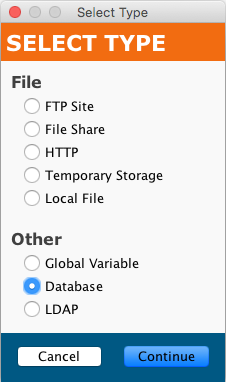
In the popup, select Database as the type:
Your new source appears in its own New Source tab in the right pane of the window.
Note
If you create a standalone source using any of these methods, note that it is not connected to an operation. See Use an existing database source in an existing operation below to use the new source.
Create a new database source in an existing operation
A source is usually created by default when you create a new operation. (The exception is an operation that consists only of a script.) With an existing operation, you can specify the type of its source by:
-
Double-clicking on the source icon; in the popup, select Create New Source; or
-
Right-clicking on the source icon and selecting Create New Source.
In the configuration screen that appears, use the Type dropdown to select Database, as shown above.
Use an existing database source in an existing operation
To use an existing Database source in an existing operation with a source, you can set it by any of:
-
Within the operation, double-clicking on the source icon, and in the resulting popup, selecting the desired Database source from the list; or
-
Within the operation, right-clicking on the source icon, choosing Select Existing Source, and in the resulting popup, selecting the desired Database source from the list; or
-
Dragging the desired Database source from the tree on the left and dropping it onto the existing source icon of the operation.
Configure a database source
After you have created a Database source, the configuration screen will open in the main view of Design Studio. You can return to the configuration screen at any time by double-clicking on the source icon in the operation, or by double-clicking on the source in the tree on the left.
Basic configuration
The configuration screen will appear similar to this example:
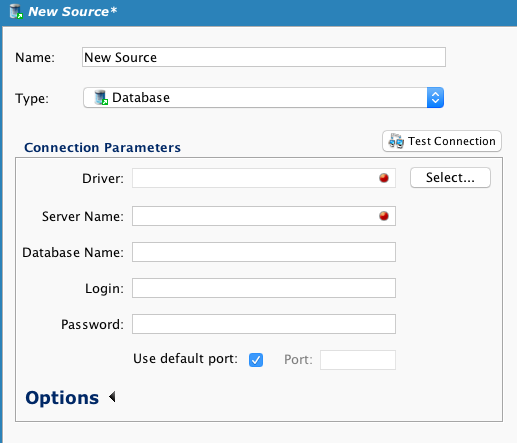
- Name: Enter an appropriate, unique name for the source.
- Type: Use the dropdown to select Database, if it is not already specified.
- Connection Parameters: Specify the details for your database connection:
- Driver: Enter a driver name, either manually or by clicking the select Button (preferred) next to the driver field. Depending on the driver selected (see Database drivers below), certain fields in the source configuration are enabled or disabled.
- Server Name: Enter either the server name or IP address of the server to be accessed.
- Database Name: Enter the database name to be accessed.
- Login: If a login is required, enter a valid username into the Login field.
- Password: Enter a password to use with the Login to access the database.
- Use default port: The default port will vary depending on the database driver selected. For a different port, deselect the Use default port checkbox and enter a port to use in the Port field.
- Test Connection: Clicking the
 button will test the Database source; it will fail if it is unable to make a connection to the database server with the provided connection parameters.
 - Click the Save button in either the main toolbar or the target's toolbar to save the configuration.
Database drivers
The database drivers dialog will appear similar to this example:
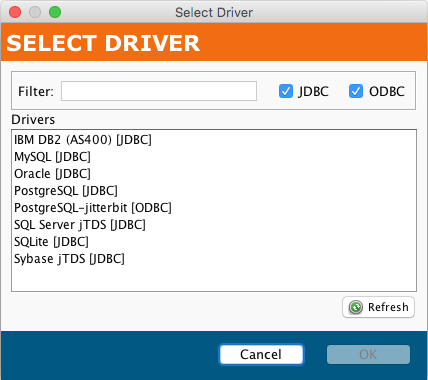
Clicking the Refresh button will update the displayed list of drivers available on the agent. The list can be filtered by type (JDBC or ODBC) and name. (ODBC drivers are supported only on private agents.) Depending upon the driver selected, certain fields in the source configuration are enabled or disabled. To add additional drivers to an agent, see Install additional ODBC or JDBC drivers.
The available drivers depend on whether you are using cloud agents or private agents.
Cloud agents
cloud agent groups support JDBC drivers only. These JDBC drivers are provided:
- IBM DB2 (AS400)
- MySQL
- Oracle
- Oracle NetSuite
- PostgreSQL
- Redshift
- SQL Server jTDS
- SQL Server MS JDBC
- Sybase jTDS
Private agents
Private agents support JDBC drivers and ODBC drivers. For ODBC drivers, the architecture of the driver must match the system of the agent. That is, 32-bit agents support 32-bit ODBC drivers and 64-bit agents support 64-bit ODBC drivers.
These JDBC drivers are provided by 64-bit Windows and Linux private agents:
- Amazon Redshift
- IBM DB2 (AS400)
- IBM DB2 (JCC)
- MySQL
- Oracle
- Oracle NetSuite
- PostgreSQL
- SQL Server jTDS
- SQL Server Microsoft
- SQLite
- Sybase jTDS
These ODBC drivers are bundled with the 64-bit Windows private agent installation:
- PostgreSQL ANSI (x64)
- PostgreSQL Unicode (x64)
This ODBC driver is bundled with the 64-bit Linux private agent installation:
- PostgreSQL-jitterbit
Note
Drivers for only 64-bit private agents are listed above, as 32-bit private agents are end-of-life.
Additional drivers are detected from the operating system. You can install additional database drivers as needed.
Options
Additional connection parameters can be specified by clicking the Options at the bottom of the Connection Parameters section:
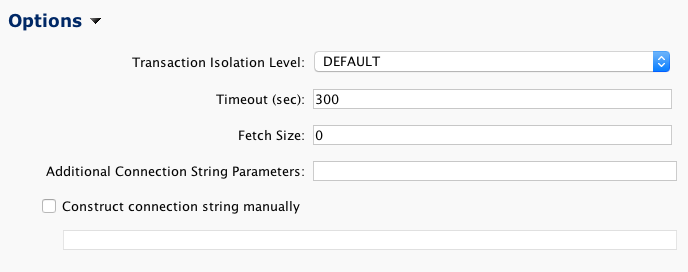
-
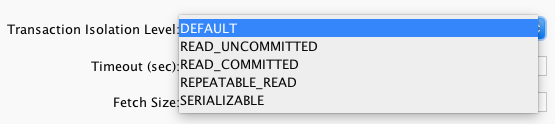
Transaction Isolation Level: Specify an isolation level using the dropdown menu. The DEFAULT setting uses the driver or database server default transaction isolation level. Driver-specific levels are not supported; available are Transact-SQL transition isolation levels:
-
Timeout (sec): Specifies the limit to wait for a successful database connection in seconds. Default is 300 seconds (5 minutes).
-
Fetch Size: If a JDBC driver is used, a Fetch Size can be specified, giving the driver a hint as to the number of rows to fetch when additional rows are needed. This setting can improve the processing of large data sets.
-
Additional Connection String Parameters: Additional parameters that should be added to the database connection string can be entered in this field. Connection string parameters are specific to the database driver you use (i.e. Microsoft SQL, MySQL, PostgreSQL, Oracle, etc.). Review the driver specifications to determine the required parameters.
-
Construct connection string manually: Checking this allows entry of the connection string manually in the field below the checkbox. It will then disable the Additional Connection String Parameters. See Manual connection string for details.
Tip
See Converting a database source or target to use a JDBC driver for instructions to convert from an ODBC driver to a JDBC driver.