Create an email target in Jitterbit Design Studio
Introduction
An Email target can be used to send email messages with attachments as a target.
Create an email target
You can choose to create a new Email target on its own, or within an existing operation. For details on how targets work within operations, see Creating an operation.
Create new email target as a standalone target
Within your project in Jitterbit Design Studio, you create a new Email target by any of:
-
Go to File > New > New Target; or
-
In the tree on the left, right-click on Targets and select New Target; or
-
In the top toolbar, click the blue target icon
 .
.
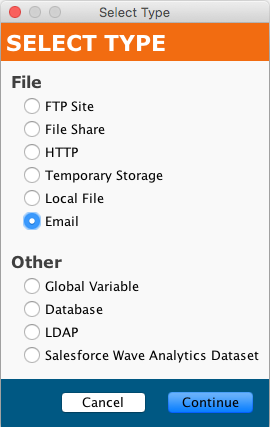
In the popup, select Email as the type:
Your new target appears in its own New Target tab in the right pane of the window.
Note
If you create a standalone target using any of these methods, note that it is not connected to an operation. See Use an existing email target in an existing operation below to use the new target.
Create a new email target in an existing operation
A target is usually created by default when you create a new operation. (The exception is an operation that consists only of a script.) With an existing operation, you can specify the type of its target by:
-
Double-clicking on the target icon; in the popup, select Create New Target; or
-
Right-clicking on the target icon and selecting Create New Target.
In the configuration screen that appears, use the Type dropdown to select Email, as shown above.
Use an existing email target in an existing operation
To use an existing Email target in an existing operation with a target, you can set it by any of:
-
Within the operation, double-clicking on the target icon, and in the resulting popup, selecting the desired Email target from the list; or
-
Within the operation, right-clicking on the target icon, choosing Select Existing Target, and in the resulting popup, selecting the desired Email target from the list; or
-
Dragging the desired Email target from the tree on the left and dropping it onto the existing target icon of the operation.
Configure an email target
After you have created an Email target, the configuration screen will open in the main view of Design Studio. You can return to the configuration screen at any time by double-clicking on the target icon in the operation, or by double-clicking on the target in the tree on the left.
The configuration screen will appear similar to this example:
![]()
- Name: Enter an appropriate, unique name for the target.
-
Type: Use the dropdown to select Email, if it is not already specified.
-
Connection Parameters: Specify the details for your Email connection:
-
Email Message: Use the dropdown to select either an existing email message or to create a new one. If an existing Email message is selected, the Edit button will be enabled to enable editing of that message. Email messages are configured separately as described in Creating an email message.
-
Attachment Size Limit: Enter an integer number and use the units dropdown (Bytes through Gigabytes) to set a limit on the allowed file attachment size. If this field is left blank, the file attachment size will not be limited.
-
Attachment Name: Enter a name for the email attachment. Variables may be used in this field. If left blank, the attachment name will be auto-generated.
Note
As an alternative to specifying the attachment name, you can use the
WriteFile()function in a script to specify file attachment contents and the file attachment name:WriteFile("<TAG>Targets/Email Target</TAG>","My Email Attachment","Attachment.txt");If the
WriteFile()function is used, its parameters will override any attachment name specified in the email target's configuration screen.
-
-
Send each attachment separately: If checked, each attachment will be sent as a separate email message. (Note: using this option disables the attachment name specified above and instead uses an auto-generated attachment name.)
-
Test Connection: Clicking the
 button will test the Email target; it will fail if unable to make a connection to the Email message's server with its provided connection parameters.
 -
Click the Save button in either the main toolbar or the target's toolbar to save the configuration.
Tip
You can use global and project variables in the fields of Email targets. They can be used to specify the attachment size limit and attachment name.