Create a File Share target in Jitterbit Design Studio
Introduction
File Share targets provide access to resources (files and folders) using Microsoft Windows File Share UNC paths.
Create a File Share target
You can choose to create a new File Share target on its own, or within an existing operation. For more information on how targets work within operations, see Create an operation.
Create a new File Share target as a standalone target
Within your project in Jitterbit Design Studio, you create a new File Share target by any of:
-
Go to File > New > New Target; or
-
In the tree on the left, right-click on Targets and select New Target; or
-
In the top toolbar, click the blue target icon
 .
.
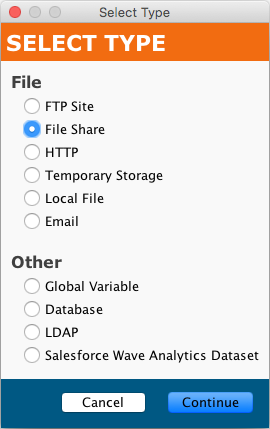
In the popup, select File Share as the type:
Your new target appears in its own New Target tab in the right pane of the window.
Note
If you create a standalone target using any of these methods, note that it is not connected to an operation. See Use an existing File Share target in an existing operation below to use the new target.
Create a new File Share target in an existing operation
A target is usually created by default when you create a new operation. (The exception is an operation that consists only of a script.) With an existing operation, you can specify the type of its target by:
-
Double-clicking on the target icon; in the popup, select Create New Target; or
-
Right-clicking on the target icon and selecting Create New Target.
In the configuration screen that appears, use the Type dropdown to select File Share, as shown above.
Use an existing File Share target in an existing operation
To use an existing File Share target in an existing operation with a target, you can set it by any of:
-
Within the operation, double-clicking on the target icon, and in the resulting popup, selecting the desired File Share target from the list; or
-
Within the operation, right-clicking on the target icon, choosing Select Existing Target, and in the resulting popup, selecting the desired File Share target from the list; or
-
Dragging the desired File Share target from the tree on the left and dropping it onto the existing target icon of the operation.
Configure a File Share target
After you have created a File Share target, the configuration screen will open in the main view of Design Studio. You can return to the configuration screen at any time by double-clicking on the target icon in the operation, or by double-clicking on the target in the tree on the left.
Basic configuration
The configuration screen will appear similar to this example:
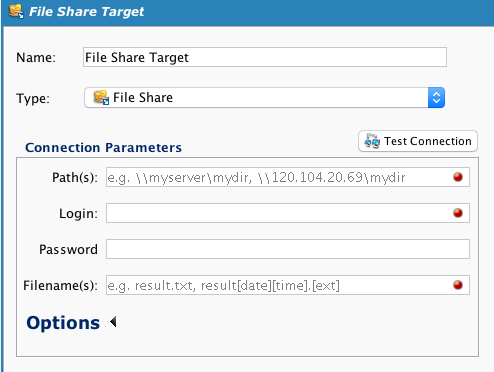
- Name: Enter an appropriate, unique name for the target.
- Type: Use the dropdown to select File Share, if it is not already specified.
-
Connection Parameters: Specify the details for your file share connection:
-
Path(s): Enter the Universal Naming Convention (UNC) file share path(s) that you want to write to, excluding filename(s). When entering a path, use this format:
\\servername\sharename\path\. In addition, take note:- UNC paths must start with two backslashes
\\but a trailing backslash\is optional (for example,\\dropserver\incoming\po). - An IP address can be used in place of the server name (for example,
\\198.51.100.1\mydir). - Multiple paths can be specified using comma-separated values (for example,
\\myserver\mydir, \\120.104.20.69\mydir).
Important
If using a cloud agent group, UNC paths work only with a public IP address in place of the server name.
All agent groups are limited by restrictions imposed by the file share being accessed:
- They are bound by security and access control set for the user defined in the source or target for that given file share.
- If the file share permits only a certain number of connections, the agent group will be bound to that limit.
- As most file shares do not permit multiple users changing a given file concurrently, if a file is being used by another user or process, the agent group will not be able to change it.
- UNC paths must start with two backslashes
-
Login: If a login is required (in the form of
DomainName\UserName) to access a shared network drive, enter a valid username into the Login field. - Password: Enter a password to use with the Login to access a shared network drive referenced in the Path(s) field.
- Filename(s): Enter the desired name for the target file(s). Variables may be used in this field. If specifying a compressed file (ZIP), see the "Compression" section of the additional connection parameters under Options below. The file will automatically be written into the archive at the root level. (Required.)
- Test Connection: Clicking the
 button will test the File Share target; it will fail if the path is not a valid UNC path on the operating system where the Jitterbit agent is running. It does not test if the specified user has write permission on the directory.
 - Click the Save button in either the main toolbar or the target's toolbar to save the configuration.
-
Options
Additional connection parameters can be specified by clicking the Options at the bottom of the Connection Parameters section:
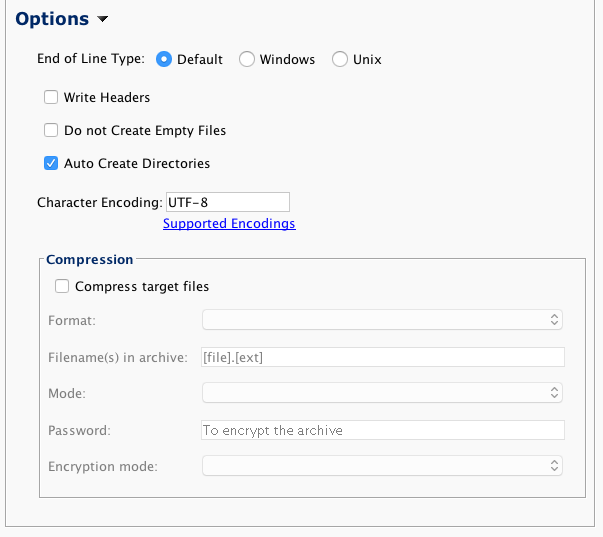
- End of Line Type: Specifies how Jitterbit writes line breaks when writing to a target. End-of-line characters in the data will not be converted. Available options:
- Default: Standard end-of-line characters for the platform the agent is running on.
- Windows: CRLF (ASCII 13 and ASCII 10)
- Unix: LF (ASCII 10)
- Write Headers: If checked and a flat text target, a header of column/field names will be written as the first line.
- Do not Create Empty Files: If checked, creating the target file will be skipped if there is no target data.
- Auto Create Directories: If checked, any intermediate directories required to complete the paths (as specified above in Connection Parameters) will be created automatically.
- Character Encoding: Used to specify a character encoding for the target file. If left blank, Jitterbit will attempt to detect the encoding. To specify a different encoding than that default, insert one of the supported encodings described in Supported character encodings.
- Compression: If the checkbox for Compress target files is selected, target files will be compressed using the ZIP format. Additional options are:
- Filename(s) in archive: Accepts variables and filename keywords. To keep the filename in the archive the same as the filename defined in the target, use a format of
[file].[ext]as shown above. - Mode: Not applicable for File Share targets.
- Password: For encrypted archives, supply a password.
- Encryption mode: If a password is supplied, two encryption modes are available: AES or Standard ZIP.
- Filename(s) in archive: Accepts variables and filename keywords. To keep the filename in the archive the same as the filename defined in the target, use a format of