Create an FTP site source
Introduction
An FTP Site source can read from an FTP server with options such as success/error folders and a trigger file.
Prerequisite
Before you can use the success/error folders and trigger file feature of an FTP Site source (see the Options below), you must have enabled Local File Location on your Jitterbit private agent. See Enabling local file location for details.
Important
SSH client keys are used to authenticate with external resources such as SFTP servers. Public and private key files for SFTP can be configured in the SSH section of the private agent configuration file, as described in Connect to sFTP with ssh keys. Note that SFTP and FTP/FTPS are different protocols and use different default ports.
Create an FTP site source
You can choose to create a new FTP Site source on its own, or within an existing operation. For more information on how sources work within operations, see Creating an operation.
Create a new FTP site source as a standalone source
Within your project within Jitterbit Design Studio, you create a new FTP Site source by any of:
-
Go to File > New > New Source; or
-
In the tree on the left, right-click on Sources and select New Source; or
-
In the top toolbar, click the green source icon
 .
.
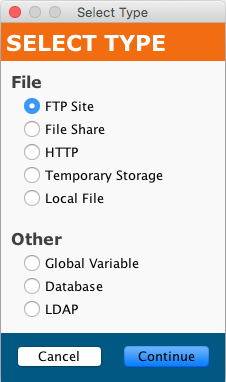
In the popup, select FTP Site as the type:
Your new source appears in its own New Source tab in the right pane of the window.
Note
If you create a standalone source using any of these methods, note that it is not connected to an operation. See Use existing FTP site source in an existing operation below to use the new source.
Create new FTP site source in an existing operation
A source is usually created by default when you create a new operation. (The exception is an operation that consists only of a script.) With an existing operation, you can specify the type of its source by:
-
Double-clicking on the source icon; in the popup, select Create New Source; or
-
Right-clicking on the source icon and selecting Create New Source.
In the configuration screen that appears, use the Type dropdown to select FTP Site, as shown above.
Use existing FTP site source in an existing operation
To use an existing FTP Site source in an existing operation with a source, you can set it by any of:
-
Within the operation, double-clicking on the source icon, and in the resulting popup, selecting the desired FTP Site source from the list; or
-
Within the operation, right-clicking on the source icon, choosing Select Existing Source, and in the resulting popup, selecting the desired FTP Site source from the list; or
-
Dragging the desired FTP Site source from the tree on the left and dropping it onto the existing source icon of the operation.
Configure an FTP site source
After you have created an FTP Site source, the configuration screen will open in the main view of Design Studio. You can return to the configuration screen at any time by double-clicking on the source icon in the operation, or by double-clicking on the source in the tree on the left.
Basic configuration
The configuration screen will appear similar to this example:
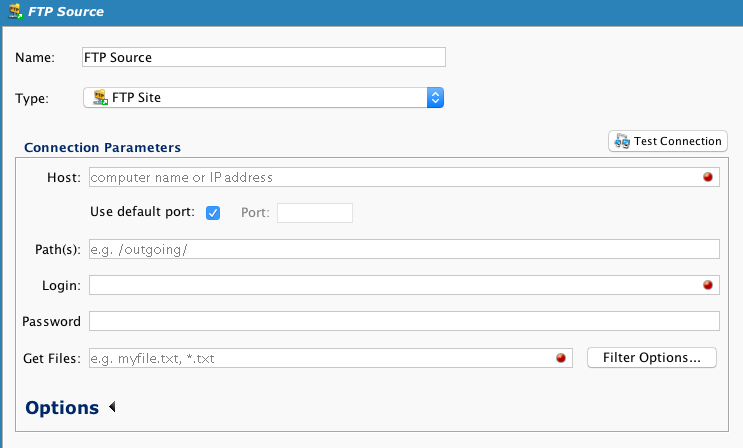
- Name: Enter an appropriate, unique name for the source.
- Type: Use the dropdown to select FTP Site, if it is not already specified.
-
Connection Parameters: Specify the details for your FTP connection:
- Host: Enter a valid FTP server location for your source, such as
ftp.example.com. (Required.) - Use default port: The default ports are 21 for FTP/FTPS and 22 for SFTP/SCP. For different ports, deselect the Use default port checkbox and enter a port to use in the Port field.
- Path: Enter a single valid path. A path should point to an existing directory on the FTP server such as
/inbound/. - Login and Password: Enter a username (required) and password (if applicable) that will allow access to the FTP server. Leave the password blank if no password is required.
-
Get Files: Enter the name of the source file(s) that you want to read from within the directory specified in Path. This field may also include an asterisk
*to use as a wildcard (for example,*.txtor*.*) or a question mark?to match exactly one character (for example,file?.txt). Variables may also be used in this field. If specifying a compressed file (ZIP), see the "Compression" section of the additional connection parameters under Options below. The compressed file can automatically be uncompressed and read. (Required.)Tip
If you are missing known files or if the names of files have extra information attached to them after retrieving them from the endpoint, set
jitterbit.source.ftp.enable_regex_parsertotrueupstream of reading files from the endpoint. -
Filter Options: Allows specifying if filename case should be ignored or if the Get Files information should be treated as a regular expression
- Host: Enter a valid FTP server location for your source, such as
-
Test Connection: Click the
 button will test the FTP Site source; it will fail if a connection to the host cannot be made or the path is not a valid path that finds files. A list of files matching the pattern specified in the Get Files will be returned.
 -
Click the Save button in either the main toolbar or the target's toolbar to save the configuration.
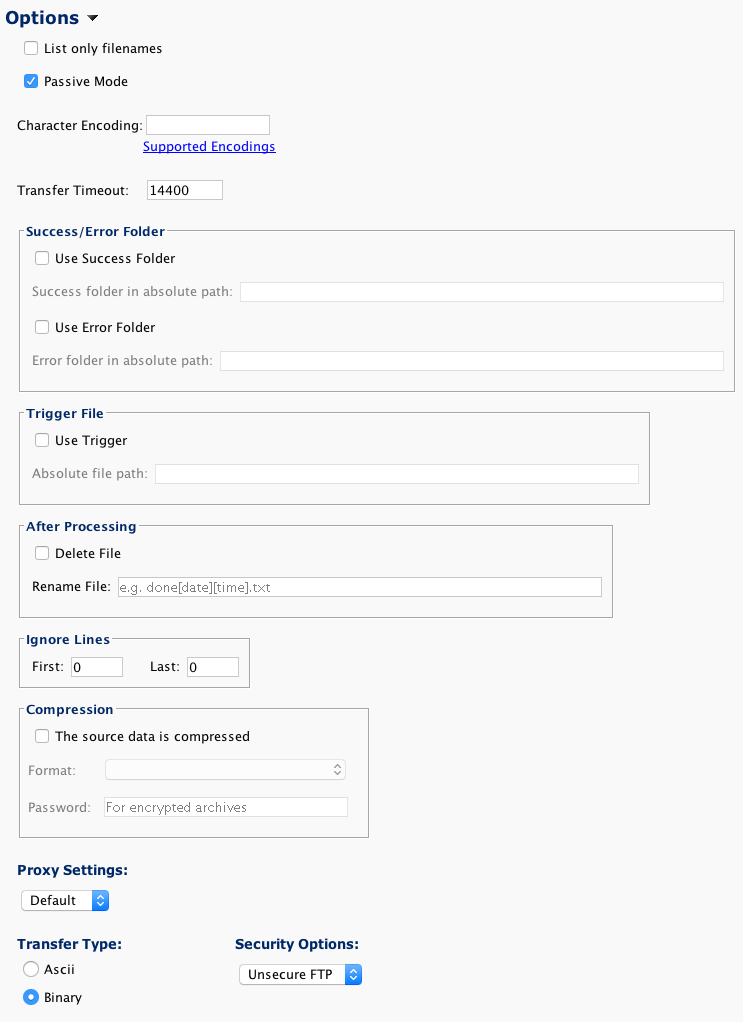
Options
Additional connection parameters can be specified by clicking the Options at the bottom of the Connection Parameters section:
-
List only filenames: Check this box to list only file names (it uses the FTP command NLST instead of LIST). Try this if Jitterbit cannot parse the FTP directory listing sent back by the FTP server.
Tip
If you are missing known files or if the names of files have extra information attached to them after retrieving them from the endpoint, set
jitterbit.source.ftp.enable_regex_parsertotrueupstream of reading files from the endpoint. -
Passive Mode: Leave this box checked to use the FTP server's "PASV" method to retrieve files. When this option is enabled, the agent will open a control connection to the FTP server, tell the FTP server to expect a second connection, and then open the data connection to the FTP server itself on a randomly chosen high-numbered port. This works with most firewalls unless the firewall restricts outgoing connections on high-numbered ports.
- Character Encoding: Used to specify a character encoding for the source file(s). If left blank, Jitterbit will attempt to detect the encoding. To specify a different encoding than that default, insert one of the supported encodings described in Character encoding.
- Transfer Timeout: Specify the number of seconds after which an FTP transfer will time out. By default, this number is 14,400 seconds, or 4 hours.
-
Success/Error Folder: Specifies if success and/or error folders will be used to archive a copy of all files processed.
- If a success folder is specified, upon successfully processing the source, a copy of the file will be written to a file in that folder.
- The file will be named the same as that specified in the Get Files field above, but with a trailing underscore and a timestamp added. If there is already a file with the same name in that folder, an additional underscore and a counter will be added.
- Example: if a file named
data.csvis successfully processed, a copy nameddata.csv_2018-01-01_12-00-00-000could be written to the folder specified as the Success Folder on the private agent machine. If such a file already exists from a previous run, a new filedata.csv_2018-01-01_12-00-00-000_1would be added. - In a similar fashion, if an error folder is specified, any files that fail will be written to a file in the Error Folder on the private agent machine.
Important
Absolute paths for the success and error folders are located on the private agent, not on the FTP server.
When using filename keywords in these fields, the keywords are not resolved. For a workaround, see Limitation and workaround under Filename keywords. Using asterisks (
*) and other typically unsupported file name characters will cause the operation to fail. -
Trigger File: Specifies if a trigger file will initiate processing of the source file(s). The trigger file is deleted when processing starts.
- After selecting the Use Trigger checkbox, specify an Absolute file path to a file whose presence will trigger processing.
- Variables (though not wildcards) may be used in this field.
- As the trigger file is deleted as processing starts, the trigger file cannot be the same file as a source file being processed.
- The operation will poll, looking for the trigger file. Polling time interval is fixed at one second.
- The trigger file is deleted as processing starts.
- If the trigger file is not found, the operation will keep attempting to find the trigger file until the operation times out.
- Setting a trigger file blocks any operation or script that uses the source until either the trigger file condition is satisfied or the operation times out.
-
After Processing:
- If the Delete File checkbox is checked, the source file(s) will be deleted after they have been processed.
- If a value is specified in the Rename File field, the file will be renamed using the pattern supplied. Variables may be used in this field.
- Only one of deleting or renaming is accepted; if the Delete File checkbox is checked, Rename File will be disabled and ignored. If the Rename File is empty, it will be ignored. If left as the default, no post-processing of source files will take place.
-
Ignore Lines: The indicated numbers of first and last lines that are to be ignored for each file. If there are headers or footers to be ignored, enter the number of lines into the First and Last fields as appropriate.
-
Compression: If the checkbox for The source data is compressed is checked, source files will be uncompressed using the ZIP format. A Password (for encrypted archives) can be specified. Only reading from the root directory of the archive is supported.
-
Proxy Settings: Use the dropdown to select one of these options for a custom proxy for the FTP host:
- Disable: Proxy settings are disabled for this specific source, bypassing the agent proxy configuration if one exists.
- Default: Proxy settings are enabled, using the agent proxy configuration if one exists. If proxy settings are not specified in the agent configuration, the Default setting has the same result as the Disable setting.
-
Custom: Proxy settings are enabled for this specific source using custom information provided here. This option bypasses the agent proxy configuration if one exists. When Custom is selected, these fields become available:
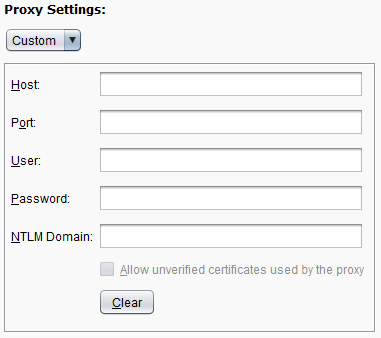
See Enabling proxy for private agents for details on these fields.
-
Transfer Type: If files are ASCII-based, choose the ASCII transfer type; for all other file types, choose Binary. Binary is the default and usually works best.
- Security Options: These options are available:
-
Unsecure FTP: This uses normal unencrypted FTP and is not secure since passwords are sent in clear text over the network. Use only in a safe environment. (Default.)
-
Explicit FTPS: This option uses explicit FTP with SSL, requiring the FTP client to request security information before a file transfer begins. When this option is selected, you can set the preferred Authentication Mode (either TLS or SSL) and these SSL Options:
- Try SSL: This tries to initiate a TLS/SSL-encrypted transfer. If that fails, non-encrypted FTP will be used.
- RequireTLS/ SSL for control connection: With this option, the initial FTP control connection is encrypted using TLS/SSL to ensure that the password exchange is encrypted. The transfer itself will not be encrypted but at least the password is not sent in clear text. If the data itself is not sensitive or already encrypted, you can use this option. If the server does not support FTPS, the transfer will fail.
- Require TLS/SSL for all data transfer: This option requires both the control connection and the data connection to be encrypted using TLS/SSL. If the server does not support SSL, the transfer will fail.
-
Implicit FTPS: This option uses implicit FTPS (implicit FTP with TLS/SSL), requiring a TLS/SSL connection prior to file transfer.
- SFTP: This option uses the SFTP protocol instead of FTP. This option can only be used if you are connecting to an SFTP server. Public and private key files for SFTP can be configured in the SSH section of the agent configuration file, as described in Connect to sFTP with ssh keys. Note that SFTP and FTP/FTPS are different protocols and use different default ports.
-