Create an HTTP source
Introduction
An HTTP connection can be configured and used as a source in Jitterbit.
When an HTTP connection is used as a source, the Jitterbit agent submits an HTTP action (one of GET, POST, PUT, DELETE, or CUSTOM) and retrieves data from the URL specified in the source configuration.
Create an HTTP source
You can choose to create a new HTTP source on its own, or within an existing operation. For more information on how sources work within operations, see Creating an operation.
Create a new HTTP source as a standalone source
Within your project in Jitterbit Design Studio, you create a new HTTP source by any of:
-
Go to File > New > New Source; or
-
In the tree on the left, right-click on Sources and select New Source; or
-
In the top toolbar, click the green source icon
 .
.
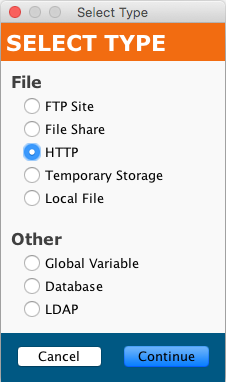
In the popup, select HTTP as the type:
Your new source appears in its own New Source tab in the right pane of the window.
Note
If you create a standalone source using any of these methods, note that it is not connected to an operation. See Use an existing HTTP source in an existing operation below to use the new source.
Create a new HTTP source in an existing operation
A source is usually created by default when you create a new operation. (The exception is an operation that consists only of a script.) With an existing operation, you can specify the type of its source by:
-
Double-clicking on the source icon; in the popup, select Create New Source; or
-
Right-clicking on the source icon and selecting Create New Source.
In the configuration screen that appears, use the Type dropdown to select HTTP, as shown above.
Use an existing HTTP source in an existing operation
To use an existing HTTP source in an existing operation with a source, you can set it by any of:
-
Within the operation, double-clicking on the source icon, and in the resulting popup, selecting the desired HTTP source from the list; or
-
Within the operation, right-clicking on the source icon, choosing Select Existing Source, and in the resulting popup, selecting the desired HTTP source from the list; or
-
Dragging the desired HTTP source from the tree on the left and dropping it onto the existing source icon of the operation.
Configure an HTTP source
After you have created an HTTP source, the configuration screen will open in the main view of Design Studio. You can return to the configuration screen at any time by double-clicking on the source icon in the operation, or by double-clicking on the source in the tree on the left.
Basic configuration
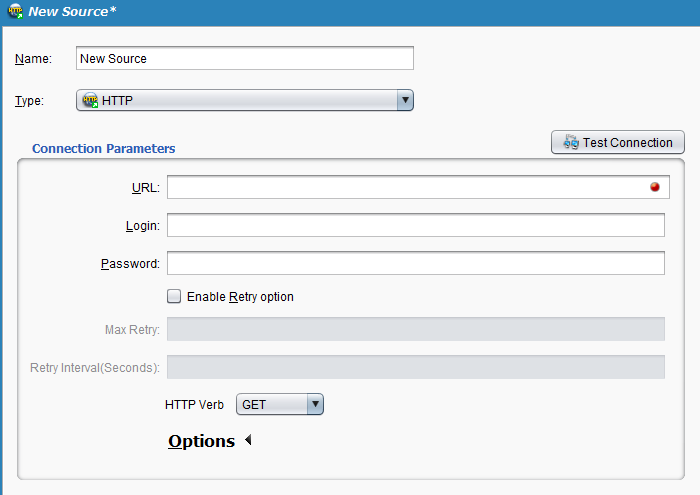
The configuration screen will appear similar to this example:
-
Name: Enter an appropriate, unique name for the source.
-
Type: Use the dropdown to select HTTP, if it is not already specified.
-
Connection Parameters: Specify the details for your HTTP connection:
-
URL: Enter a valid URL for the source. An HTTP source is defined by the URL of the resource, such as
http://www.example.com/ups.app/xml/ShipConfirm.-
To use SSL encryption, use
https://instead ofhttp://in the URL, such ashttps://www.example.com/ups.app/xml/ShipConfirm. -
If query parameters are specified, provide them as they would be in a web browser, such as
https://www.example.com/queryrecord?id=10.
-
-
Login: If applicable, enter the username and password that allows access to the URL. Leave these fields blank if no username or password is required.
-
Password: Enter a password to use with the Login to access the URL referenced in the URL field, if required.
-
-
Enable Retry option: Available only in Design Studio versions 10.22 and higher when using an environment associated with a private agent group, this setting is used to retry a request when an HTTP endpoint returns one of these status codes:
500,501,502,503, or504.In order for this setting to take effect, private agents must be version 10.22 or higher. With earlier agent versions, the configuration of this setting will be ignored without an error.
Select the checkbox to enable additional configuration options:
-
Max Retry: Enter the maximum number of retries (recommended no more than 5 retries) that a request will be resent to NetSuite. If the request still fails after the maximum number of retries, an exception with an error message will be returned in the operation log. In addition, the private agent log file
jitterbit.logwill log each retry.Each retry is treated as part of the same operation run, where only a single record appears in the operation log. Any On Success or On Failure events configured to run downstream operations are triggered based on the end status of the operation after retrying up to the maximum number of retries.
-
Retry Interval (Seconds): Enter the number of seconds (maximum of 5) to wait between resending a request to the HTTP endpoint.
-
-
HTTP Verb: Use the dropdown to select one of GET, POST, PUT, DELETE, or CUSTOM, depending on the requirements of the endpoint. For a POST, an empty request is posted to the URL and the response is used as the source.
-
Test Connection: Clicking the
 button will test the HTTP source; Jitterbit will perform an HTTP HEAD request and return an error if it is not successful. Note that HEAD may not be permitted by the HTTP server referenced by the URL, even if GET or POST is.
 -
Click the Save button in either the main toolbar or the target's toolbar to save the configuration.
Options
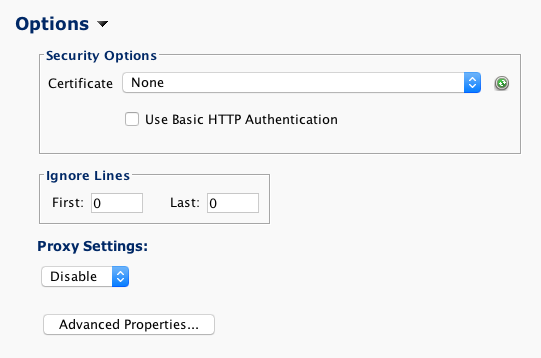
Additional connection parameters can be specified by clicking the Options at the bottom of the Connection Parameters section:
-
Security Options: To have the agent use a certificate to authenticate with the host, specify an appropriate certificate from the dropdown menu. (The green button to the right of the dropdown menu will refresh the list of certificates available from Harmony.)
- If applicable, select Use Basic HTTP Authentication** to authenticate with the host using basic HTTP authentication without SSL encryption. Note that if this option is used, the provided password will be sent in clear text. (Unless required, this is not recommended.)
-
Ignore Lines: The indicated numbers of first and last lines that are to be ignored for each file. If there are headers or footers to be ignored, enter the number of lines into the First and Last fields as appropriate.
-
Proxy Settings: Use the dropdown to select one of these options for a custom proxy for the HTTP host:
-
Disable: Proxy settings are disabled for this specific source, bypassing the agent proxy configuration if one exists.
-
Default: Proxy settings are enabled, using the agent proxy configuration if one exists. If proxy settings are not specified in the agent configuration, the Default setting has the same result as the Disable setting.
-
Custom: Proxy settings are enabled for this specific source using custom information provided here. This option bypasses the agent proxy configuration if one exists. When Custom is selected, these fields become available:
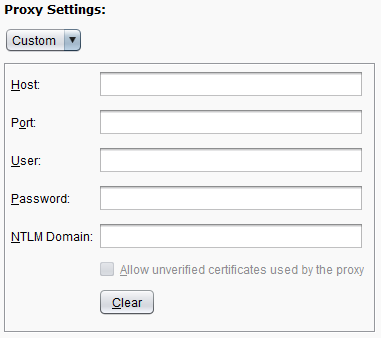
See Enabling Proxy for private agents for details on these fields.
Note
The fields Host, User, Password, and NTLM Domain support variables entered in square bracket syntax with 10.66 agents and later.
-
Advanced properties
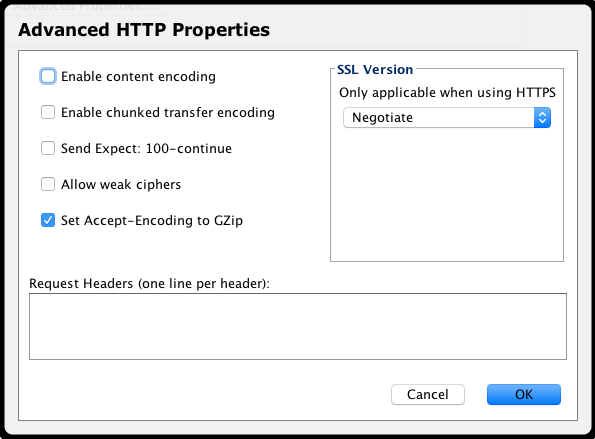
Additional advanced parameters can be specified by clicking the Advanced Properties at the bottom of the Options section. These concern the HTTP headers sent with the request and SSL-related parameters:
-
Enable content encoding: If checked, the "Accept-Encoding" header will be sent with the encoding supported by Jitterbit. Currently, Gzip is supported. This option is off by default.
-
Enable chunked transfer encoding: If checked, the "Transfer-Encoding: chunked" header will be sent. Use this option if you are transferring large data sets. This option is off by default.
-
Send Expect: 100-continue: If checked, the "Expect: 100-continue" header will be sent. With this option, no data will be sent until the HTTP server has validated the headers. Use this option if you are sending large amounts of data but don't want to use chunked transfer encoding. This option is off by default.
-
Allow weak ciphers: If checked, this will allow communication with HTTP endpoints that use weak ciphers (DES/3DES and RC4). This option is off by default.
-
Set Accept-Encoding to GZip: Checked by default, this option tells the HTTP server that Jitterbit can accept a Gzip-compressed response. In return, Jitterbit will follow the RFC 1952 standard and automatically decompress Gzip HTTP responses. If the server does not use Gzip, Jitterbit will see that the response is not compressed and handle it as usual. This feature was added as of Jitterbit version 8.20 and is now checked by default for all new and existing HTTP sources.
-
Request Headers (one line per header): Any text entered in this box will be sent as an HTTP header. Specify one header per line unless the header is wrapped according to the HTTP standard. Global data elements in square brackets will be replaced with their values.
-
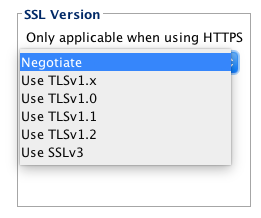
SSL Version: Only applicable when using HTTPS, it allows the specification of a specific SSL version if the HTTP server requires it. The default is "Negotiate". Options available are:
Predefined source global variables that affect an HTTP submission
These predefined source global variables affect HTTP sources:
jitterbit.source.http.max_redirsjitterbit.source.http.request.header._HeaderName_(shown in the script editor asjitterbit.source.http.response.header.*)jitterbit.source.http.responsejitterbit.source.http.ssl_cert_idjitterbit.source.http.status_codejitterbit.source.http.transfer_timeout
See Source Jitterbit variables for details.