Connect to a REST API
Introduction
This page shows how to use the information from validating a REST API to connect to the API in Harmony. This page continues the REST API tutorial using Atlassian Jira Cloud REST API v2 as an example, using the information that was gathered following researching a REST API and validated in Validating a REST API.
The connection to the API within Harmony is configured through Design Studio. Unlike WSDL-based web services, a wizard that walks through the setup is not available. Instead, a connection to a REST API is configured by setting up an HTTP source or HTTP target. You will later use the HTTP source or target in an operation as described under Using a REST API in operations.
While this tutorial focuses only on common configuration options, experienced and inexperienced users alike are encouraged to review the pages HTTP source and HTTP target, which provide more detailed information about all options that are available to configure.
Configure an HTTP source or target
An example configuration using the Jira example is provided below, followed by subsections that describe particular parts of the HTTP source/target configuration. Refer to the documentation for HTTP source and HTTP target for how to create a source or target, as well as all available configurable options.
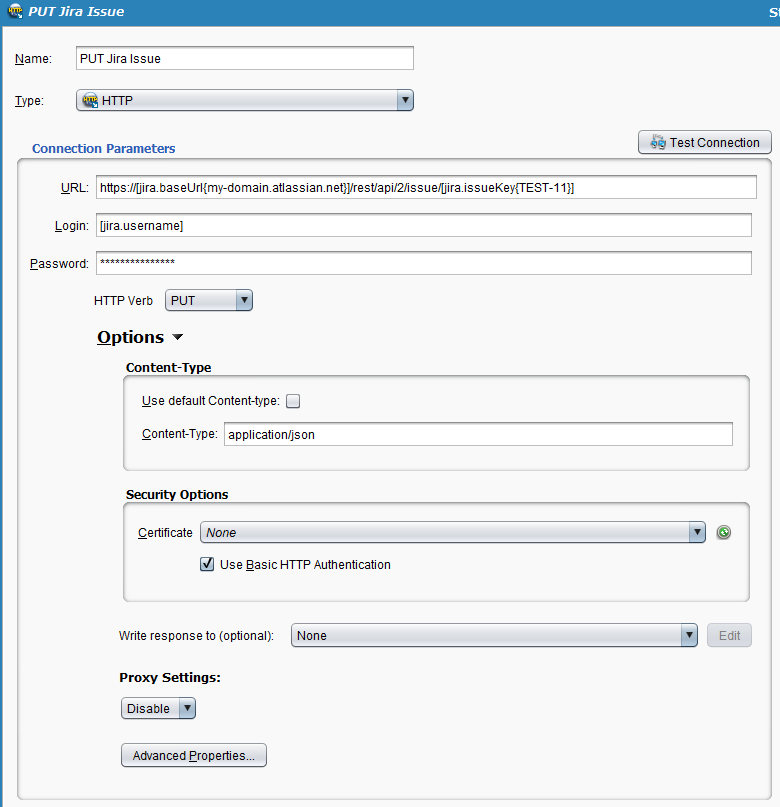
HTTP verb and URL
During configuration, select the appropriate HTTP Verb for your request and provide the same URL that you used as the request URL in Postman.
To make the URL dynamic, you can use project or global variables in place of a base URL or to add query parameters.
If variables are used, you can also provide default values (as shown in curly brackets) for testing or default purposes. (If default values are not provided, testing the connection may fail, but because the variable values will be populated at runtime, the operation should still be successful at runtime).
For example, for our Jira "Edit Issue" PUT, our URL is constructed as:
https://[jira.baseUrl{my-domain.atlassian.net}]/rest/api/2/issue/[jira.issueKey{TEST-11}]
Authentication
The authentication setup will vary for different authentication methods.
In the example, because we are using basic authentication, we filled out the same Login and Password we used for testing (also employing project variables), and then expanded the Options to select the checkbox for Use Basic HTTP Authentication.
You should use the authentication type you have configured for your specific endpoint. For example, if you were using negotiated authentication, such as with a Windows server that has built-in authentication, you would fill out the Login and Password but not select the checkbox for basic authentication.
As another example, if you were using token-based authentication, you might leave these credentials blank and instead provide a project or global variable authentication token in the request headers under Options > Advanced Properties. A typical token-based setup is described in REST transformation - sugar CRM - request session token.
Headers
Under Advanced Properties is also where you would supply any additional request headers not already covered in the HTTP source/target interface. For each call, it is recommended to check the request headers when validating the API to be sure you have all required request headers.
When providing request headers with the Advanced Properties "Request Headers (one line per header)" box, note that the standard auto-completion aid for variables in Design Studio does not function in this area. That is, when you begin typing an open square bracket ([), you will not be presented with choices of existing variables. However, it's useful to know that you can still use project or global variables in this area.
Response headers, on the other hand, are not validated in Harmony. However, if you need to use something provided in the API response header, you can use the Jitterbit variable appropriate for an HTTP source or a target:
-
HTTP Source:
$jitterbit.source.http.response.header.* -
HTTP Target:
$jitterbit.target.http.response.header.*
Documentation for these variables is provided within Source Jitterbit variables and Target Jitterbit variables.
Content type
For HTTP targets, under Options, check that the content-type matches the format expected by the API. Note that this option is applicable to the format of only the request structure (not the response structure).
It is typical for REST APIs to accept requests and provide responses in JSON, as is the case with our Jira API example. In this example, we cleared the checkbox for a default content-type of text/plain and entered a custom content-type of application/json.
If you are providing a REST API request in a different format, specify the content-type accordingly. If the method does not accept structured data, clear the checkbox and leave this field blank.
Response
For an HTTP target using a request that provides a response that you'd like to write to another target, you configure this under Options.
Any target type can be used here. In our example for Jira's "Create Issue" POST, we chose to write the response to a global variable target using a global variable called "Response." For datasets greater than 4 MB, using temporary storage is recommended in place of using a global variable (see Global variable versus Temporary Storage).
Test connection
After you have completed the configuration, click Test Connection to verify that Harmony can connect to your REST API.
Note
If you are using token-based authentication by providing a variable token as a request header, testing the connection may not be successful at this time but may still be successful at runtime.
For an HTTP source, if successful, you should receive back the file with the URL name. Note that you cannot read the contents of the file from here; testing the connection just verifies that you are receiving something back from the API. Later, after you use the source in an operation, you can use the contents if desired.
For an HTTP target, if successful, the message will simply indicate the connection is successful.
If the connection fails using the same request URL and authentication method that you successfully tested in Postman, then the issue is likely with configuration of the HTTP source or target in Design Studio. Refer back to the documentation on HTTP source and HTTP target and check your configuration.
Next steps
After you have configured an HTTP source or target, the next step is Using a REST API in operations. Although each REST API adheres to the same architectural constraints, they are not all designed the same way for each HTTP method. As each specific request and response depends on the specific API, in the next step we present four design patterns for designing operations.