Research a REST API
Introduction
This page is intended for those who are unfamiliar with the process of gathering information on a specific API, and covers the specifics to look for within an API's documentation that are relevant to setting up an integration in Harmony.
If you are unfamiliar with a specific API, the first thing you should do is locate its documentation. Some APIs have multiple versions or products, so pay attention to the specific version. It is becoming more common for API documentation to be embedded within the API implementation. Such APIs may be documented using the OpenAPI/Swagger specification or other frameworks. Other API documentation that is not embedded can be more susceptible to inaccuracies, making testing and validation even more important.
For purposes of this tutorial, we use Atlassian Jira Cloud REST API v2 as an example.
Authentication
Within the API documentation, look for instructions on configuring the type of authentication you want Harmony to use to authenticate with the API, such as basic, OAuth, or token-based. Then set up the desired authentication as required.
Using the Jira example, we set up basic authentication following the Jira documentation on Basic auth for REST APIs. With this type of authentication, we will be able to configure Harmony to use a username and password to authenticate with Jira.
Later in this tutorial, we'll show how you can test this configuration (see Validating a REST API) and how to use whichever method of authentication you have configured to configure an HTTP source or target in Design Studio (see Connecting to a REST API).
Request URL
For each call to the API, you'll need to know the associated URL. The documentation should show how to construct this URL, which is often a combination of a base URL for the specific endpoint along with parameters for the specific request. The URL may include parameters that are intended to be replaced with the specific record identifiers you want to interact with.
In the API documentation, the URL or partial URL may be listed for each type of request, or may be shown within a complete request. The Jira documentation provides both. For example, the partial URL path is provided for "Create Issue":
POST /rest/api/2/issue
The Jira documentation also provides examples for each request for a variety of tools and languages (such as cURL, Node.js, Java, Python, and PHP). The full URL complete with a dummy domain name that will need to be replaced can be found within each example. The example cURL request provides the URL after the --url option:
curl --request POST \
  --url 'https://<your-domain>.atlassian.net/rest/api/2/issue'
An API's documentation should note any query parameters that can be added at the end of the URL. Later, in Design Studio, you will be able to make the base URL and any query parameters dynamic by replacing these with project or global variables in the URL provided in the HTTP source or target configuration. An example of this is provided later in this tutorial in Connecting to a REST API.
Request headers
For each call to a REST API, take note of any headers included in the request.
In Design Studio, the most commonly included header information is specified during the standard configuration of an HTTP source or target, such as authentication and content type. Taking note of the required values helps you properly configure the source or target. Additional request headers can be specified while configuring the source/target under Options > Advanced Properties (and is covered in Connecting to a REST API).
In the example cURL request, header information is provided as --header options:
curl --request POST \
  --url 'https://<your-domain>.atlassian.net/rest/api/2/issue' \
  --header 'Authorization: Bearer <access_token>' \
  --header 'Accept: application/json' \
  --header 'Content-Type: application/json'
Request and response structures
For each call to a REST API, you'll need to know the request and response structures, if they are present.
Not all API calls have a request or response structure. Whether a call uses one (or both) of these structures depends on the specific API. Well-documented APIs usually provide the request structure. The response structure might be provided, but in any case can be obtained using a tool such as Postman or SoapUI.
Note
Even if a sample response structure is provided in an API's documentation, it is recommended to test the request and retrieve a current and accurate response structure, as covered later in this tutorial within Validating a REST API.
For calls that accept structured request data, the structure should be provided in the documentation, either contained within the request or provided separately. Coded requests may be for a variety of tools or languages, with the payload in a format expected by the API, so you need to be familiar with the tool or language being used to know where to look for the request structure.
For example, in the Jira API documentation for "Create Issue," the request structure is contained within the --data option for cURL (as seen below) and is provided in several other languages. You may need to adjust the input data for the specific request, for example by replacing the values for any fields (such as the Jira project key and issue type) with those that are valid for the specific endpoint. You will then need to provide this input structure when validating the call in a tool such as Postman, as covered later in Validating a REST API.
curl --request POST \
  --url 'https://<your-domain>.atlassian.net/rest/api/2/issue' \
  --header 'Authorization: Bearer <access_token>' \
  --header 'Accept: application/json' \
  --header 'Content-Type: application/json' \
  --data '{"fields": {"project": {"key": "TEST"}, "summary": "REST ye merry gentlemen.", "description": "Creating of an issue using project keys and issue type names using the REST API", "issuetype": {"name": "Bug"}}}'
Some API calls do not contain any structured input data for the request. For example, in the case of Jira's "Get Issue," the absence of --data containing a structure indicates this call does not accept structured request data, as is common for GET calls.
curl --request GET \
  --url 'https://<your-domain>.atlassian.net/rest/api/2/issue/<issueIdOrKey>' \
  --header 'Authorization: Bearer <access_token>' \
  --header 'Accept: application/json'
Using a GET can be helpful in cases where the API documentation may not have an accurate or complete request structure, or in cases where you have added custom fields. You can perform a GET on an existing object to obtain a list of possible fields or values, then use that structure later in Postman to test what might be accepted for the request in another method.
For calls that return structured response data from the API, if the documentation provides a sample response, note what format it is in and familiarize yourself with what is returned. Most REST APIs provide responses in JSON, but some APIs may provide XML or another type. For now, you don't need to copy the response provided by the documentation; we will generate the actual response from the API later for use in Design Studio (see Validating a REST API).
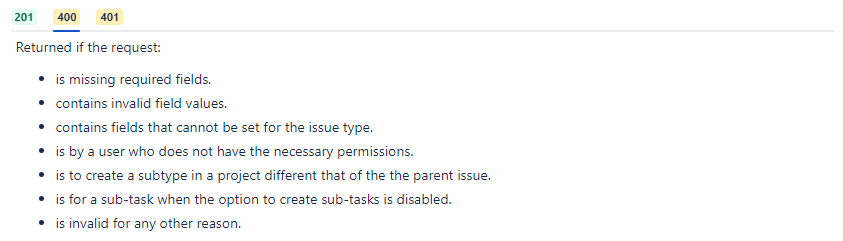
Take note of any documented status codes that are expected to be returned. These will be useful as reference to interpret the response received from the API after making the request. For example, the following table shows codes that can be returned from the Jira "Create Issue" request. In addition to a status code, error messages with helpful information may be returned in a structured response.
Jira "Get Issue" Status Codes
Other information unique to the endpoint
The overall importance of becoming familiar with your endpoint cannot be stressed enough. An API's documentation may provide recommendations or cautions to help you along the way. For example, in the Jira documentation, there are special notes on permissions, resource expansion, pagination, and special headers. Being aware of what's available (or unavailable) will help you design successful integrations and address any challenges you encounter.
Next steps
After you have set up the desired authentication and become familiar with the API's documentation, refer to these pages for next steps:
-
Validating a REST API
Before connecting to a REST API with Harmony, testing and validation using an independent tool is strongly recommended. This page walks through testing authentication, and validating and saving structures for each request and response. -
Connecting to a REST API
In Design Studio, an HTTP source or target must be configured for the appropriate HTTP method of your request (GET, PUT, POST, DELETE, or custom method) so you can use it in an operation. While this page focuses on common configuration options, the pages HTTP source and HTTP target provide more detailed information about all options that are available to configure. -
Using a REST API in Operations
Although each REST API adheres to the same architectural constraints, they are not all designed the same way for each HTTP method. As each specific request and response depends on the specific API, we present four design patterns for designing operations.