Use a REST API in operations
Introduction
Although each REST API adheres to the same architectural constraints, they are not all designed the same way for each HTTP method. For example, for a POST, one API may take a request structure and provide a response structure, while another API may take a request structure but respond only with a status code. For a DELETE, one API may require the request to be provided in the URL instead of a structure.
Because each method can be different, it's important to have checked the documentation for the specific API (Researching a REST API) and have validated the request and response with an independent tool (Validating a REST API). Thus, rather than provide patterns for each method, which may vary per API, the patterns presented below are based on whether request or response structures are provided.
On this page, we'll look at these design patterns and see how to model them in Design Studio:
The patterns continue the REST API tutorial using Atlassian Jira Cloud REST API v2 as an example. However, it is not necessary to complete the previous steps in the tutorial in order to use these patterns, which are applicable across REST APIs in general.
A response structure only
This pattern applies to methods where you need to provide only a response structure and no request structure. This is usually the case with GET methods, since you are typically only requesting data to be sent back from the API, rather than providing data to the API. You are still sending a request to the API, but your request isn't in the form of structured data. The request is made simply using the request URL and any request headers or other configurable options set during HTTP source configuration.
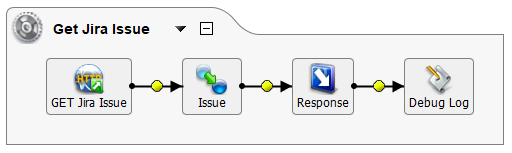
In this example of the pattern, we make a request using a GET method ("GET Jira Issue"), pass the received data through the transformation ("Issue"), and write the data returned from the API to a global variable target ("Response"), which we then write to the operation log using a script ("Debug Log") to report back on the data returned.
Note that any other target type could be used, and that the method and what it returns depends on the specific API. This pattern can be modified depending on how you would like to use the response data returned from the API.
-
Create a transformation operation using an HTTP source with the HTTP Verb and URL for the specific API request.
-
In the operation, double-click on the target placeholder and create a global variable target with a variable called "Response." (Any target type could be used here.)
-
In the operation, right-click on the global variable target you just added and select Insert After This > Script. Then, double-click on the script and create a new Jitterbit Script where we'll write the global variable value to the operation log:
<trans> WriteToOperationLog($Response) </trans> -
In the operation, double-click on the transformation placeholder and create a new transformation. Here is where we'll provide the sample response structure so that Harmony knows how to process the data.
-
In the Name step of the transformation wizard, select the format of the source and target of data. In the example, we selected "JSON" for both, as Jira's API provides responses in this format.
-
In the Source step, select the option to create a new structure from a sample file. On the next screen, provide the sample response file you saved from validating the API for this type of request, then generate the XSD from that sample file. In our example, we generated the XSD from the
Jira_GET_GetIssue_Response.jsonsample response we had saved earlier (see Validating a REST API). -
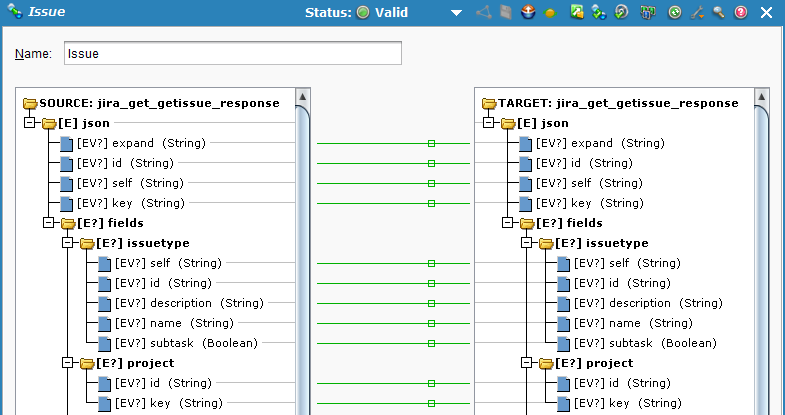
In the Target step, select the same schema you just generated, as in this case the source and target structure will be identical.
-
-
On the transformation mapping screen, automap the source and target fields, which should be an exact match since they are using the same structure. This will pass through all fields being returned from the API.
If you want to transform any of the data, you can do so at this time. However, it is typical to just pass through data obtained from a GET so that you can see what the API is returning, and possibly use that data in a later operation. You could also map directly into other configured endpoints.
-
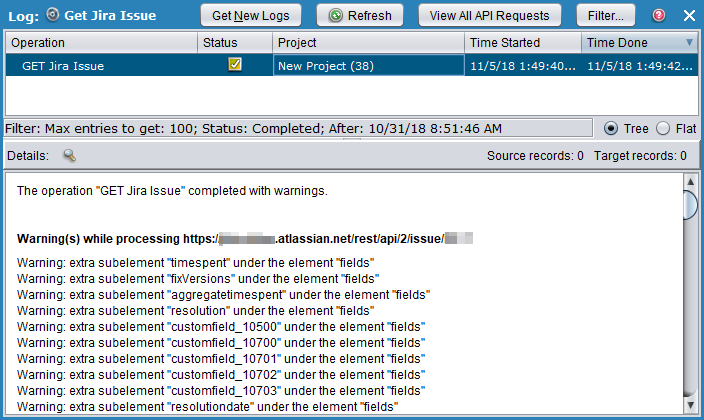
When you're ready, deploy and execute the operation. Double-click on the status icon(s) in the operation monitor to view information about the operation status. If the operation completed successfully, you'll see this status as well as the response from the API that you set up to write to the operation log.
Since we removed fields from our sample structure prior to generating the XSD for the transformation, the status shows successful completion with warnings. The warnings are included farther down in the log message.
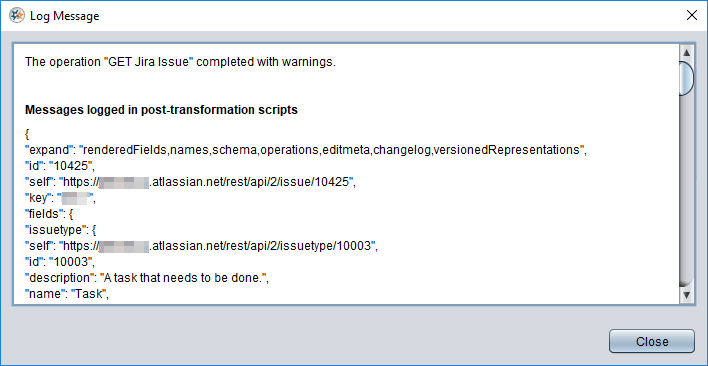
You can also right-click on the operation and select Operation Log to see the warnings directly in the operation log:
Both request and response structures
This pattern applies to methods where you are providing both request and response structures. This is often the case with POST methods, where you are requesting data to be created and then receive back information about what was created. The response back from the API can be used in any way, but it is often the case to use the new object IDs in a later operation.
Many REST APIs have POST or PUT methods that allow you to create only one record at a time. In that situation, if you have a source with multiple records, you call a method to create or update one record at a time. For this reason, this pattern does not use a project item source as typically seen in Harmony operations. Instead, we use a script to loop through multiple records, feeding them into the same operation to be processed one at a time.
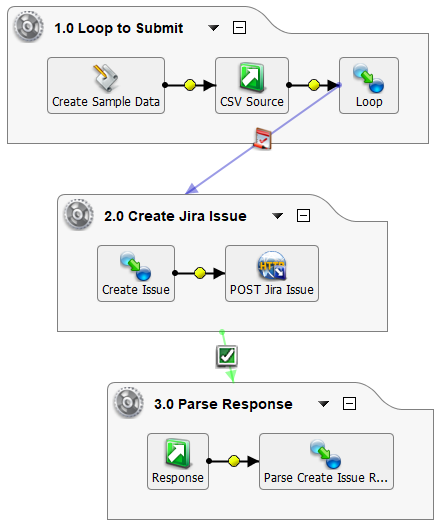
In this example of the pattern, we loop through multiple source records to make a request for each one using a POST method, and write the data returned from the API to a global variable target, which we then write to the operation log to parse the response and report back on the data returned. To do this, we chained together three operations, covered in detail in the following subsections:
-
Create a Loop of Records. In the first operation, "1.0 Loop to Submit," we used a script ("Create Sample Data") to create a global variable that we then used as a source ("CSV Source") for the transformation ("Loop"), where we wrote field values for each source record to global variables.
-
Send the Request. In the second operation, "2.0 Create Jira Issue," we then used those global variables in our transformation ("Create Issue") to write to our target ("POST Jira Issue") where we saved the response from the API to a global variable.
-
Parse the Response. In the third operation, "3.0 Parse Response," we used that response in a global variable source ("Response") and in our transformation ("Parse Create Issue Response") wrote those values to the operation log.
Note that any other target type could be used, and that the method and what it returns depends on the specific API. This pattern can be modified depending on how you would like to provide data and use the response data returned from the API.
Create a loop of records
-
Create a transformation operation using the source of data you want to use in your API call. For purposes of this example, we created a script defining the global variable
source.csvwith several records to be used and wrote the global variable to a global variable source. For an actual implementation, this type of data would likely come from another connected endpoint; any source can be used.<trans> $source.csv = 'TEST,Research My API,Become familiar with my REST API endpoint.,High,Task TEST,Add Missing Fields,Iterate using Postman to make sure all desired fields are generated.,Highest,Bug TEST,Build Operations in Jitterbit,Use Jitterbit to design the REST API integration.,Medium,Task' </trans> -
Double-click on the transformation placeholder and create a new transformation. Here is where we will create the loop to process each source record individually.
-
In the Name step of the transformation wizard, select the format appropriate for your source and target. In this example, we select "Text" for both, but you could use any format.
-
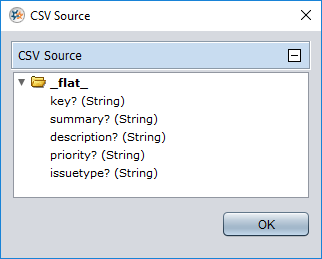
In the Source step, you specify the structure being used for your source data. Since we selected a text format, we created a new file format definition to match the structure of our data. Whether you use a file format or another structure, it needs to match the structure of your source data.
-
In the Target step is where we will create the loop. For this you should have one field that will be used to loop through each record. Since we used a text format, we created a new file format definition with a single field.

-
-
In the transformation mapping, add a transformation script on the
Loopfield and define each of the source fields as global variables. Later, we will add aRunOperation()function into the script to kick off the next operation using the data for each record.<trans> $jira.key = key; $jira.summary = summary; $jira.description = description; $jira.priority = priority; $jira.issuetype = issuetype; </trans>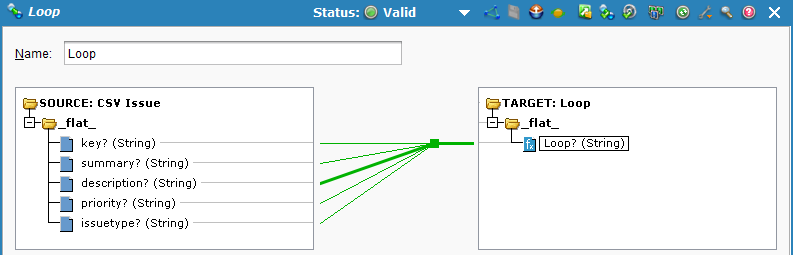
Send the request
-
Create a second transformation operation, using an HTTP target with the HTTP Verb and URL for the specific API request. If you want to use the response received back from the API, under Options use the "Write response to (optional)" field to set to a target of your choice. In this example, we write the response returned to a global variable target with a variable called "Response."
-
In the second operation, right-click on the source placeholder and select Remove From Graph, since we're going to use a script to loop in records as the source rather than define a project item source to use in the transformation.
-
In the second operation, double-click on the transformation placeholder and create a new transformation. Here is where we'll provide the sample request and response structures so that Harmony knows how to process the data.
-
In the Name step of the transformation wizard, select "None" for the source of data, as we are not using a traditional source for the operation. Select "JSON" for the target of data, as Jira accepts requests in this format.
-
In the Target step, select the option to create a new structure from a sample file. On the next screen, provide the sample request file you saved from validating the API for this type of request, then generate the XSD from that sample file. In our example, we generated the XSD from the
Jira_POST_CreateIssue_Request.jsonsample request we had saved earlier (see Validating a REST API).
-
-
On the transformation mapping screen, you should not see a structure on the source side. On the target side, we'll create a transformation script on each field we want to map to that provides data for each record. In this example, we use the global variables that we previously defined from our source data.
Target Field Mapping Script json$fields$project$key$<trans>$jira.key</trans>json$fields$summary$<trans>$jira.summary</trans>json$fields$description$<trans>$jira.description</trans>json$fields$priority$name<trans>$jira.priority</trans>json$fields$issuetype$name<trans>$jira.issuetype</trans>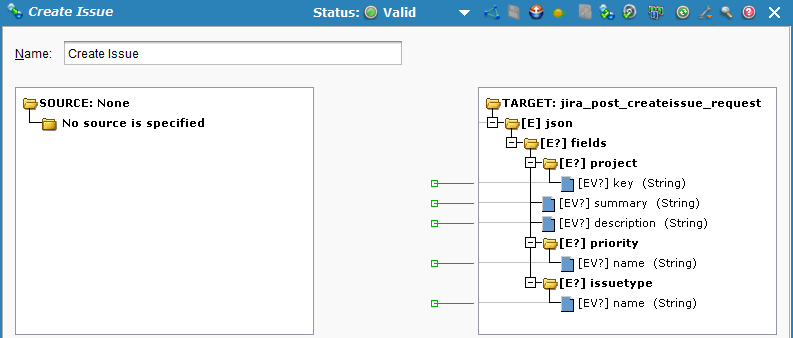
-
Now that the second operation is created, go back to the transformation script on the loop being used in the first operation and add the function
RunOperation()to run the second operation you just created. This will make it so as each record is processed by the first operation, the second operation runs for each record, effectively looping in all records.<trans> $jira.key = key; $jira.summary = summary; $jira.description = description; $jira.priority = priority; $jira.issuetype = issuetype; RunOperation("<TAG>Operations/POST/2.0 Create Jira Issue</TAG>"); </trans> -
Create a third operation that parses the API response that runs upon success of the second operation. To do so, right-click on the background of the second operation and select On Success > Operation > Create New Operation and create a new transformation operation.
-
In the third operation, use as the source wherever you specified the API response to be saved during the HTTP target configuration; in the example, we used a global variable. To use the same global variable as a source, in the project items tree, right-click on the global variable target and select Copy to New Source to create a global variable source using the same global variable (
$Response) as a source.
Parse the response
-
In the third operation, use whichever target you would like to write the response to. For the example, we will later write the response to the operation log rather than an actual project item target. Right-click on the target placeholder and select Remove From Graph.
-
Double-click on the transformation placeholder and create a new transformation. Here is where we'll provide the sample request and response structures so that Harmony knows how to process the data.
-
In the Name step of the transformation wizard, select "JSON" for the source of data, since we're using the response data from our API, which comes in a JSON format. For the example, we select "JSON" as the target of data to write the response using the same structure, but you could choose any type here depending on how you want to write the data.
-
In the Source step, select the option to create a new structure from a sample file. On the next screen, provide the sample response file you saved from validating the API for this type of request, then generate the XSD from that sample file. In our example, we generated the XSD from the
Jira_POST_CreateIssue_Response.jsonsample response we had saved earlier (see Validating a REST API). -
In the Target step, select the same schema you just generated, as we are just passing through the API response.
-
-
On the transformation mapping screen, map any fields you want to be written. In the example, we add a transformation script on the target
idfield that writes the returned values to global variables that are then written to the operation log. You could also put a transformation script on each target field, but because they are used only for writing to the operation log, as a shortcut we put them all into one field's script.<trans> $jira.id = json$id$; $jira.key = json$key$; $jira.link = json$self$; WriteToOperationLog("Issue ID: " + $jira.id); WriteToOperationLog("Issue Key: " + $jira.key); WriteToOperationLog("Issue Link: " + $jira.link); </trans>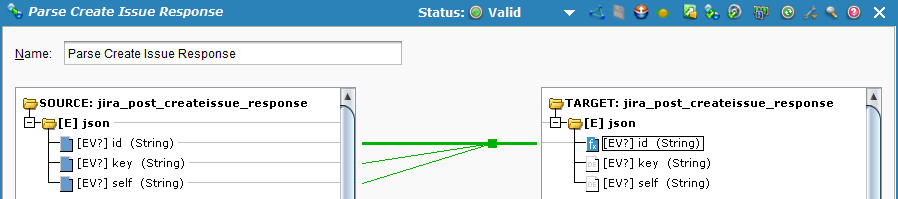
-
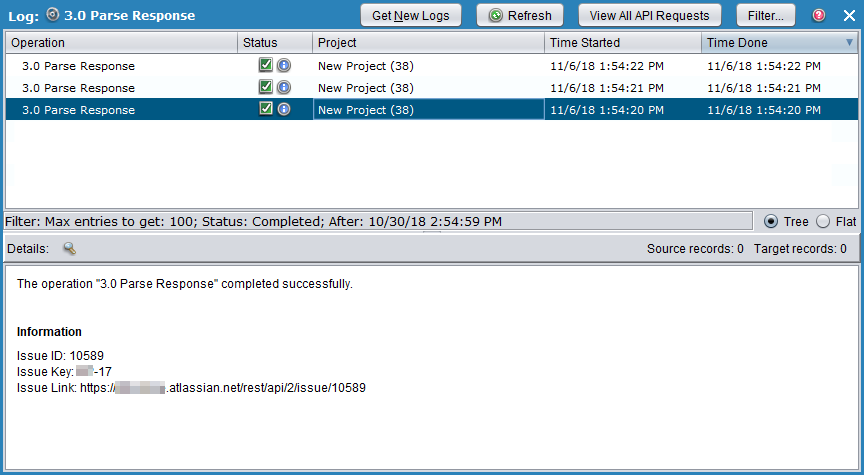
When you're ready, deploy and execute the operation. If the operation is successful, right-click on the third operation and select Operation Log to confirm that the records have been written to the operation log. Because each record was processed separately, there will be a line in the operation log for each record. You can also check the endpoint to see that the new record has been created or do a GET on the identifier of the new object.
A request structure only
This pattern applies to methods where you provide a request structure, but there is no structured data returned by the REST API. For APIs that have a request structure only, this doesn't mean the API doesn't respond; it means that the API response may be as simple as a status code.
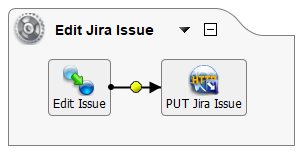
In this example of the pattern, we provide a source for the request in a transformation ("Edit Issue") and then make a request using a PUT method ("PUT Jira Issue") to update and add several fields in a single record. As with POST, it can be common for a specific API to allow updating of only one record at a time. To loop through data, refer to the looping portion of the previous pattern for Both request and response structures.
If the status code is in the 200 range, Harmony will report it as successful. For other codes that indicate errors, the returned code will be reported in the operation log. If you receive an error, you can also configure operation chains to run upon failure (for example, to send a Slack message or email that reports the operation was unsuccessful).
-
Create a transformation operation using an HTTP target with the HTTP Verb and URL for the specific API request.
-
In the operation, use a source appropriate for your use case. In the example, as we will provide the source data in a script, we right-click on the source placeholder and select Remove From Graph.
-
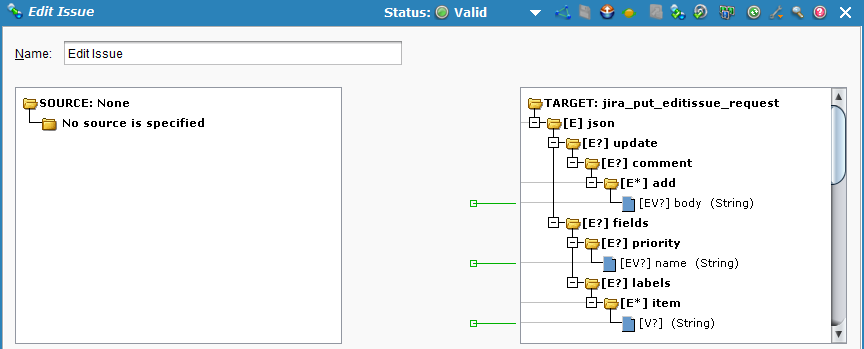
In the operation, double-click on the transformation placeholder and create a new transformation. Here is where we'll provide the sample request structure.
-
In the Name step of the transformation wizard, select the format of your source and target of data. In the example, we selected "(None)" for the source of data, as we are not using a traditional source for the operation. We selected "JSON" for the target of data, as Jira accepts requests in this format. If you need to loop multiple source records, refer to the looping portion of the previous pattern for Both request and response structures.
-
In the Target step, select the option to create a new structure from a sample file. On the next screen, provide the sample request file you saved from validating the API for this type of request, then generate the XSD from that sample file. In our example, we generated the XSD from the
Jira_PUT_EditIssue_Request.jsonsample request we had saved earlier (see Validating a REST API).
-
-
On the transformation mapping screen, you should not see a structure on the source side. On the target side, we'll create a transformation script on each field we want to map to that provides data for each field. In this example, we hard-code the values for the update to add a comment, change the priority, and add a label. For this request, the object ID is provided in the URL, so we are not mapping any keys here. For an example of mapping using variables, refer to the previous pattern for Both request and response structures.
-
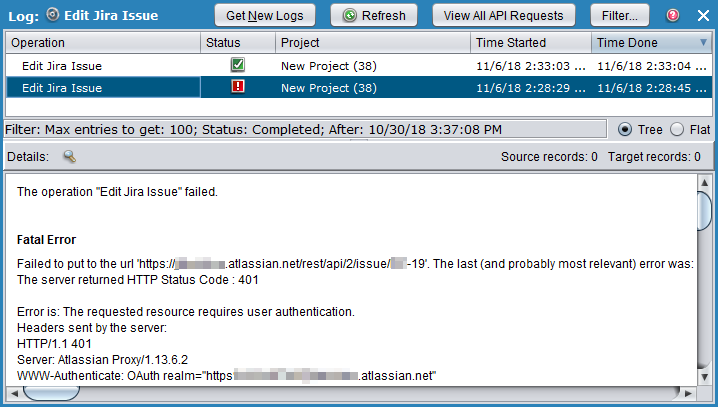
When you're ready, deploy and execute the operation. Double-click on the status icon(s) in the operation monitor to view information about the operation status. If the status code is in the 200 range, Harmony will report that the operation completed successfully. You can also check your endpoint or do another GET to see that the updates have been made.

If there were any other status codes, response headers, or any error messages returned back from the API, they will be reported.
Neither a request nor a response structure
This pattern applies to methods that do not accept any structured input data nor return any structured output data. In such cases, the request is usually specified entirely with the URL and request headers; the response is normally a status code.
In this example of the pattern, we make a request using a DELETE method, where we delete the records that were created and updated in the previous patterns, using the object ID (Jira issue key). To minimize the number of pieces required, this operation is done entirely within a script ("Delete Issue"). While the script in this pattern is included in its own operation, it could also be referenced in a transformation script included in another operation (for example, on a loop node to delete records that meet certain conditions).
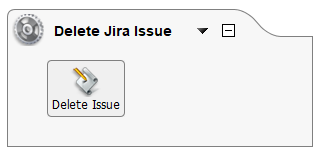
-
Create an HTTP target with the HTTP Verb and URL for the specific API request. Remember to clear the content-type, since no structured data is being sent to the API.
-
Create a script operation with a new Jitterbit Script that provides the record to delete (overriding the project variable value we previously defined) then calls the HTTP target we just created to send the request.
<trans> $jira.issueKey = "TEST-11"; WriteFile("<TAG>Targets/DELETE Jira Issue</TAG>", ""); </trans> -
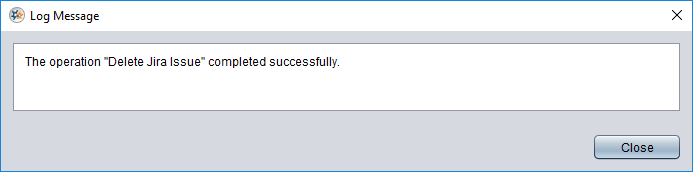
Deploy and execute the operation. Double-click on the status icon(s) in the operation monitor to view information about the operation status. If the operation is not successful, the status code, response headers, and any error messages returned back from the API will be reported in the operation log. You can also verify in your endpoint or confirm if the records have been deleted by doing a GET.