Use NetSuite TBA by calling a RESTlet from a local file source in Jitterbit Design Studio
Introduction
This page describes how to use NetSuite token-based authentication (TBA) by calling a RESTlet from a local file source in Harmony. Prior to configuring TBA in Harmony, see Jitterbit's recommendations for enabling TBA in NetSuite.
To call a RESTlet to authenticate with NetSuite TBA using a local file source, these steps are recommended, as covered on this page:
- Associate the RunCommand plugin
- Install Node.js
- Create the Node.js file
- Call the Node.js file in a script
- Process the RESTlet response
- Troubleshooting
Prerequisites
To use NetSuite TBA by calling a RESTlet from a local file source in Harmony, these criteria must be met:
-
You must have the appropriate permissions role on your NetSuite account.
-
You must be using SuiteTalk version 2015.2 or higher.
-
You must have TBA enabled for your NetSuite account.
Tip
For additional information, refer to the NetSuite documentation on Getting Started with Token-based Authentication (login to NetSuite required).
-
You must be using a Jitterbit private agent (Linux or Windows) and have Node.js and npm installed (covered in the instructions below).
Warning
This method is not available for use with cloud agents, as it requires the use of local files and being able to run a command where the file is located.
Associate the RunCommand plugin
The use of the Runcommand plugin is required in order to execute a Node.js file that will be created later. In order to use this plugin, you must first associate it with your private agent group. This will make the plugin available on all private agents within the private agent group.
To associate the plugin:
- Log in to the Harmony portal and go to the Management Console. Then use the menu in the top left to navigate to Customizations > Plug-ins.
- In the table, locate the row "Jitterbit - Run Command." On the far right, use the Action dropdown to select Associate Agent Group.
- In the popup, select your private agent group and click Save.
Tip
Detailed documentation on associating plugins is available in Customizations > Plug-ins.
Install Node.js
Node.js must be installed in order to run a file that will be created later to call the RESTlet from Harmony. The npm program, which is used to manage Node.js packages, is also required and is usually included with Node.js.
In this step, check whether Node.js and npm are installed on your private agent(s), and if they aren't, install them.
Note
Ubuntu 18.04 is used as an example below, although other supported Linux and Windows systems where your private agent(s) run may also be used.
-
Check to see if Node.js is installed.
$ node -v -
Check to see if npm is installed.
$ npm -v -
If either command does not respond with a version, use these commands to install the application that is needed:
$ sudo apt install nodejs $ sudo apt install npm -
Create a new directory that will be used later as the location of the NetSuite call and response. This can be changed to any desired location and will need to be provided later in your Harmony project.
$ mkdir -p /opt/Jitterbit_projects/TBA_RESTlet/ -
Navigate to the new directory.
$ cd /opt/Jitterbit_projects/TBA_RESTlet/ -
Install these required Node.js packages.
$ npm install request
$ npm install oauth-1.0a@1.0.1
Create the Node.js file
This is the file that you will need to call the RESTlet from Harmony.
In this step, create a new JavaScript outside of Harmony. To create a new file in Ubuntu 18.04, for example, using the name request.js:
$ nano request.js
Inside the new JavaScript, paste the contents provided below:
const request=require('request');
const OAuth=require('oauth-1.0a');
const fs=require('fs');

var args=process.argv;
var outputFile=args[2];

var accountID=args[3];
var token={
  public:args[6],
  secret:args[7]
};

var consumer={
  public:args[8],
  secret:args[9]
};

var restlet_url=args[4];

var oauth=OAuth({
  consumer:consumer,
  signature_method:'HMAC-SHA256',
  hash_function(base_string,key){
  return crypto.createHmac('sha256',key).update(base_string).digest('base64');
  }
});

var request_data={
  url:restlet_url,
  method:args[5],
};

var authorization=oauth.authorize(request_data,token);
var header=oauth.toHeader(authorization);
header.Authorization+=', realm="'+accountID+'"';
header['content-type']='application/json';

request({
  url:request_data.url,
  method:request_data.method,
  headers:header,
  json:{message:"this is the payload"}
},function(error,response,body){
  if(error){
    console.log(error);
  }else{
    console.log(body);
  }
  fs.writeFile(outputFile,body,function(err){
    if(err){return err;}
  });
});
Call the Node.js file in a script
To use the Node.js file created in the previous step, set up a Jitterbit Script that sets TBA variables and calls the Node.js file using the RunCommand plugin.
-
In Design Studio, create a new Jitterbit Script as a project item.
-
Within the script, paste the contents below into the Jitterbit Script. In this example, this script is named
01-Call_Node.js_File.Note
This script uses several project variables that are predefined in the example to set the values needed for TBA and provide the local file location of the Node.js file and RESTlet response. Use these variables or provide values directly as obtained while enabling TBA in NetSuite.
01-Call_Node.js_File<trans> $nsAccountID=$NS_OrgID; $RESTletURL='https://'+$nsAccountID+'.restlets.api.netsuite.com/app/site/hosting/restlet.nl?script=999999&deploy=1'; $httpMethod='GET'; $tokenKey=$NS_tokenKey; $tokenSecret=$NS_tokenSecret; $consumerKey=$NS_consumerKey; $consumerSecret=$NS_consumerSecret; $nodeRESTletFile=$NS_RESTlet_Node_File; $nodeResponseFile=$NS_RESTlet_Node_Response; $Command='node'; $Arguments=$nodeRESTletFile // arg[1] +" "+$nodeResponseFile // arg[2] +" "+$nsAccountID // arg[3] +" "+$RESTletURL // arg[4] +" "+$httpMethod // arg[5] +" "+$tokenKey // arg[6] +" "+$tokenSecret // arg[7] +" "+$consumerKey // arg[8] +" "+$consumerSecret; // arg[9] $response=RunPlugin("<TAG>plugin:http://www.jitterbit.com/plugins/pipeline/user/RunCommand</TAG>"); if($response==1, WriteToOperationLog('success'); RunOperation("<TAG>Operations/NS_Node_RESTlet_TBA/02-Process_RESTlet_Response</TAG>",true); ); </trans> -
Create a script operation and place the Jitterbit Script within it. In this example, the operation is called
01-Call_Node.js_File. -
To verify that you have successfully connected to NetSuite, test the operation to ensure you receive something back from the RESTlet.
Process the RESTlet response
Now that the call to NetSuite is set up, you can then proceed with setting up the rest of your project using the response you receive back from the call.
-
Create a local file source with the location on your private agent where you specified for the response to be written.
-
Create a transformation operation that uses the local file source you just created containing the response from NetSuite. In this example, the operation is called
02-Process_RESTlet_Response. The operation setup should look similar to that below.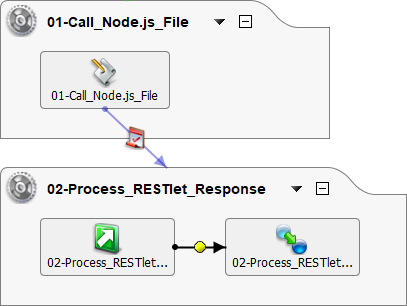
-
In the transformation, you can then use the NetSuite response however you would like, completing the mapping as usual.
Troubleshooting
If the Node.js call does not appear to be working from Harmony, or if the files are not writing on the agent, you may need to adjust the permissions of the folder with the NetSuite call and response. A simple test is to provide full access to everyone, and test the operation again. If that solves the problem you will need to adjust the directory permissions to allow the Jitterbit user/group access to read and write in the created folder.
If the RunCommand plugin returns errors, ensure that you have filled in all of the project variables with the necessary NetSuite information.