Flat to hierarchical structures in Jitterbit Design Studio
Multiple mapping
The concept of multiple mapping is the idea that you need to map a single, flat structure to a structure that is hierarchical in nature, with lower segments containing multiple sets of values, such as name/value pairs. In this circumstance, copies of a particular folder may occur many times, each folder copy must be mapped with appropriate rules.
A sample situation is provided below to illustrate how to achieve flat-to-hierarchical transformations.
Sample situation
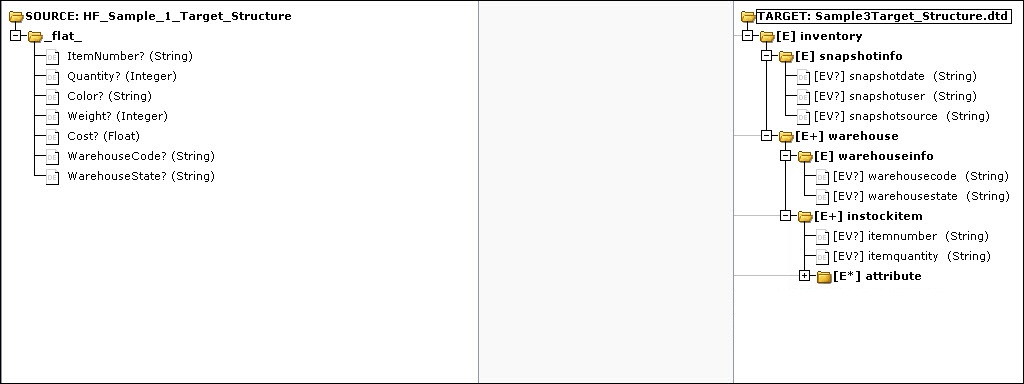
Consider the situation where the source of data is a flat (de-normalized) data structure, and the target definition is hierarchical in nature. In the following example, the source data is depicted in a structure that is de-normalized, such as a flat file.
Document structures and data
-
Source Document Structure refers to the source document. It is a text file.
-
Source Document Data is the file that contains sample data that mirrors the DTD file's structure.
-
Target Document Structure is the data structure of the target document. It is hierarchical in nature, with at least one header row and multiple detail rows that are assigned to the header row.
-
Target Output is the desired end result of this transformation and is output into a specific format.
Mapping to single folders
The first set of mappings is for items that are the same for each record (keep in mind that there may be multiple records created at the target).
-
Map each of these source entries to its respective target:
Source Target ItemNumber inventory.warehouse.instockitem.itemnumber Quantity inventory.warehouse.instockitem.itemquantity WarehouseCode inventory.warehouse.warehouseinfo.warehousecode WarehouseState inventory.warehouse.warehouseinfo.warehousestate -
Once you've mapped these four elements, compare your work to the figure below:

Add extra folders
The remaining source data elements (Color, Weight, and Cost) will each require their own "copy" of the target folder.
-
Select the name of the folder you want to duplicate (in this case, instockitem).
-
Click on the multiple folders icon
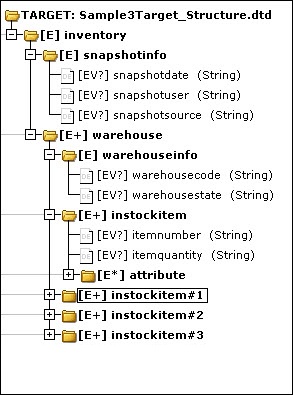
 to display the Mapping Options dialog. Since you have three data elements you want to map separately, select the Create additional folders radio button and enter the number 3:
-
Click OK to dismiss the dialog.
You will now have three additional copies of the instockitem folder, indicated by the #1, #2, and #3 at the end of their folder names:

Map source to new target data elements
Now you need to map your source data elements to these new target folders.
- Select Color in the Source pane.
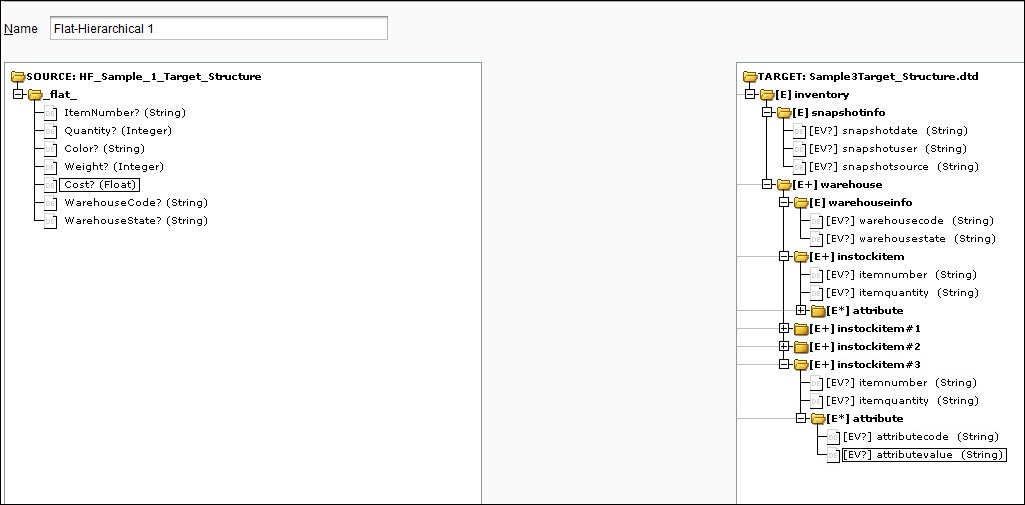
- Toggle open instockitem#1 , then Open the attribute folder, and finally Select the attributevalue folder's value data element ( [V] )
- Click the Map button to map this relationship.
Repeat these steps for the source Weight and Cost data elements, mapping them to the instockitem#2's and instockitem#3's respective attributevalues [V]. Compare your work to the figure below.


Define associated attribute codes
Each of the data elements you mapped to the multiple occurrences of the folders needs to have its corresponding attributecode data element defined correctly:
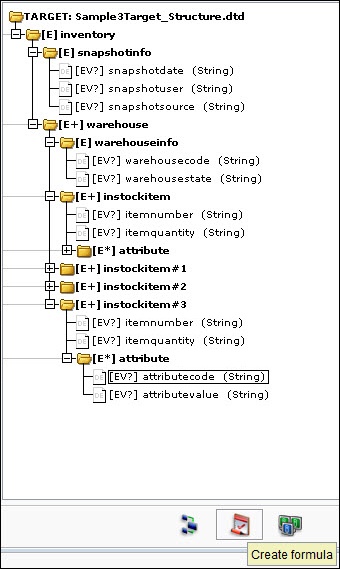
- Select the attributecode folder's value data element ([V]) in attributecode's attribute folder within instockitem#1.
-
Click the Formula button to launch the Formula Builder.

-
Type in the appropriate Value for the field in the expression field at the top of the window. In this example, enter COLOR (but don't use any quotes).
- This simple code is all this data element requires, so click OK to dismiss it
- Repeat these steps for the other two folders that were created, so that each of the attribute fields in the source is mapped to their appropriate values (WEIGHT and COST) in the target.
Note
Make sure you use all capitals, as the XML target could be case-sensitive.
You've completed your Transformation mapping. To test it, create an operation that references the appropriate source, target, and this transformation that you just made.