Web service response to database in Jitterbit Design Studio
Create a new transformation
-
Make sure you have opened the appropriate project in which you want to create the new transformation.
-
There are several ways you can start to create a new transformation:
-
If you are working in an operation, you can click the control button to the right of the Transformation field and select Create New; OR
-
Select New in the File menu, then choose New Transformation from the sub-menu; OR
-
Click the down arrow next to the file icon in the toolbar, then choose New Transformation from the sub-menu; OR
-
Right-click on Transformations in the hierarchical tree in the Design tab in the left pane of the screen, then choose New Transformation from the pop-up menu.
-
-
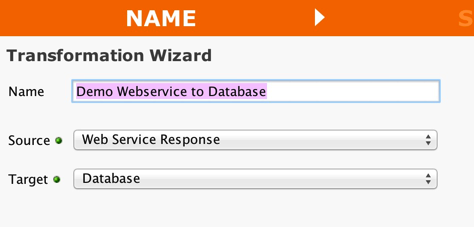
The transformation wizard appears in its own New Transformation tab in the right pane of the window.
Specify source and target types

-
Enter an appropriate name for your new transformation in the Transformation Name field.
-
Select Web Service Response from the Source drop-down list and Database from the Target drop-down list.
-
Click the Next button in the toolbar to continue.
Select web service source information
-
In the next screen of the Transformation Wizard, select the name of the Web Service Call that you want to use from the Web Service Definition drop-down list, or click the control button to the right of the field to create a new Web service call.
-
Click the Next button in the toolbar to continue.
Select database target information
-
Select the name of the data target that you defined as your Target Definition from the Database Target drop-down menu, or click the control button to the right of the field to create a new target database.
-
Click the Next button in the toolbar to continue.
-
The next steps you follow depend upon whether you want to use only a single table in your target database, or whether you need to access more than one database table. Select how you will write information to your target database:
-
Only a single table in the target database will be accessed
-
More than one table in the target database will be accessed
-
What's next?
Once you have completed defining your database target, a tree data structure should appear in the target transformation tree to depict what you have defined.
In mapping to your database target, if you have a multi-table target with parent child relationships and you are inserting data, you should become familiar with using the transformation functions <SQLIDENTITY> and <SEQUENCE>.
-
<SQLIDENTITY>is used for all target databases that support identity or automatic number generating keys. Once the parent is inserted then the child can inherit the generated number from the parent by mapping this function to the foreign key in the child table. -
<SEQUENCE>performs a similar action and should be used for Oracle.
Now that you have defined the nature of the source and your desired target, you are ready to map the relationship between your source and target at the field, or element, level.