Vinyl Upgrade Guide
Overview
This is the instruction guide for upgrading an existing installation of Vinyl from 3.2+ to 3.3. If you are installing Vinyl for the first time, please refer to the installation instructions for your Vinyl version and server system. If you are upgrading from an earlier version of Vinyl, there are significant upgrade instructions. Please refer to the Vinyl 3.2 Upgrade Guide and upgrade to Vinyl 3.2 first.
This guide assumes that the root directory for the currently installed version of Vinyl is C:\inetpub\wwwroot\Vinyl and that the system already has the prerequisite software and framework installed and configured.
Prerequisites
-
.NET Prerequisites:
-
.NET 6.0 is required for Vinyl 3.3+. This prerequisite should be checked if you are upgrading from Vinyl 3.2 or earlier.
-
To check if .NET 6.0 is installed:
-
Open a command prompt and run:
dotnet --list-runtimes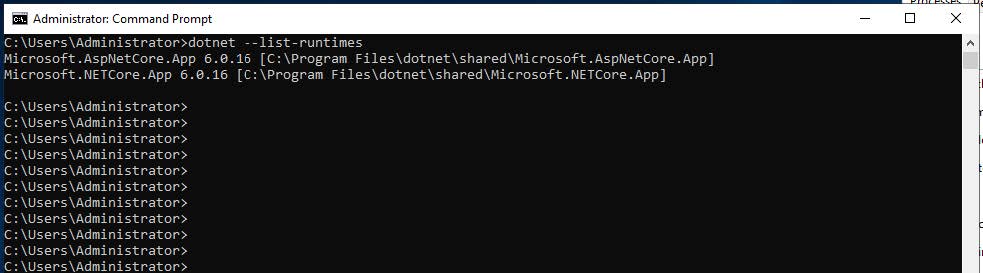
-
If "dotnet" is not a recognized command or you do not see a runtime beginning with "6.0", download the .NET 6 Runtime bundle from this url:
https://dotnet.microsoft.com/en-us/download/dotnet/6.0
-
-
-
Crystal Reports Prerequisites:
-
Vinyl requires Crystal Reports runtime installed on the app server
-
Crystal Reports SP21 is the minimum for Vinyl 3.3, and SP21-SP32 are supported
-
Enable Crystal Reports
On Windows systems, Vinyl supports Crystal Reports. Crystal Reports is hosted out-of-process in a COM server. Follow these steps to register the Crystal Reports COM server.
-
Launch Windows PowerShell as an administrator.
-
Switch to the Scripts directory beneath the Vinyl installation directory.
-
Run the RegisterCrystalReports.ps1 script.
Upgrade Instructions
Preparing for Upgrade
-
Make a note of the current Vinyl version you are running, in case you need to restore to this version.
-
Stop IIS. You can do this by entering the IIS Manager, selecting the appropriate web server, and clicking the Stop button at the top right of the Actions pane.
-
Backup your database(s) in case you need to recover them later.
Deploying New Software
-
Download the archive (
Vinyl-3.3.xxxxx.zip). -
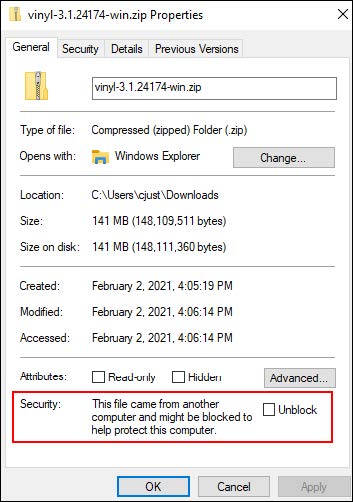
After moving the file to the web server, ensure that the "mark of the web" (MOTW) is removed from the zip file, by right clicking on the file and checking properties and selecting "Unblock" if necessary.
-
Move the contents of your previous Vinyl root directory to a backup folder.
-
Extract the new archive to a temporary directory (e.g.
C:\Vinyl-3.3.xxxxx) -
Copy the entire contents of the temporary directory to the Vinyl application root directory (e.g.
C:\inetpub\wwwroot\Vinyl). -
Copy the Connection.xml file from your backup directory into the Vinyl directory.
-
If you have any customizations in appsettings.json file, copy these over from the backup folder into the Vinyl directory.
-
Copy the Keys directory from your backup into the new folder as well.
-
Delete the temporary directory you created.
Configuration
-
Open the IIS Manager.
-
Expand the Vinyl folder.
-
Right click the data folder and choose the Edit Permissions... option.
-
Select the Security tab.
-
Click the Edit button to launch the Permissions for data dialog box.
-
Click the Add... button to launch the Select Users or Groups dialog box.
-
Provide the name
IIS AppPool\Vinylin the bottom field. -
Check Allow Full Control in the Permissions field, then click the OK button to close the Permissions for data dialog box.
-
Click the OK button to close the data Properties dialog box.
-
Repeat steps 3-9 for the logs and keys directories as well.
-
Restart IIS by selecting the server and clicking the Start button in the Actions pane.
Suggested Test Sequence
-
Launch your web browser.
-
Navigate to
http://localhost/Vinyl/. -
Vinyl will automatically update the database(s). The system will begin responding normally once the upgrade is complete.
Note
An upgrade that takes 5 minutes is normal; larger upgrades might take longer, and smaller upgrades might run faster.