Get started with Jitterbit Harmony
Overview
Harmony is Jitterbit's enterprise integration platform-as-a-service (iPaaS). Use it to integrate systems, expose those integrations as APIs, build custom web and mobile apps, and process EDI (electronic data interchange) transactions.
To get started, follow these steps:
-
Learn more about Harmony applications and components.
-
Register a Harmony account.
-
Log in to the Harmony portal at https://login.jitterbit.com and start using Harmony applications.
-
(Optional) Administer your organization: configure organization settings, install privately hosted infrastructure, configure environments, and invite team members.
Applications and components
Harmony applications provide the frontend design interface, while their platform components do the backend work to execute those designs at runtime. Communication between Harmony applications and the Harmony platform takes place via Harmony microservices.
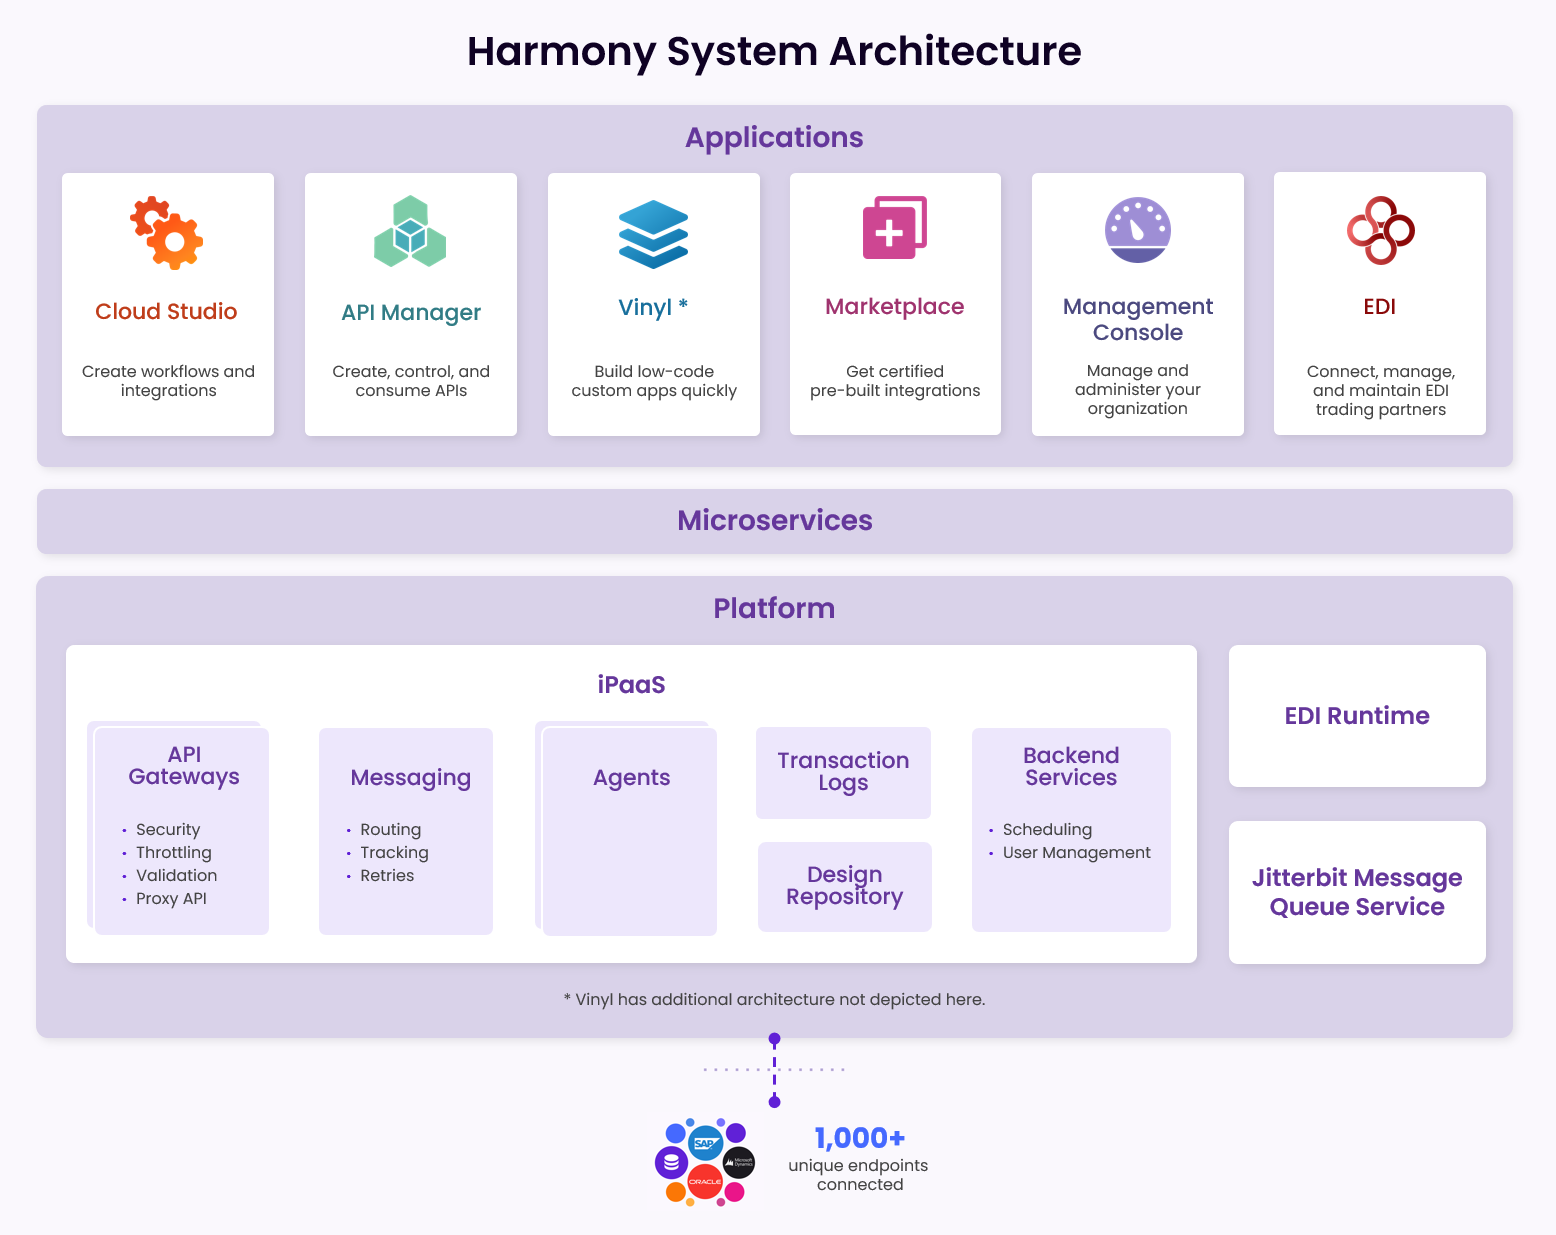
Jitterbit's web-based Harmony applications are accessible through the Harmony portal. You can use the latest versions of Google Chrome, Microsoft Edge (Windows only), Mozilla Firefox, or Apple Safari (macOS only) browsers to access them.
To communicate with the Harmony cloud platform, JavaScript must be enabled, and the HTTPS outbound port (443) must be open. (This is normally allowed by corporate server firewalls.)
The Security and architecture white paper has more details on system components.
Register a Harmony account
You'll need a Harmony account to interact with a Harmony organization through the Harmony cloud. There are three ways to get one:
-
Be invited by another Harmony user. Use the link provided within your welcome email to register your account.
-
Be invited by another Harmony user in an organization using single sign-on. You will already be registered through your Identity Provider.
-
Request a free trial at jitterbit.com/harmony/trial. A Jitterbit sales representative will send you a welcome email with further instructions after approving your request. Use the link provided in that welcome email to complete the registration process.
Tip
If someone in your company converts a trial to a full subscription, you should move your projects to it before your trial expires (see Cloud Studio Project exports and imports, Design Studio Export as a Jitterpak, and API Manager Export and import APIs).
Log in to the Harmony portal
Log in to the Harmony portal at https://login.jitterbit.com using your Harmony account credentials.
Once logged in, your currently selected Harmony organization is shown in the top right. You can use the menu to switch between organizations:
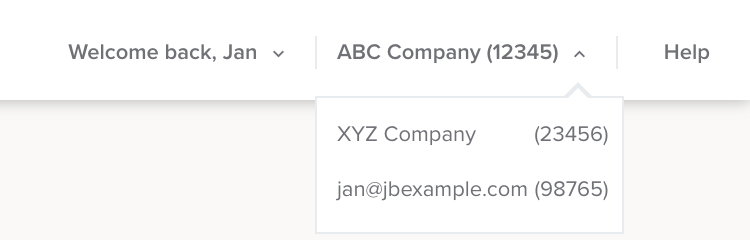
Note
By default, Harmony accounts are provisioned with a personal Data Loader organization whose name is the email address associated with your Harmony account. For Harmony subscribers, this Data Loader organization isn't relevant and shouldn't be used.
Administer your organization
Harmony organization administrators are users with a role having the Admin permission. Administrators can change an organization's configuration.
To get your organization ready for users, you can do any of the following:
- Configure organization settings.
- Install privately hosted infrastructure.
- Configure environments.
- Invite team members.
Configure organization settings
You can define and manage organization policies and security settings from the Management Console Organizations page:
- In the Harmony portal, go to Management Console > Organizations.
- Select an organization in the table, or hover on one and click Organization Policies.
- Review and configure the available settings, including password requirements, two-factor authentication, single sign-on, and other security details. Each option is described at Edit organization policies.
Install and configure privately hosted infrastructure
If you don't want to use Jitterbit's cloud agents, you can host your own private agents within your corporate firewall or virtual private cloud. (You can also host a private API gateway instead of using Jitterbit's cloud API gateway to process API traffic, but this is less common.)
If you choose to host components privately, these additional system requirements apply:
You may also need to add certain Jitterbit IP addresses to your firewall's allowlist.
To use private agents, create an agent group, then add and install agents in it:
Create an agent group
- In the Harmony portal, go to Management Console > Agents > Agent Groups.
- In the top right of the page, click New Agent Group.
- Complete the configuration of the agent group. Each option is described at Add agent groups.
- The newly created agent group is now listed in the table.
Add agents
- In the Harmony portal, go to Management Console > Agents > Agents.
- In the top right of the page, click New Agent.
- Complete the configuration of the agent by providing a name and selecting the newly created agent group. Then click Save.
- The newly added agent is now listed in the table with a status of Unregistered. The agent will not be available for runtime processing until you install the agent software and associate the agent group to an environment.
Install agents
- In the Harmony portal, go to Downloads.
- Download the version of the agent for your system. (See Downloads.)
-
Follow the instructions for your operating system:
- Windows: Windows private agent (most common) or Windows quiet private agent.
- Linux: Debian private agent, RPM private agent, or Linux-based Docker private agent.
-
Once an agent is installed and running, its status in the Management Console > Agents > Agents page will be Running. The agents will not be available for runtime processing until you associate the agent group to an environment.
- To use a highly available and load-balanced agent group, repeat the agent installation process for all agents in the agent group.
Configure environments
Most Harmony applications use environments to keep projects or APIs separate. New Harmony organizations automatically get an environment called Default Environment that is associated with Jitterbit's Production Cloud Agent Group.
If you are using private agents, you can change the agent group associated with the default environment to your newly created private agent group.
You can also configure additional environments, such as Development, Test, or Production, according to your software development lifecycles and practices.
You can create and edit environments on the Management Console Environments page.
Change agent groups
- In the Harmony portal, go to Management Console > Environments.
- On the far right of an existing environment row, use the Action menu to select Associate Group.
- Select the appropriate agent group and click Save.
Add an environment
- In the Harmony portal, go to Management Console > Environments.
- In the top right of the page, click Add New Environment.
- Complete the configuration of the environment. Each option is described in Add environments.
Invite team members
Before a user can collaborate in your organization, they must be a member of a role that has permissions assigned at the organization level. To access and perform actions in a given environment, that role must also be granted access at the environment level:
-
In the Harmony portal, go to Management Console > User Management.
The page has these tabs:
-
Harmony Users: Users who have accepted invitations to join an organization. Access to Harmony is defined by the roles they are assigned, the permissions each role grants, and the access levels those roles have in different environments.
-
External Users: Users who have accepted invitations to access the API portal. External users don't have roles.
-
Roles: A role defines a set of permissions that a role member has. The permissions grant access to different applications within the organization, and let the member perform certain actions within them. A user can be a member of one or more roles.
-
-
Select your organization in the top part of the page, then select the Harmony Users tab.
-
Click Add Harmony user or Add user. A new row appears in the table.
-
Enter the email address of the Harmony user. If the organization has SSO enabled, the email address must match that used with the SSO identity provider.
-
Click the Roles menu to open it, then select one or more roles.
-
Click Send invitation to send an email to the user.
-
-
The invited user receives an email with further instructions. Use the Harmony Users tab to check the status of members of your organization.
-
To give organization members access to an environment, you must also define role access for the environment. To do this, follow these steps:
-
Use the menu to go to Management Console > Environments.
-
Select your environment in the table. The Role Access panel opens at the bottom of the page.
-
For each role, the access levels for the environment are shown. Each access level can be enabled or disabled.
-
Next steps
To start designing an integration project, see the Cloud Studio quick start guide.