Configure Harmony SSO with OAuth 2.0
Introduction
OAuth 2.0 is one of two supported protocols for Harmony single sign-on (SSO). (SAML 2.0 is the other Jitterbit-supported protocol.) This page describes how to configure OAuth 2.0 in the Management Console.
OAuth 2.0 Configuration
Before following the instructions below, refer to Configure SSO in the Management Console for requirements and additional information for configuring Harmony SSO.
To configure OAuth 2.0 for a Harmony SSO identity provider, from the Organizations page, use the organization's Action menu dropdown to select Edit Organization Policies.
In the Edit Organization Policies dialog, use the Enable SSO dropdown to select OAuth 2.0.
The user interface for the Edit Organization SSO Provider Info dialog for OAuth 2.0 depends on the selected OAuth Provider:
Autodesk, Google, or Salesforce OAuth Providers
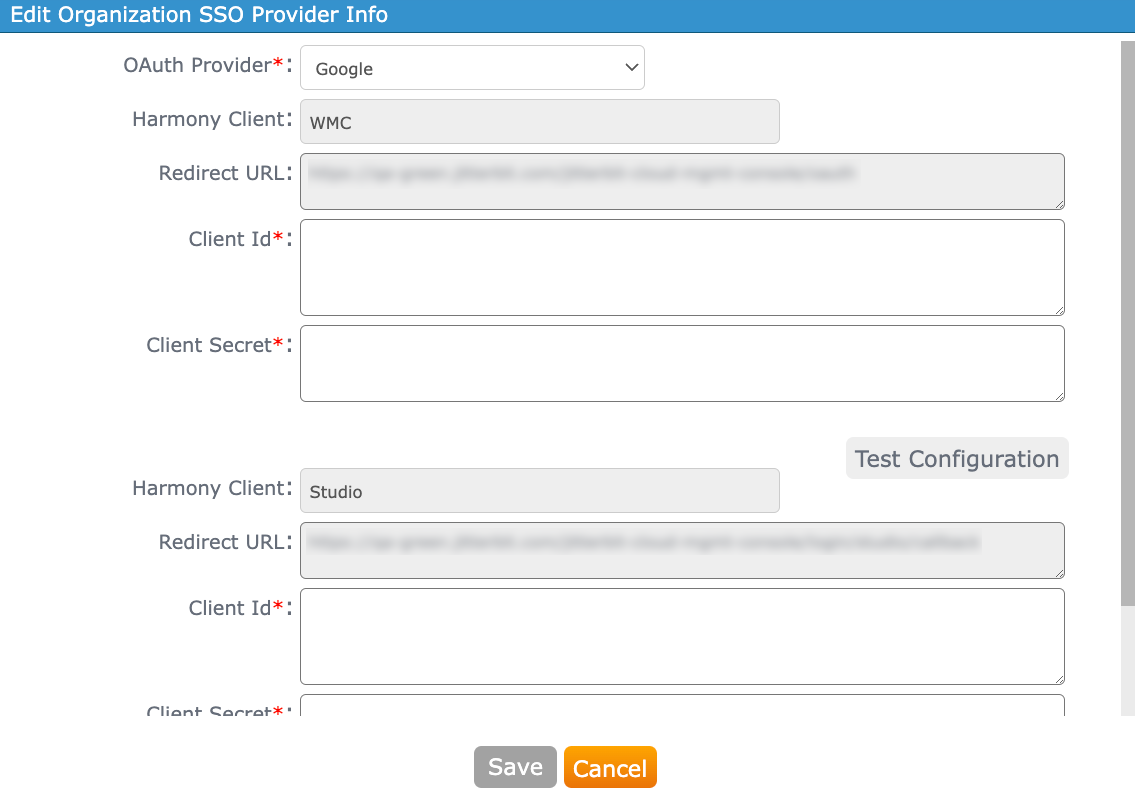
If Autodesk, Google, or Salesforce is selected as the OAuth Provider, this interface is presented:
-
OAuth Provider: Use the menu to select Autodesk, Google, or Salesforce as the OAuth 2.0 identity provider.
-
Harmony Client: Jitterbit supports SSO for two Harmony clients: WMC and Studio. These two clients are provided by default in the configuration and cannot be edited.
-
WMC: This Harmony client is for the Harmony Portal and its applications.
Note
Although the user interface refers to WMC (the former name for the Management Console), the WMC Harmony client configuration applies to all of the web-based products accessible via the Harmony Portal.
-
Studio: This Harmony client is for Design Studio. An app for this client must be created, even if you do not intend to use Design Studio.
Warning
Both WMC and Studio must be configured for SSO when SSO is enabled. If either client is configured improperly, you will not be able to test the configuration successfully and save the SSO settings.
-
-
Redirect URL: The URL associated with the Harmony client is provided by default for each Harmony client and cannot be edited.
-
Client ID: Enter the client ID obtained from the identity provider. Refer to instructions for obtaining the client ID for Autodesk, Google, or Salesforce.
-
Client Secret: Enter the client secret obtained from the identity provider. Refer to instructions for obtaining the client secret for Autodesk, Google, or Salesforce.
-
Test Configuration: After configuring the Client ID and Client Secret for each Harmony client, click its Test Configuration button. On clicking this button, a new browser tab opens, displaying the native login interface for the identity provider. Enter or verify your credentials for the identity provider, and accept any prompts to allow access to the Harmony client.
-
If SSO is configured properly, you will be redirected to the Management Console with a message indicating success.
-
If SSO is not configured properly, you will be redirected to the Management Console with an error message providing more information about the specific error.
Caution
Be careful about how many times you test configuration within a given timeframe. Continuous or excessive unsuccessful test attempts may lock access to your identity provider account.
-
-
Save: This button is disabled until Test Configuration is performed successfully for both Harmony clients. Once enabled, click to save the configured SSO settings. After you have configured and saved an OAuth 2.0 configuration, the newly configured SSO policies will take effect on next user log in.
-
Cancel: Click to close without saving.
BMC OAuth Provider
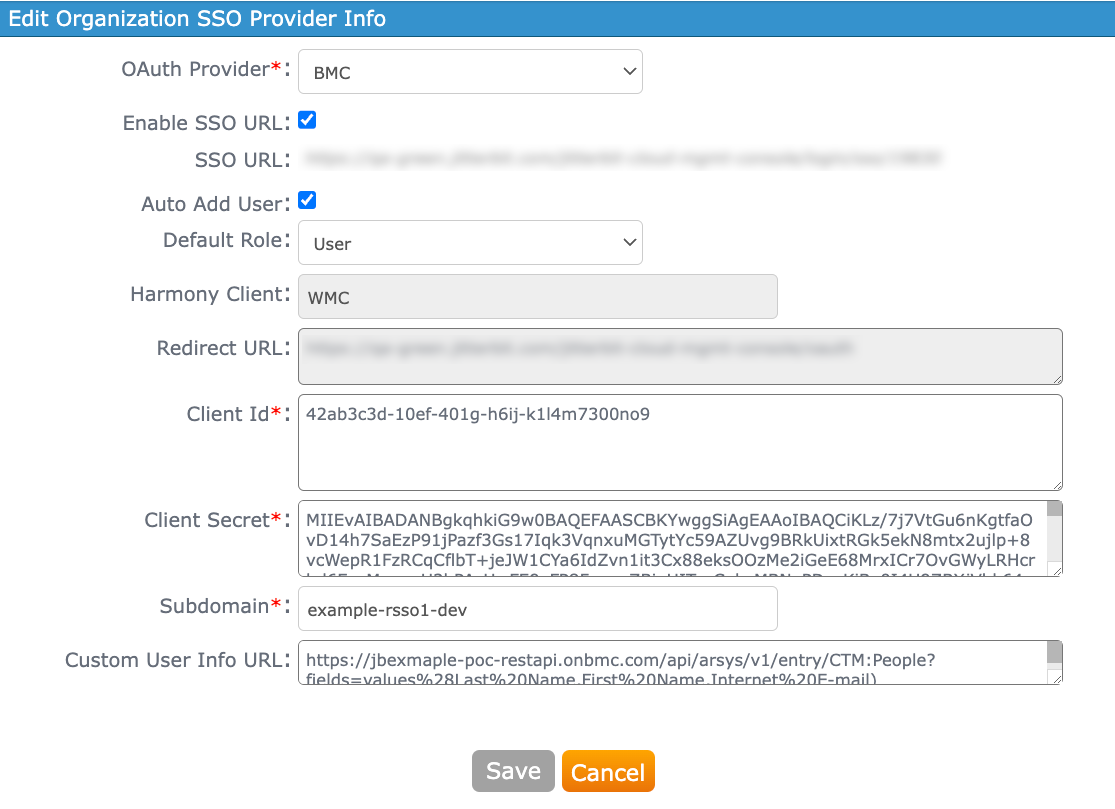
If BMC is selected as the OAuth Provider, this interface is presented:
-
OAuth Provider: Use the menu to select BMC (proprietary to BMC customers only) as the OAuth 2.0 identity provider.
-
Enable SSO URL: When selected, the fields SSO URL and Auto Add User are displayed:
-
SSO URL: Displays an organization-specific URL that is used to identify the organization in BMC Helix iPaaS. This link is used in the BMC Helix Platform as a tile for BMC Helix iPaaS or as a clickable link.
-
Auto Add User: Select to automatically add users to the organization if they are not an existing member in the organization. When selected, the field Default Role is displayed:
- Default Role: Use the menu to select the default role for users that are automatically added to the organization (required when Auto Add User is selected).
-
-
Harmony Client: The WMC client is provided by default in the configuration and cannot be edited.
-
WMC: This Harmony client is for the Harmony Portal and its applications.
Note
Although the user interface refers to WMC (the former name for the Management Console), the WMC Harmony client configuration applies to all of the web-based products accessible via the Harmony Portal.
-
-
Redirect URL: The URL associated with the Harmony client is provided by default for each Harmony client and cannot be edited.
-
Client ID: Enter the BMC client ID.
-
Client Secret: Enter the BMC client secret.
-
Subdomain: Enter the BMC customer's subdomain to identify the tenant.
-
Custom User Info URL: Enter the URL to be used to verify the BMC customer's email address. The provided URL must be a GET request and should also be using the same token received from the OAuth token endpoint.
-
Test Configuration: After configuring the Client ID and Client Secret for the Harmony client, click its Test Configuration button. On clicking this button, a new browser tab opens, displaying the native login interface for BMC. Enter or verify your credentials, and accept any prompts to allow access to the Harmony client.
-
If SSO is configured properly, you will be redirected to the Management Console with a message indicating success.
-
If SSO is not configured properly, you will be redirected to the Management Console with an error message providing more information about the specific error.
Caution
Be careful about how many times you test configuration within a given timeframe. Continuous or excessive unsuccessful test attempts may lock access to your identity provider account.
-
-
Save: This button is disabled until Test Configuration is performed successfully. Once enabled, click to save the configured SSO settings. After you have configured and saved an OAuth 2.0 configuration, the newly configured SSO policies will take effect on next user log in.
-
Cancel: Click to close without saving.