Salesforce OAuth 2.0
Introduction
Harmony supports single sign-on (SSO) with Salesforce using OAuth 2.0. This page shows how to set up and test Harmony SSO with Salesforce by following these steps:
- Enable Salesforce as an Identity Provider
Configure the Salesforce instance as an identity provider. - Create Connected Apps in Salesforce
Configure each Harmony client as a Connected App in Salesforce and obtain the Salesforce Consumer Keys (Client IDs) and Salesforce Consumer Secrets (Client Secrets) that you will need to use as input for configuring SSO in Harmony. - Configure SSO in Harmony
Configure and test Salesforce as the SSO provider in the Harmony Portal. You will need to use the Salesforce Consumer Keys (Client IDs) and Salesforce Consumer Secrets (Client Secrets) obtained in the previous step.
After SSO is configured in both Salesforce and Harmony, members of your Harmony organization will be able to use their Salesforce credentials to log in to Harmony.
For additional information, see the Salesforce documentation Enable Salesforce as an Identity Provider and Authorize Apps with OAuth.
1. Enable Salesforce as an Identity Provider
Follow these steps to enable Salesforce as an identity provider in the Salesforce Classic UI:
-
Log in to the Salesforce instance as a Salesforce Admin.
Caution
In order to set up Harmony SSO, your Salesforce username must match your Harmony email address. This applies to the members of your Harmony organization as well, unless they are configured to bypass SSO and instead use their Harmony credentials (see Configure SSO in the Management Console).
-
In the Salesforce Classic UI, navigate to Setup > Administer > Security Controls > Identity Provider.
-
In the section Identity Provider Setup, verify that you have a domain name configured and that Salesforce is enabled as an identity provider:
-
If you do not have a domain configured, click the link to Configure a Domain Name and follow the steps to set up a domain and deploy it to users. This automatically enables Salesforce as an identity provider.
-
If you have a domain configured but disabled as an identity provider, click the button Enable Identity Provider.
Tip
After making changes in Identity Provider Setup, you may need to refresh the page.
-
2. Create Connected Apps in Salesforce
Follow these steps to configure each Harmony client as a Connected App within Salesforce and obtain the Salesforce Consumer Key (Client ID) and Salesforce Consumer Secret (Client Secret):
-
If you are continuing from Enable Salesforce as an Identity Provider, on the same screen, in the section Service Providers, click the link to create via Connected Apps. Otherwise, navigate to Setup > Build > Create > Apps and click New under the Connected Apps section.
-
You need to create a Connected App for each of these Harmony clients:
-
WMC: This Harmony client is for the Harmony Portal and its applications.
Note
Although the user interface refers to WMC (the former name for the Management Console), the WMC Harmony client configuration applies to all of the web-based products accessible via the Harmony Portal.
-
Studio: This Harmony client is for Design Studio. An app for this client must be created, even if you do not intend to use Design Studio.
For each Connected App:
-
Under Basic Information, provide a Connected App Name (for example, Harmony Portal or Design Studio) and populate other required fields.
-
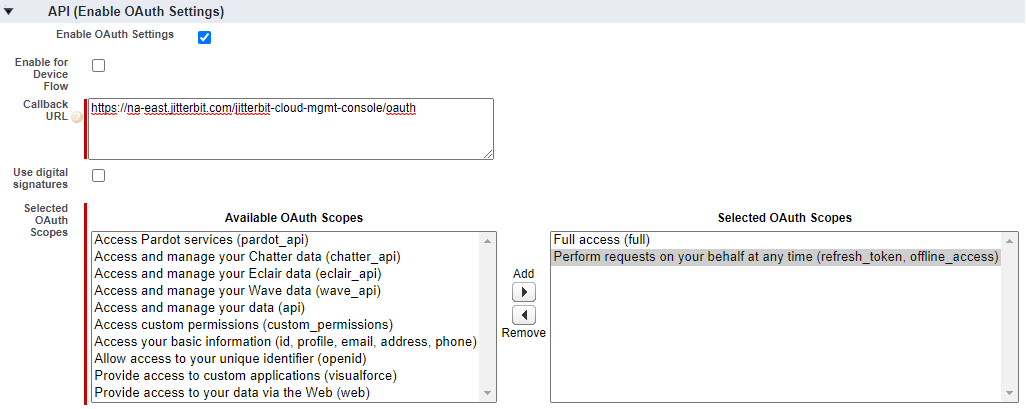
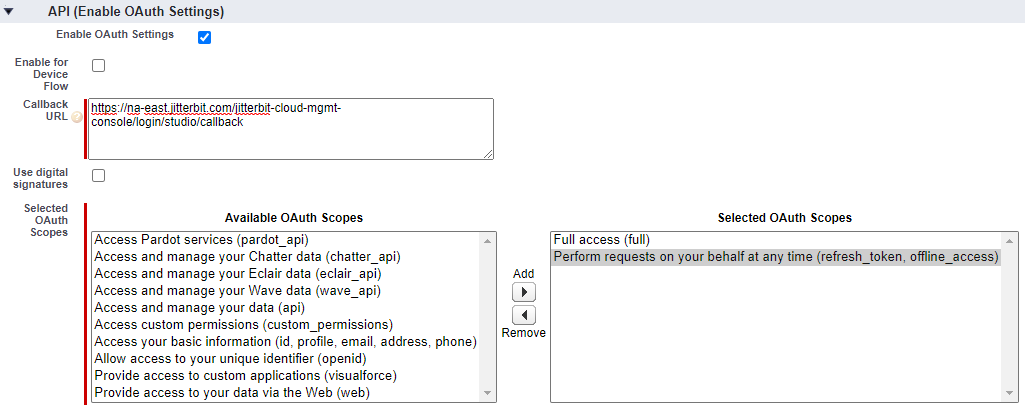
Under API (Enable OAuth Settings), select Enable OAuth Settings. This enables the additional fields Callback URL and Selected OAuth Scopes:
- Callback URL: Enter the URL appropriate for your Harmony region (see Finding My Region):
- WMC:
- NA:
https://na-east.jitterbit.com/jitterbit-cloud-mgmt-console/oauth - EMEA:
https://emea-west.jitterbit.com/jitterbit-cloud-mgmt-console/oauth - APAC:
https://apac-southeast.jitterbit.com/jitterbit-cloud-mgmt-console/oauth
- NA:
- Studio:
- NA:
https://na-east.jitterbit.com/jitterbit-cloud-mgmt-console/login/studio/callback - EMEA:
https://emea-west.jitterbit.com/jitterbit-cloud-mgmt-console/login/studio/callback - APAC:
https://apac-southeast.jitterbit.com/jitterbit-cloud-mgmt-console/login/studio/callback
- NA:
- WMC:
- Selected OAuth Scopes: Select these OAuth scopes by moving them to Selected OAuth Scopes:
- Callback URL: Enter the URL appropriate for your Harmony region (see Finding My Region):
- Full access (full)
- Perform requests on your behalf at any time (refresh_token, offline_access)
WMC: API (Enable OAuth Settings)
Studio: API (Enable OAuth Settings)
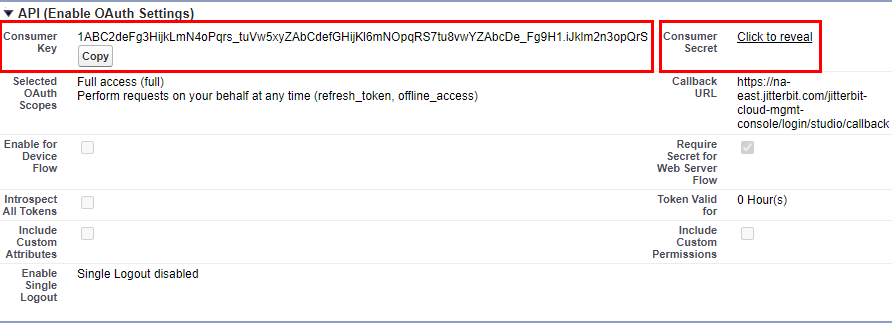
On clicking Save for each Connected App, the Consumer Key and Consumer Secret are displayed under API (Enable OAuth Settings). Retain these for later use, as they will be required when configuring SSO in Harmony.
-
3. Configure SSO in Harmony
Follow the instructions for Configure SSO in the Management Console. When entering information into the Edit Organization SSO Provider Info screen, use the values obtained above for each Harmony client:
- Client ID: Paste the Salesforce Consumer Key.
- Client Secret: Paste the Salesforce Consumer Secret.
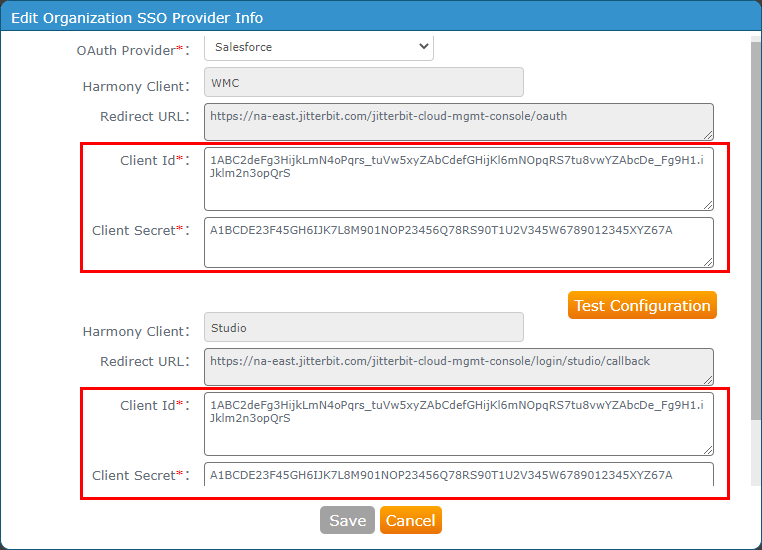
Click Test Configuration for each Harmony client and then click Save. Both clients need to be successfully tested before the Save button becomes enabled.