Salesforce SAML 2.0
Introduction
Harmony supports single sign-on (SSO) with Salesforce using SAML 2.0. This page shows how to set up and test Harmony SSO with Salesforce by following these steps:
- Enable Salesforce as an Identity Provider and Downloading Metadata
Configure the Salesforce instance as an identity provider and obtain the identity provider metadata that you will need to use as input for configuring SSO in Harmony. - Set Up Connected Apps in Salesforce
Configure each Harmony client as a Connected App within Salesforce. - Assign Profiles to the Salesforce Connected Apps
Assign profiles to the Salesforce Connected Apps so that users have the appropriate permissions. - Construct the Service Provider Metadata
Construct the service provider metadata you will need to use as input for configuring SSO in Harmony. - Configure SSO in Harmony
Configure and test Salesforce as the SSO provider in the Harmony Portal. You will need to use the identity provider metadata and service provider metadata obtained in the previous steps.
After SSO is configured in both Salesforce and Harmony, members of your Harmony organization will be able to use their Salesforce credentials to log in to Harmony.
For additional information, see the Salesforce documentation Enable Salesforce as an Identity Provider and Define Service Providers as SAML-Enabled Connected Apps.
Demonstration
SAML and Callback URLs
During configuration, the SAML and callback URLs referenced throughout this page should be replaced with the URL values appropriate for your region (see Finding My Region).
SAML URLs
- NA:
https://na-east.jitterbit.com/jitterbit-cloud-mgmt-console/saml - EMEA:
https://emea-west.jitterbit.com/jitterbit-cloud-mgmt-console/saml - APAC:
https://apac-southeast.jitterbit.com/jitterbit-cloud-mgmt-console/saml
Callback URLs
- NA:
https://na-east.jitterbit.com/jitterbit-cloud-mgmt-console/login/studio/callback - EMEA:
https://emea-west.jitterbit.com/jitterbit-cloud-mgmt-console/login/studio/callback - APAC:
https://apac-southeast.jitterbit.com/jitterbit-cloud-mgmt-console/login/studio/callback
1. Enable Salesforce as an Identity Provider and Download Metadata
Follow these steps to enable Salesforce as an identity provider and download the identity provider metadata in the Salesforce Classic UI:
-
Log in to the Salesforce instance as a Salesforce Admin.
Caution
In order to set up Harmony SSO, your Salesforce username must match your Harmony email address. This applies to the members of your Harmony organization as well, unless they are configured to bypass SSO and instead use their Harmony credentials (see Configuring SSO in the Management Console).
-
In the Salesforce Classic UI, navigate to Setup > Administer > Security Controls > Identity Provider.
-
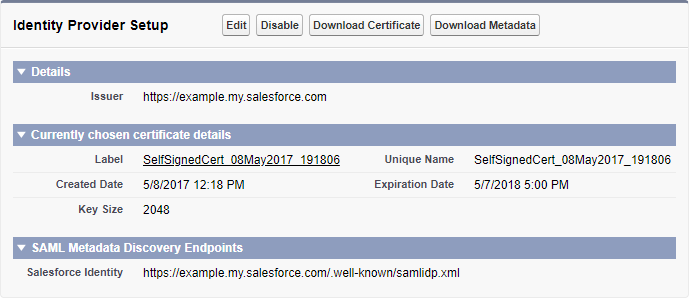
In the section Identity Provider Setup, click the button Download Metadata to obtain the identity provider metadata. This option is available only if you have a domain configured and enabled.
-
If you do not have a domain configured, click the link to Configure a Domain Name and follow the steps to set up a domain and deploy it to users. This automatically enables Salesforce as an identity provider. Then download the metadata as described.
-
If you have a domain configured but disabled as an identity provider, click the button Enable Identity Provider, then download the metadata as described.
Identity Provider Setup
Tip
After making changes in Identity Provider Setup, you may need to refresh the page.
-
2. Set Up Connected Apps in Salesforce
Follow these steps to configure each Harmony client as a Connected App within Salesforce:
-
If you are continuing from Enable Salesforce as an Identity Provider and Download Metadata, on the same screen, in the section Service Providers, click the link to create via Connected Apps. Otherwise, navigate Setup > Build > Create > Apps and click New under the Connected Apps section.
-
You need to create a Connected App for each of these Harmony clients:
-
WMC: This Harmony client is for the Harmony Portal and its applications.
Note
Although the user interface refers to WMC (the former name for the Management Console), the WMC Harmony client configuration applies to all of the web-based products accessible via the Harmony Portal.
-
Studio: This Harmony client is for Design Studio. An app for this client must be created even if you do not intend to use Design Studio.
For each Connected App:
-
Under Basic Information, provide a Connected App Name (for example, Harmony Portal or Design Studio) and populate other required fields.
-
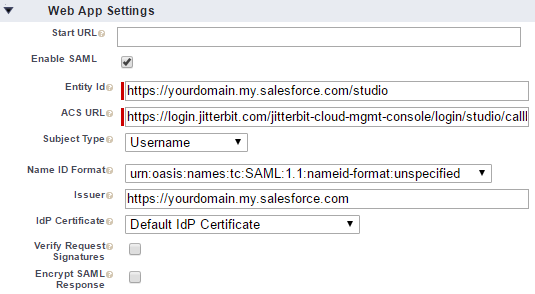
Under Web App Settings, select Enable SAML. This enables the additional fields Entity Id and ACS URL:
-
Entity Id: The Entity Id must be unique per Harmony client. As a recommendation, look in your downloaded XML metadata file from the identity provider and find the
entityIDlisted. This should be the same as your Salesforce domain (https://yourdomain.my.salesforce.com/). To create a unique Entity Id per client, you can append/wmcor/studioto the default ID. For example:-
WMC:
https://yourdomain.my.salesforce.com/wmc -
Studio:
https://yourdomain.my.salesforce.com/studio
-
-
ACS URL: The ACS URL is also referred to as the Redirect URL in the Management Console, or as the
Locationwithin the service provider metadata. This value is also unique and depends on the Harmony client and the Harmony region (see Find My Region):-
WMC: Enter the SAML URL for the Harmony region (see SAML URLs).
-
Studio: Enter the callback URL for the Harmony region (see Callback URLs).
-
WMC – Web App Settings

Studio – Web App Settings
-
-
-
Complete any other optional fields as desired, and click Save to create each Connected App.
3. Assign Profiles to the Salesforce Connected Apps
These steps show how to assign profiles to the Connected Apps so that users have the appropriate permissions:
- If you are continuing from Set Up Connected Apps in Salesforce, on the resulting screen for each Connected App, click the Manage button. Otherwise, return to this screen from Setup > Administer > Manage Apps > Connected Apps.
-
You need to assign profiles for each Connected App. For each:
-
Under the Profiles section, click Manage Profiles.
-
On the Application Profile Assignment screen, select System Administrator to provide access to the service provider. Also select any profiles associated with the users you want to be able to use Harmony SSO.
Warning
Profiles associated with the users you want to be able to use SSO must be assigned to each app, or these users will not be able to log in to Harmony using SSO.
-
When all desired profiles have been assigned, click Save.
- The Harmony clients should now be listed under Manage Connected Apps. Note that you may not see the apps from the identity provider page listed under service providers.
-
4. Construct the Service Provider Metadata
Use these instructions to construct the input for the Service Provider Metadata field required for configuring SSO in Harmony.
WMC
This section shows how to construct the XML metadata for the Harmony Portal, to be entered for the WMC client.
Note
Although the user interface refers to WMC, the former name for the Management Console, the WMC Harmony client configuration applies to all of the web-based products accessible via the Harmony Portal.
Use the sample provided below, replacing the [entityid] with the Salesforce Entity Id and replacing the Location with the SAML URL for the Harmony region (see SAML URLs).
<md:EntityDescriptor xmlns:md="urn:oasis:names:tc:SAML:2.0:metadata"
    xmlns:ds="http://www.w3.org/2000/09/xmldsig#"
entityID="[entityid]">
    <md:SPSSODescriptor
        protocolSupportEnumeration="urn:oasis:names:tc:SAML:2.0:protocol">
        <md:NameIDFormat>urn:oasis:names:tc:SAML:1.1:nameid-format:emailAddress</md:NameIDFormat>
        <md:AssertionConsumerService index="1" isDefault="true"
            Binding="urn:oasis:names:tc:SAML:2.0:bindings:HTTP-POST"
Location="https://na-east.jitterbit.com/jitterbit-cloud-mgmt-console/saml"/>
    </md:SPSSODescriptor>
</md:EntityDescriptor>
Studio
This section shows how to construct the XML metadata for Design Studio, to be entered for the Studio client.
Use the sample provided below, replacing the [entityid] with the Salesforce Entity Id and replacing the Location with the callback URL for the Harmony region (see Callback URLs).
<md:EntityDescriptor xmlns:md="urn:oasis:names:tc:SAML:2.0:metadata"
    xmlns:ds="http://www.w3.org/2000/09/xmldsig#"
    entityID="[entityid]">
    <md:SPSSODescriptor
        protocolSupportEnumeration="urn:oasis:names:tc:SAML:2.0:protocol">
        <md:NameIDFormat>urn:oasis:names:tc:SAML:1.1:nameid-format:emailAddress</md:NameIDFormat>
        <md:AssertionConsumerService index="1" isDefault="true"
            Binding="urn:oasis:names:tc:SAML:2.0:bindings:HTTP-POST"
            Location="https://na-east.jitterbit.com/jitterbit-cloud-mgmt-console/login/studio/callback"/>
    </md:SPSSODescriptor>
</md:EntityDescriptor>
5. Configure SSO in Harmony
Follow the instructions for Configure SSO in the Management Console. When entering information into the Edit Organization SSO Provider Info screen, use the values obtained above:
- Identity Provider Metadata: Paste the contents of the metadata obtained during Enable Salesforce as an Identity Provider and Download Metadata above.
- Service Provider Metadata: Paste the contents of the metadata constructed in Construct the Service Provider Metadata above for the WMC and Studio Harmony clients.
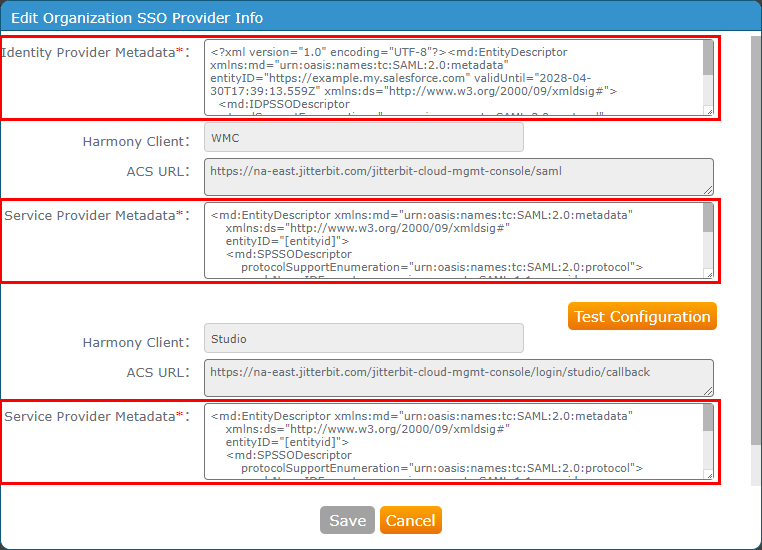
Click Test Configuration for each Harmony client and then click Save. Both clients need to be successfully tested before the Save button becomes enabled.
Troubleshoot
If you receive an error of "No valid signing cert found," make sure that the identity provider metadata has a KeyDescriptor tag and sub-tag with use="signing", similar to this example:
<?xml version="1.0" encoding="UTF-8"?><md:EntityDescriptor xmlns:md="urn:oasis:names:tc:SAML:2.0:metadata" entityID="https://example.my.salesforce.com" validUntil="2028-04-30T17:39:13.559Z" xmlns:ds="http://www.w3.org/2000/09/xmldsig#">
 <md:IDPSSODescriptor protocolSupportEnumeration="urn:oasis:names:tc:SAML:2.0:protocol">
  <md:KeyDescriptor use="signing">
   <ds:KeyInfo>
    <ds:X509Data>
     <ds:X509Certificate>MIIErDCCA5SgAwIBA...