Introduction to Vinyl 3.3: Creating an Application
Add an Application
The following steps will guide you through how to create an application. This process uses the Create New Application wizard and creates a named database source associated with the app.
-
Regardless of your position in Vinyl, the Action Drawer icon
 will appear in the top right corner of the page.
 -
Select Site Menu from the Action Drawer to navigate to the Site Menu.
-
From the Site Menu, click the + App button.
-
This is the Create New Application wizard where you can create your application. Enter
Global Importsfor the Name: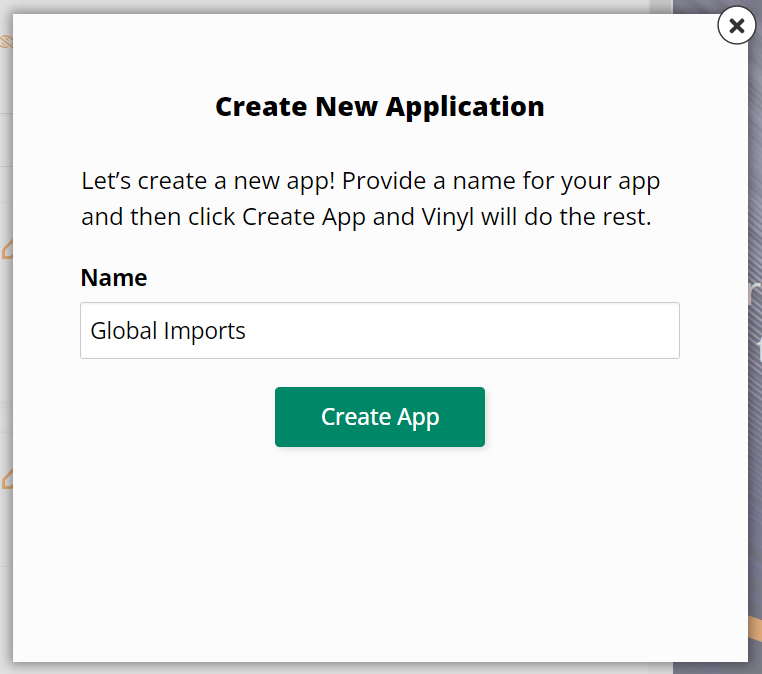
-
Click Next.
Note
This may take several seconds to complete.
Build a Database and Add Records
In the Global Imports app we are building, we intend to manually build out the database tables, columns, keys, and any associated relationships required between tables.
By default, Vinyl creates a Parameter table that contains Application and Version columns, as well as the audit lite columns to track AddedOn, AddedBy, ChangedOn, and ChangedBy data. In addition to the table, Vinyl creates a Parameter (Business Object) rule that the default home page uses.
Vinyl contains accelerators in the data storage layer that drastically reduce development time and effort. These accelerators add columns to your table to support auditing and functions, build out business logic, and quickly add pages to your application. We will take advantage of the accelerators as we build out our database.
When building out the business logic from the data storage layer, one of the key concepts to understand is Business Objects. Business objects are objects that are leveraged to build the application UI layer. Depending on their purpose, business objects can be very simple objects, like source and list objects, or very complex depending on the need.
The following steps will guide you through building out the additional tables and associated columns and information our GlobalImports database will need for the Global Imports app.
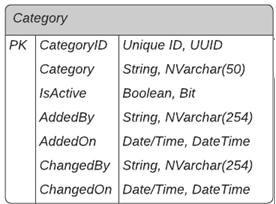
Create a Category Table
Follow the steps below to create the Category table. The diagram illustrates the table along with the columns defined for the table. The primary key column is indicated by PK. The column name and the logical and physical data type are also enumerated in the diagram:
-
Navigate to the Action Drawer.
-
Click Design Center.
-
Click the + Table button.
-
Select Table Builder.
-
Click the Next button.
-
Assign the Table Name as
Category. -
Click the Next button.
-
Click the Add Title button, then Proceed to add the Category title column to the table.
Note
By default, Vinyl automatically adds columns to all tables to support audit and the user selectable function. The columns added are IsActive, AddedBy, AddedOn, ChangedBy, and ChangedOn. All columns are visible when opening the table in the data layer.
-
Click the Next button.
-
Confirm and click the Generate Pages button.
-
Select Configuration as the menu to link to the page.
-
Click the Next button.
-
Validate that Grid and Form is selected.
-
Click the Next button.
-
Confirm and click the Create Pages button.
Note
Completing this wizard instructs Vinyl to add a Category table to the data storage layer, create business object views for the data in the business logic layer, and build two pages to view the information from the application UI layer. We selected a Grid and Form page type to be used for the data presentation and record input. All information built in this step can be modified as needed.
-
When generated, create the following three records on the Category Form page:
Category IsActive Dairy Yes Meats Yes Produce Yes -
Enter
Dairyinto the Category field, -
Click the Save button.
-
Click X to exit out of the Category page.
-
Click the Create button.
-
Enter
Meatsinto the Category field. -
Click the Save button.
-
Click X to exit out of the Category page.
-
Click the Create button.
-
Enter
Produceinto the Category field. -
Click the Save button.
-
Click X to exit out of the Category page.
-
Confirm you now see three data records on the Categories page.
-
Click X to exit out of the Categories page.
Hands-on: Create Tables and Data Records
Follow the instructions provided for the Category table and records to build out tables and associated data records for UnitOfMeasure and Supplier. Add Grid and Form pages for these tables to the Configuration menu in the Global Imports. Remember, IsActive, AddedBy, AddedOn, ChangedBy, and ChangedOn are automatically added to your tables.
Data Records to Add
| UnitOfMeasure | Description | IsActive |
|---|---|---|
| EA | Each | Yes |
| GL | Gallon | Yes |
| LB | Pound | Yes |
| BX | Box | No |
| Supplier | IsActive |
|---|---|
| Chatham Organics | Yes |
| Colorado Meats | Yes |
| Paiva Dairy | Yes |
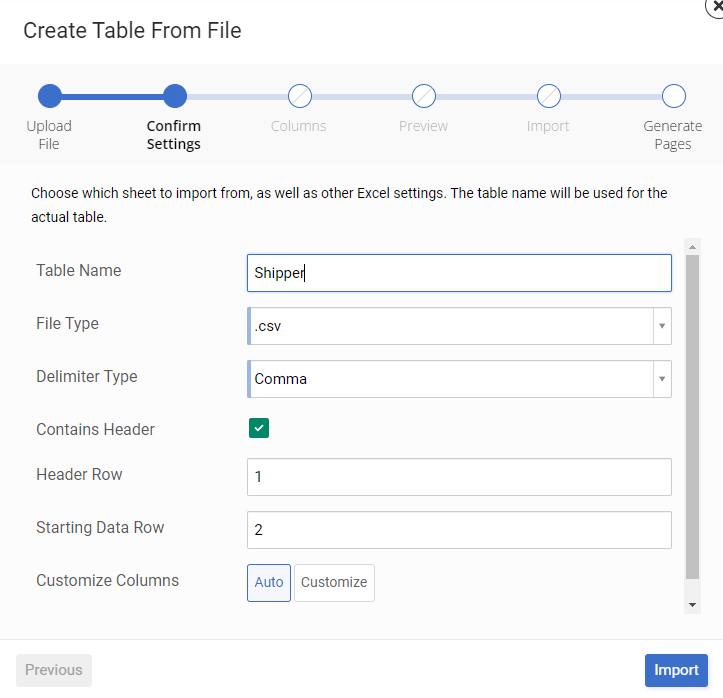
Create a Shipper Table from Excel
The examples so far have been manually creating tables and associated data records. In this section we step through creating a table using an Excel-generated file. Add the pages to the Configuration menu.
For this example, use the provided Shipper.csv file.
-
Navigate to the Design Center.
-
Click the + Table button.
-
Select Excel Spreadsheet.
-
Click the Next button.
-
Click Browse to select the
Shipper.csvfile. -
Click Open to upload the file.
-
Click the Next button.
-
Review the settings on the Create Table From File screen:
-
Click the Import button.
-
Click Generate Pages to build pages in the UI layer.
-
Select a menu to link the page to. In this example, select Configuration.
-
Click the Next button.
-
Validate that Grid and Form is selected.
-
Click the Next button.
-
Confirm and click the Create Pages button.
-
Confirm you now see a Shippers page.
Create a Product Table with Foreign Keys
Here we build a Product table, which is more complex than the previous tables built. This table contains a foreign key, or a primary key value from a different table, and we'll see how Vinyl supports creating foreign key relationships across tables in the data layer.
-
Navigate to the Design Center.
-
Click the + Table button.
-
Select Table Builder.
-
Click the Next button.
-
Assign the Table Name as
Product. -
Click the Next button.
-
Click the Add Title button, then the Proceed button to add the Product title column to the table.
-
Click the Add Column button.
-
Populate the name CategoryID. If available, select it from the list.
-
Click the checkmark to save.
Note
Vinyl ships with preconfigured database and UI templates to help speed up application development. We see examples of database templates when building out tables and columns with commonly used values such as Address, City, State, and Postal Code.
-
Click the Add Column button.
-
Populate the name SupplierID. If available, select it from the list.
-
Click the checkmark to save.
-
Click the Add Column button.
-
Populate the name UnitOfMeasureID. If available, select it from the list.
-
Click the checkmark to save.
-
Click the Add Column button.
-
Populate the name Price. If available, select it from the list.
-
Click the checkmark to save.
-
Click the Next button.
-
Confirm and click Generate Pages button.
-
Select Home as the menu.
-
Click the Next button.
-
Validate that Grid and Form is selected.
-
Click the Next button.
-
Confirm and click Create Pages.
-
When generated, create the following records on the Product Form page:
Product Category Supplier Price / UOM IsActive Lettuce Produce Chatham Organics 2 / EA Yes Milk (Whole) Dairy Paiva Dairy 2 / GL Yes Hamburger Meats Colorado Meats 5 / LB Yes -
Navigate to the Design Center.
-
Click the Tables button.
-
Review the table relationships that are now created on the Database Schema panel.
Hands-on: Create Customer, Order, and OrderDetail
Follow the methodology used to create the Product table to build out tables for Customer, Order, and OrderDetail. Add data records for the Customer table. Any time a foreign key is being referenced in a table, be sure to create the associated relationship. Add the Customer and Order tables to the Home page menu and add the OrderDetail to None.
Data Records to Add to Customer
| Customer | Address | City | State | PostalCode | Shipper | Shipping Instructions | IsActive |
|---|---|---|---|---|---|---|---|
| Zany Brothers | 303 East Dilido Drive | Miami Beach | FL | 33139 | Slo Mo | Yes | |
| Salem Witch Museum | 19 1/2 N Washington Square | Salem | MA | 01970 | Fast Eddie | Yes |