Database connection
Introduction
A Database connection is configured using the Database connector, establishing access to a database. Once a connection is established, you can configure one or more Database activities associated with that connection to be used either as a source to provide data to an operation or script, or as a target to consume data in an operation or script.
Cloud agents support a provided set of JDBC drivers. Private agents support both ODBC and JDBC drivers. In addition to provided drivers, you can install additional ODBC and JDBC drivers on private agents.
To convert an existing Database connection from using an ODBC driver to using a JDBC driver, see Converting from ODBC to JDBC later on this page.
Note
This connector supports the Enable Re-authentication on Change organization policy. If enabled, a change to the Server Name or Login in an endpoint's connection will require users to re-enter the Password for the connection.
Create or edit a database connection
A new Database connection is created using the Database connector from one of these locations:
- The design component palette's Project endpoints and connectors tab (see Design component palette).
- The Global Connections page (see Create a global endpoint in Global Connections).
An existing Database connection can be edited from these locations:
- The design component palette's Project endpoints and connectors tab (see Design component palette).
- The project pane's Components tab (see Component actions menu in Project pane Components tab).
- The Global Connections page (see Edit a global endpoint in Global Connections).
Configure a database connection
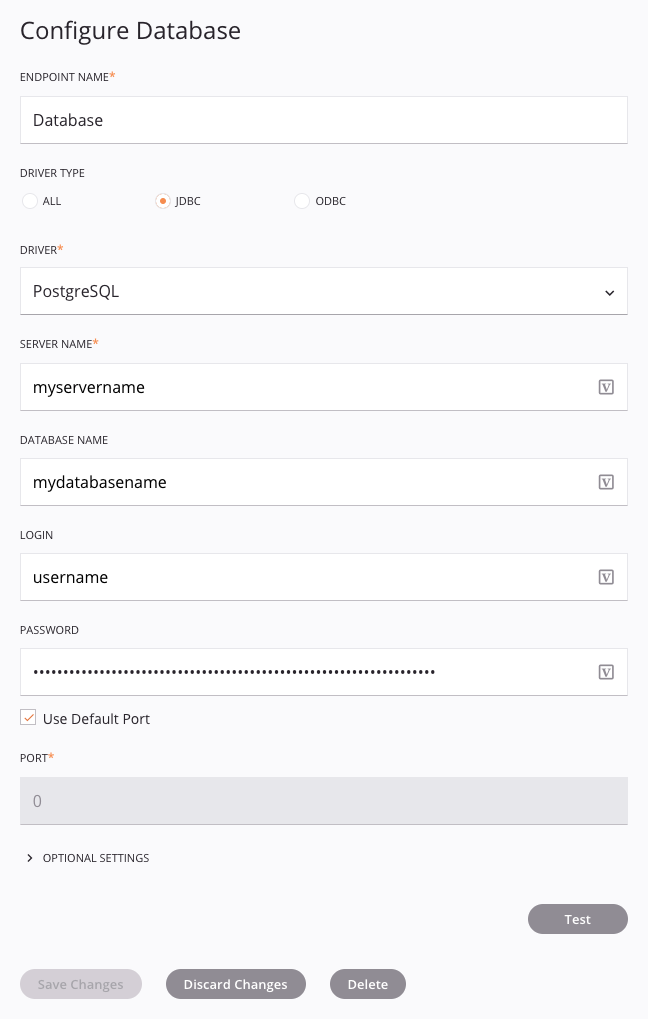
Configuration of a Database connection includes these fields:

Tip
Fields with a variable icon support using global variables, project variables, and Jitterbit variables. Begin either by typing an open square bracket [ into the field or by clicking the variable icon to display a list of the existing variables to choose from.
-
Endpoint Name: Enter a name to use to identify the Database connection. The name must be unique for each Database connection and must not contain forward slashes (
/) or colons (:). This name is also used to identify the Database endpoint, which refers to both a specific connection and its activities. -
Driver Type: To filter the list of drivers, select the button for the appropriate driver type.
-
Driver: Use the dropdown to select the database driver. The available drivers depend on whether you are using cloud agents or private agents (see Database drivers below). When you select a database driver, the remaining fields available in this configuration screen may change, as only the fields applicable to the selected database driver are shown.
-
Server Name: Enter the name, URL, or IP address of the database server.
-
Database Name: If applicable, enter the name of the database. This field may not be present for database drivers for which this field is not applicable, such as Oracle.
-
Login and Password: If applicable, enter a username and password that allows access to the database. You can leave these fields blank if no username or password is required.
-
Use Default Port: Keep this checkbox selected to use the default port. The default port differs depending on the selected driver. If you don't want to use the default port, clear the Use Default Port checkbox and enter the port to use in the Port field below.
-
Port: (This field is enabled only if the Use Default Port box is unchecked.) Enter a custom port only if the database server is listening on a non-default port.
-
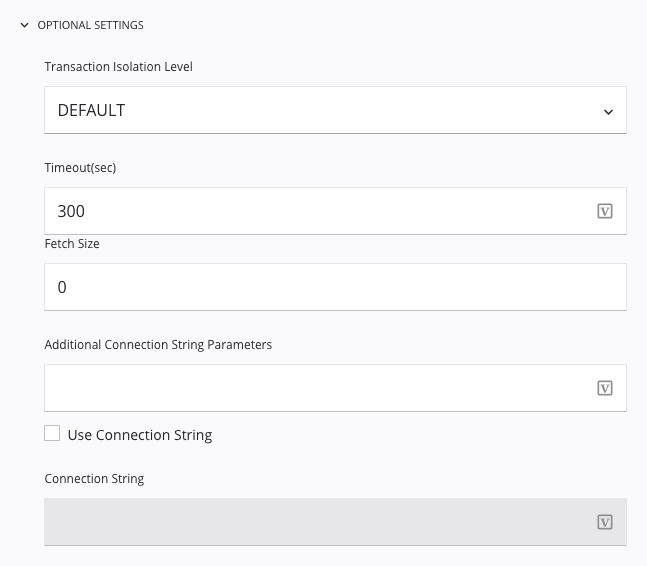
Optional Settings: Click to expand for additional optional settings:

-
Optimize for Bulk Data: Available only when either the Oracle or SQL Server jTDS database driver is selected, select this checkbox to improve performance when working with large amounts of data.
-
Transaction Isolation Level: If applicable, use the dropdown to select the Transact-SQL (T-SQL) isolation level. Driver-specific transaction isolation levels are not supported. The DEFAULT option uses the driver or database server default transaction isolation level.
-
Timeout (sec): To set a limit for how long to wait for a successful connection to the database, enter a number of seconds here. The default is 300 seconds (5 minutes).
-
Fetch Size: If using a JDBC driver, this tells the driver how many rows should be fetched when more rows are required. This can be used to improve the processing of large datasets.
-
Additional Connection String Parameters: To add additional parameters to the database connection string, enter them here. Note that this field is disabled if you have selected the option below to use a connection string.
-
Use Connection String: Select this checkbox to enter a connection string in the field below. If selected, this disables and overrides the Additional Connection String Parameters above. If selected and the Connection String field is left blank, the Server Name, Login, and Password as configured above are used.
-
Connection String: If applicable, enter a connection string into the text box. The checkbox above must be selected in order for this field to be enabled.
Tip
Consult database-specific documentation for creating manual connection strings. Examples can also be found at https://www.connectionstrings.com.
Note
The connection string will be visible in clear text during configuration, so you may not want to include the username and password in the string. Instead of including these parameters and values in the string, use the Login and Password fields provided as part of the UI. They will then be appended to the connection string when needed, but will not be visible on the screen.
-
-
Test: Click to verify the connection to the database. When you test a Database connection, the quote character used by the database, either a single or a double quote, is identified. If you don't test the connection at this time, the opening and closing quote information will be fetched when you configure an activity.
-
Save Changes: Click to save and close the connection configuration.
-
Discard Changes: After making changes to a new or existing configuration, click to close the configuration without saving. A message asks you to confirm that you want to discard changes.
-
Delete: After opening an existing connection configuration, click to permanently delete the connection from the project and close the configuration (see Component dependencies, deletion, and removal). A message asks you to confirm that you want to delete the connection.
Database drivers
The drivers available for selection in the Driver dropdown depend on whether you are using cloud agents or private agents.
Cloud agents
Cloud agent groups support JDBC drivers only. These JDBC drivers are provided:
-
IBM DB2 (AS400)
-
MySQL
-
Oracle
-
Oracle NetSuite
-
PostgreSQL
-
Redshift
-
SQL Server jTDS
-
SQL Server MS JDBC
-
Sybase jTDS
Private agents
Private agents support JDBC drivers and ODBC drivers. For ODBC drivers, the architecture of the driver must match the system of the agent. That is, 32-bit agents support 32-bit ODBC drivers and 64-bit agents support 64-bit ODBC drivers.
These JDBC drivers are provided by 64-bit Windows and Linux private agents:
- Amazon Redshift
- IBM DB2 (AS400)
- IBM DB2 (JCC)
- MySQL
- Oracle
- Oracle NetSuite
- PostgreSQL
- SQL Server jTDS
- SQL Server Microsoft
- SQLite
- Sybase jTDS
These ODBC drivers are bundled with the 64-bit Windows private agent installation:
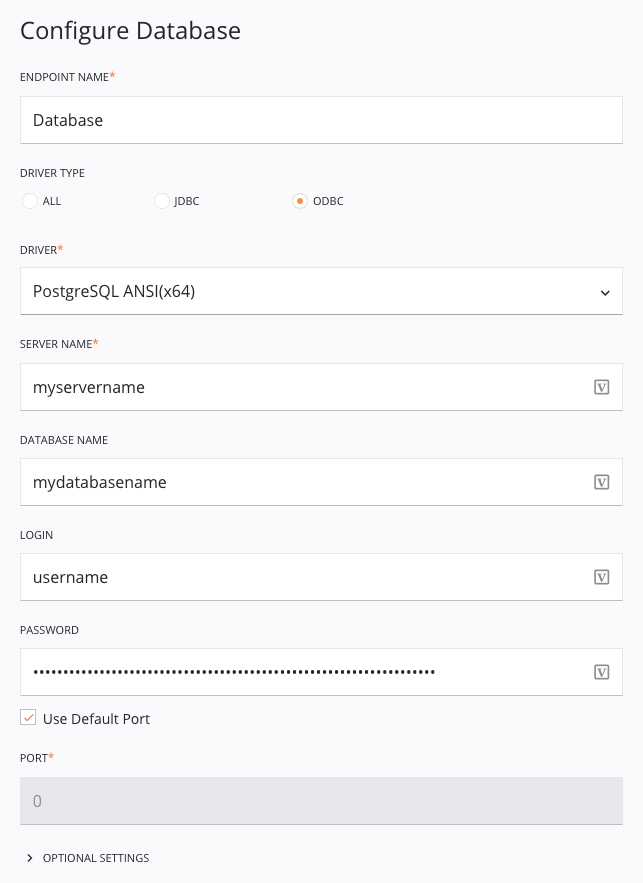
- PostgreSQL ANSI (x64)
- PostgreSQL Unicode (x64)
This ODBC driver is bundled with the 64-bit Linux private agent installation:
- PostgreSQL-jitterbit
Note
Drivers for only 64-bit private agents are listed above, as 32-bit private agents are end-of-life.
Additional drivers are detected from the operating system. You can install additional database drivers as needed.
Next steps
After a Database connection has been created, menu actions for that connection are accessible from the project pane's Components tab. See Connection actions menu for details.
Once configuring a Database connection, you can configure one or more Database activities associated with that connection to be used as a source (to provide data within an operation), as a target (to consume data within an operation), or in a script, or you can use the Database connection in a script.
Configure activities
Database activities interact with the Database connection to act as sources (providing data within an operation) or targets (receiving data within an operation).
After configuring a Database connection, use the Show dropdown to filter on Endpoints, and then click the Database connection block to display activities that are available to be used with a Database connection:

For more information, see these activities:
- Query: Queries data from a Database endpoint and is intended to be used as a source in an operation or called in a script.
- Insert: Inserts new data in a Database endpoint and is intended to be used as a target in an operation or called in a script.
- Update: Updates existing data in a Database endpoint and is intended to be used as a target in an operation or called in a script.
- Upsert: Both updates existing data and inserts new data in a Database endpoint and is intended to be used as a target in an operation or called in a script. (Harmony supports Upsert activities for databases by using a combination of Query, Insert, and Update.)
Using database connections in scripts
Database connections can be referenced in a script using script functions that use a databaseId as a parameter:
Jitterbit Script Functions
CacheLookupCallStoredProcedureDBCloseConnectionDBExecuteDBLookupDBLookupAllDBRollbackTransactionDBWrite
JavaScript Jitterbit Functions
Jitterbit.DbExecuteJitterbit.DbLookup
For more details on referencing endpoints in scripts, see Endpoints in Jitterbit Script or Endpoints in JavaScript.
Converting from ODBC to JDBC
Converting a Database connection from using an ODBC driver to using a JDBC driver is usually a straightforward process. You may need to do so if you move a project from running on a private agent using an ODBC driver to a Jitterbit cloud agent group which, as of Harmony 9.8, no longer support ODBC drivers in the cloud agent groups.
If your connection uses the default options, you can quickly convert it following the steps outlined below. However, if you have used the option to specify additional connection string parameters or to construct the connection string manually, you will need to adjust those options to accommodate the differences between ODBC and JDBC.
Jitterbit support is available to help you in converting your connection to JDBC if you require assistance with converting your Database connections or the revision of advanced options.
Converting simple database connections
To convert a Database connection that currently uses an ODBC driver to one that uses a JDBC driver, follow these steps:
-
Open the Database connection that uses an ODBC driver. In this example, a connection using the PostgreSQL driver was opened:

-
Test the connection by clicking the Test button to make sure that it works:

-
If the connection was successful, you can proceed with this conversion. If not, fix any errors before continuing.
-
Check if any additional connection parameters were specified by clicking the Optional Settings at the bottom of the configuration screen:

- If no additional connection parameters were specified beyond the defaults shown above, you can proceed with converting the Database connection following the remainder of these instructions.
- If there are additional connection parameters specified other than the defaults shown above, see the next section on Converting connections with additional connection parameters.
-
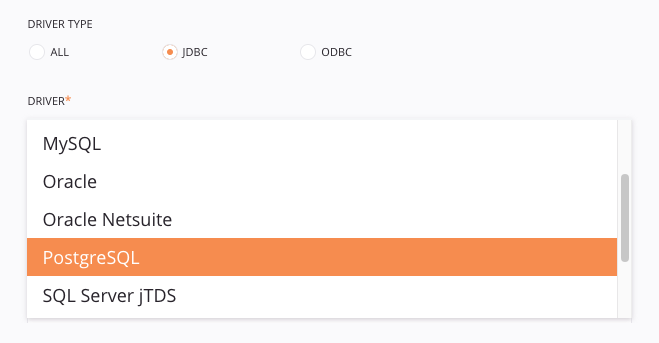
Change the Driver Type to JDBC, then use the Driver dropdown to select the appropriate JDBC driver. In this example, we selected the PostgreSQL JDBC driver.

-
Test the revised connection by clicking the Test button to make sure that it works:

-
Click the Save Changes button to save the revised Database connection.
Converting connections with additional connection parameters
If your connection uses additional connection parameters beyond the default values shown above, either as Additional Connection String Parameters or the box Use Connection String was checked and the connection string was entered manually, additional work may be required to convert the connection from ODBC to JDBC. For example, the SQL Server ODBC Additional Connection String Parameters might be (to use NTLM Windows Authentication):
integratedSecurity=true
An equivalent SQL Server jTDS JDBC driver Additional Connection String Parameters (to use NTLM Windows Authentication) would be:
useNTLMv2=true
Connection string parameters are specific to the database driver you use (for example, Microsoft SQL, MySQL, PostgreSQL, or Oracle). Review the driver specifications to determine the required parameters. If you require assistance with converting connection strings or parameters for a JDBC driver, contact Jitterbit support.