Agent groups
Introduction
The Agent Groups page of the Management Console allows Harmony organization administrators to provision, configure, and manage where your integrations run. You can manage your own customized, private agent groups (formerly known as local agent groups) to run on-premises integrations, or you can use cloud agent groups that are hosted and managed by Jitterbit. With multiple agents in a group, agent groups provide for high availability (active/active) and load balancing of integration operations across those agents.
Members of a role that has been granted Read environment access can also access the Agent Groups page. Members of a role that has been granted Write environment access have write access in that environment.
To access the Agent Groups page, log in to the Harmony portal, then use the Harmony portal menu in the top left to hover over Management Console > Agents and select Agent Groups:

Note
Make sure you are accessing the desired organization, which can be changed in the top navigation bar (see Changing the selected organization in Harmony portal).
Manage agent groups
Administrators of the organization manage the agent groups for that organization.
View agent groups
The top section of the Agent Groups page contains a table that shows all the agent groups for your organization:
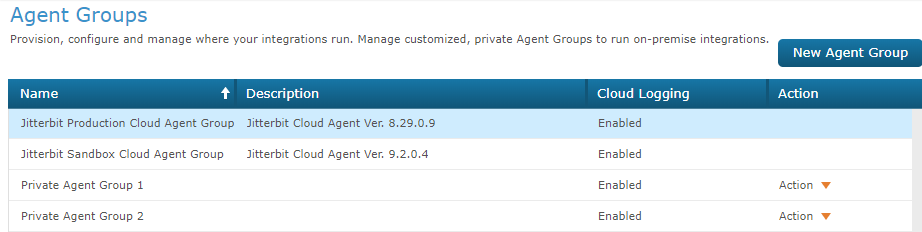
There are two types of agent groups:
-
Jitterbit cloud agent group: This type of group is already created within your organization by default. These groups are automatically scaled within the cloud as necessary, and do not require adding agents to expand capacity. By default, two cloud agent groups will already be set up:
-
Jitterbit Production Cloud Agent Group: The Jitterbit Production Cloud Agent Group runs the production version of Jitterbit, as listed in the Description column, and is the most stable.
-
Jitterbit Sandbox Cloud Agent Group: The Jitterbit Sandbox Cloud Agent Group runs the upcoming version available for testing prior to release, as listed in the Description column. The Jitterbit Sandbox Cloud Agent Group was introduced in Harmony version 9.2.2. Learn more in the video below.
-
-
Private agent group: This type of group allows you to group together your own customized, private agents to run on-premises integrations. You will need to download and install the agent software per agent of the group. Learn more about administering, configuring, and troubleshooting private agents under our private agents documentation.
Note
Private agents were formerly known as local agents.
Initially, you will see the two Jitterbit cloud agent groups, which are set up by default. Note that these agent groups are managed by Jitterbit; you cannot add additional cloud agent groups or cloud agents. There is also nothing available to edit within the cloud agent groups, as cloud logging will always be enabled. You can also sort the table by clicking on any of the column headers.
To add and edit private agent groups, follow the instructions in the next sections.
Note
At least one environment must be created and associated with the selected agent group before you will be able to run a project. See Environments for additional information.
Add agent groups
To add a new private agent group, click the  button. Fill out the dialog as follows:
-
Name: Provide a name for the private agent group, for example "private agent Group 1."
Note
These special characters are not allowed:
< > # % { } | \ / ^ ~ [ ] ` ; , : ? @ = &. -
Description: Provide a description for the private agent group.
-
Enable Cloud Logging: The cloud logging option determines if logged data will be temporarily saved and accessible from within the Harmony cloud. Select the checkbox to enable cloud logging, or clear the box to disable. When this setting is changed, a private agent restart is required for the new setting to take effect (see Windows or Linux agent restart instructions).
-
Enabled: The default is enabled, which allows operation logs, including detailed log messages from both cloud agents and private agents, to be retained for 30 days by Harmony. When cloud logging is enabled, log messages are also accessible on the Runtime Operations page in the Messages tab.
-
Disabled: Clear the checkbox to disable cloud logging. When cloud logging is disabled, a link will be displayed in the Runtime Operations page Messages tab that allows the logging information to be viewed from the agent itself. If your network configuration allows direct access to the agent server, clicking on the link displays the logging information in a separate window generated from the agent running on a local machine located behind the organization's firewall.
Warning
Disabling cloud logging will not prevent component input and output data from being logged to the Harmony cloud if operation debug logging is enabled at the operation level. To disable cloud logging of component input and output data, in the private agent configuration file under the
[VerboseLogging]section, setverbose.log.enable=false. for more information see operation debug logging.
-
The new agent group should now appear in the table of agent groups.
Note
You may be limited to the number of agent groups you can create based on your subscription plan. If you require more agent groups, please contact your Customer Success Manager.
Edit or remove agent groups
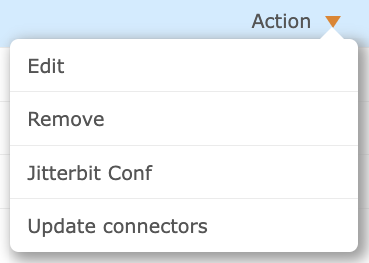
On the far right of each private agent group row is an Action dropdown showing the actions you can take for each private agent group.
-
Choose Edit to edit the Name, Description, or option to Enable Cloud Logging that was set up when the agent group was added. When the Enable Cloud Logging setting is changed, a private agent restart is required for the new setting to take effect (see Windows or Linux agent restart instructions).
Warning
Disabling cloud logging will not prevent component input and output data from being logged to the Harmony cloud if operation debug logging is enabled at the operation level. To disable cloud logging of component input and output data, in the private agent configuration file under the
[VerboseLogging]section, setverbose.log.enable=false. for more information see operation debug logging. -
Choose Remove to remove the agent group from your organization.
Note
You cannot view or edit the Jitterbit configuration file for the Jitterbit cloud agent groups.
View or edit Jitterbit Conf
On the far right of each private agent group row is an Action dropdown showing the actions you can take for each private agent group.
The action Jitterbit Conf will be available only if these conditions are met:
- All private agents within the private agent group are using agents version 8.14 or higher.
- At least one agent within the private agent group must be in the Running status.
- Remote agent configuration is enabled. You can enable remote agent configuration from the Agent Management tab of the Organizations page.
Warning
When you enable remote agent configuration, the current agent configuration (excluding the local PostgreSQL cache database information and local predefined global variables) will be read and stored in the cloud so that you can view and edit it remotely. Once you enable remote agent configuration, any changes you make manually to the local jitterbit.conf file located on the agent will not take effect.
To disable remote agent configuration and again be able to edit the local jitterbit.conf file manually, open the Organizations page, select an organization, select the Agent Management tab, then disable Remote agent configuration. However, note that you will lose the current remote agent configuration that was stored in the cloud. After agent services are restarted, your agent will read from the local jitterbit.conf file.
Note
Viewing and editing the jitterbit.conf configuration file is available only at the agent group level, not at the agent level. This is because all individual private agent configuration files should be identical. In addition, note that you cannot view or edit the Jitterbit configuration file for the Jitterbit cloud agent groups.
Choose Jitterbit Conf to view the current settings of the jitterbit.conf file in table format. There are two tabs available:
- Config: This tab provides the configuration settings available in the
jitterbit.conffile. The table shows each section of the configuration file, the key parameter, whether the parameter is enabled, its value, and a description if available. For additional information about what each setting does, refer to Edit the configuration file (jitterbit.conf). - Db Drivers: This tab provides a list of database drivers, also included in the
jitterbit.conffile. This list includes the settings for database characters.
Options available within each tab are explained as follows.
Config
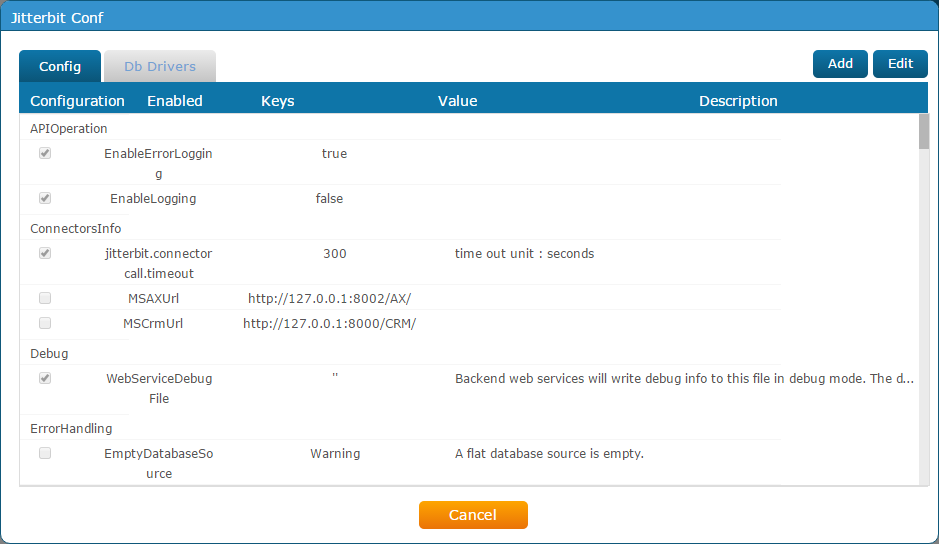
To make changes to the jitterbit.conf file, click the Add or Edit buttons in the top right. A confirmation message will appear with this notification:
If you click OK, current Agent configuration (excluding the local PostgreSQL Cache Database information and local predefined global variables) will be read and stored in the cloud so that you can view and edit them remotely. Please make sure your company policy allows for this action and that there was no proprietary information stored in the configuration files prior to this. Click Cancel now, if you prefer to edit the configurations directly on the servers.
Caution
If you do not wish to store the contents of the jitterbit.conf file in the cloud via the Management Console, but would still like to make changes to the configuration file, you can do so manually. Refer to Edit the configuration file (jitterbit.conf).
Click OK on the confirmation message to continue.
For Add, a popup will provide these options:
- Section: Select from a list of existing sections in the config file.
- Enabled: Check this box to enable the Key, or uncheck to disable the Key.
- Key: Enter the parameter that you would like to add to the selected section of the config file. For a detailed list of possible keys and values see Edit the configuration file (jitterbit.conf).
- Value: Enter the value that you would like to set for the parameter entered above. For a detailed list of possible keys and values see Edit the configuration file (jitterbit.conf).
When you are done, choose one of these options:
-
Save: Save your addition. A confirmation message will appear with the following notification:
If you click OK, All the Agent group's Agent configuration will be overwritten and Agents needs to be restarted after the update - please make sure that this is an acceptable maintenance period, backup current configuration if needed, and make sure you can perform additional maintenance on the Agent servers, should it be required.
All Jitterbit services must be restarted in order for the new configuration to take effect. For instructions on restarting services, see Restart Jitterbit services below.
-
Cancel: Close the Jitterbit Conf window without saving. No changes to the config file will be submitted.
For Edit, fields that you can make changes to now become available for you to edit. If the value shown in the Value column contains single or double quotes, you must provide the replacement value with the same format using single or double quotes. For a detailed list of possible keys and values see Edit the configuration file (jitterbit.conf).
When you are done, choose one of these options:
-
Submit: Save your changes. A confirmation message will appear with this notification:
If you click OK, All the Agent group's Agent configuration will be overwritten and Agents needs to be restarted after the update - please make sure that this is an acceptable maintenance period, backup current configuration if needed, and make sure you can perform additional maintenance on the Agent servers, should it be required.
All Jitterbit services must be restarted in order for the new configuration to take effect. For instructions on restarting services, see Restart Jitterbit services below.
-
Reset: Reset the editable fields back to the most recent stored configuration file. This option does not submit changes to the config file, but simply resets the values in the edit screen to those currently being used.
-
Reset to default: Restore all configuration fields back to default settings. This option sets the configuration to the default configuration used as if an agent were being installed from scratch. A confirmation message will appear with this notification:
If you click OK, All the Agent group's Agent configuration will be overwritten and Agents needs to be restarted after the update - please make sure that this is an acceptable maintenance period, backup current configuration if needed, and make sure you can perform additional maintenance on the Agent servers, should it be required.
All Jitterbit services must be restarted in order for the new configuration to take effect. For instructions on restarting services, see Restart Jitterbit services below.
-
Cancel: Close the Jitterbit Conf window without saving. No changes to the config file will be submitted.
Database drivers
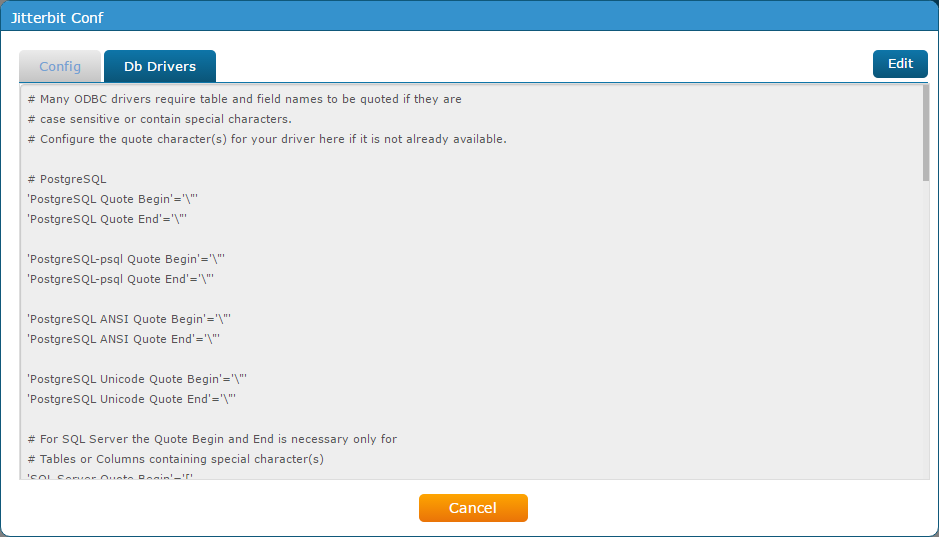
To make changes to the database driver portion of the jitterbit.conf file, click the Edit button in the top right. A confirmation message will appear with this notification:
If you click OK, current Agent configuration (excluding the local PostgreSQL Cache Database information and local predefined global variables) will be read and stored in the cloud so that you can view and edit them remotely. Please make sure your company policy allows for this action and that there was no proprietary information stored in the configuration files prior to this. Click Cancel now, if you prefer to edit the configurations directly on the servers.
Caution
If you do not wish to store the contents of the jitterbit.conf file in the cloud via the Management Console, but would still like to make changes to the configuration file, you can do so manually. Refer to to Edit the configuration file (jitterbit.conf).
Click OK on the confirmation message to continue.
The contents then become editable, where you can modify entries as appropriate. When you are done, choose one of these options:
-
Submit: Save your changes. A confirmation message will appear with this notification:
If you click OK, All the Agent group's Agent configuration will be overwritten and Agents needs to be restarted after the update - please make sure that this is an acceptable maintenance period, backup current configuration if needed, and make sure you can perform additional maintenance on the Agent servers, should it be required.
All Jitterbit services must be restarted in order for the new configuration to take effect. For instructions on restarting services, see Restart Jitterbit services below.
-
Reset: Reset the database driver portion of the config file back to the most recent stored configuration file. This option does not submit changes to the config file, but simply resets the values in the edit screen to those currently being used.
-
Cancel: Close the Jitterbit Conf window without saving. No changes to the config file will be submitted.
Restart Jitterbit services
On the machine where each private agent is installed, first stop the services, then restart them.
| Windows | Linux |
|---|---|
| From the Start Menu: Stop Jitterbit Services From the Jitterbit Agent installation directory:
| From a prompt:
|
Update connectors
When the Disable Auto Connector Update organization policy is selected to suspend the automatic updating of applicable connectors, you can manually update those connectors using the Update connectors action from the Actions menu of a private agent group:
Once clicked, the latest version of a Connector SDK-based connector is downloaded to the private agent(s) in the private agent group. (whether each Jitterbit-provided connector is based on the connector sdk is noted in each connector's documentation.)
Manage available agents
The Available Agents tab in the bottom portion of the page shows each agent associated with a selected agent group.
- Private agent groups: Shows the private agents within a private agent group and the status of each private agent.
- Cloud agent groups: Managed by Jitterbit. You are unable to manage Available Agents within these groups.
View available agents
The bottom section of the Agent Groups page contains a tab for Available Agents. This table will display all private agents for the private agent group selected in the top portion of the page:

In this table, you can see information about each private agent including IP address, operating system, version, status, and available actions you can take. You can also sort this table by clicking on any of the column headers.
View conflicts with the Jitterbit config file
If you have remote agent configuration enabled (Agent Management tab of the Organizations page) and there is a conflict between the remote agent configuration and local agent configuration file, you will see  icons next to a private agent name.
Note that if remote agent configuration is enabled, then the remote agent configuration file overrides any settings in the local agent jitterbit.conf configuration file. Thus, these warnings are provided for your information only, and may be expected in circumstances such as when you have made changes to the configuration file remotely via this page (see View or edit Jitterbit conf above).
-
Hover over the
 icon to see a short description of conflicting values.
 -
Click on the
 icon to view the detailed description of any conflicting values.
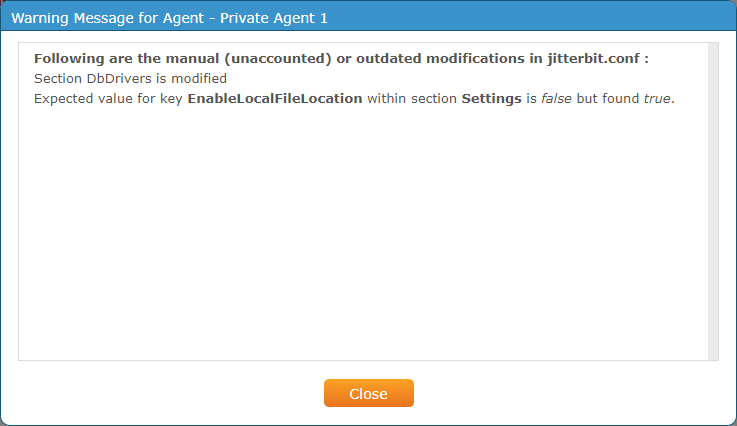
Warning
When you enable remote agent configuration, the current agent configuration (excluding the local PostgreSQL cache database information and local predefined global variables) will be read and stored in the cloud so that you can view and edit it remotely. Once you enable remote agent configuration, any changes you make manually to the local jitterbit.conf file located on the agent will not take effect.
To disable remote agent configuration and again be able to edit the local jitterbit.conf file manually, open the Organizations page, select an organization, select the Agent Management tab, then disable Remote agent configuration. However, note that you will lose the current remote agent configuration that was stored in the cloud. After agent services are restarted, your agent will read from the local jitterbit.conf file.
Add agents or download agent software
To add a new private agent to your selected private agent group, click the  button. In the popup, enter a name for your new Agent.
You should now see your new private agent listed in the table of Available Agents. By default, it will have a status of Unregistered and will not be available for runtime processing until you download and install the agent software on the private agent.
Prior to downloading and installing private agents, please review these pages:
To download the agent software for the same version as the agent selected, use the Action dropdown on the far right and select the appropriate download option for your system.
For further instructions on downloading and installing private agents, see these pages:
Note
You can also add agents and download same-version agent software via the Agents > Agents page. If added from the agents page, you will also need to select the private agent group that you want to associate the new private agent with.
Note
You may be limited to the number of agents you can create based on your subscription plan. If you require more agents, please contact your Customer Success Manager.
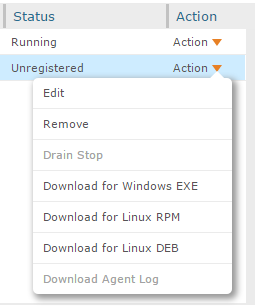
Edit or remove agents
To edit or remove private agents, use the Action dropdown on the far right. These options will be disabled if your agent is currently in the Running status. The agent must be in the Stopped, Unregistered, or Unknown statuses in order to edit or remove the agent.
-
Choose Edit to change the name of your private agent.
-
Choose Remove to delete the private agent from the organization.
Caution
This will not only remove the association of the private agent with the private agent group, but it will also remove the private agent from your organization.
Stop agent or download agent logs
To stop the private agent or download agent logs, use the Action dropdown on the far right. These options will be disabled if your agent is currently in the Stopped or Unregistered status. The agent must be in the Running status in order to stop the agent or download agent logs.
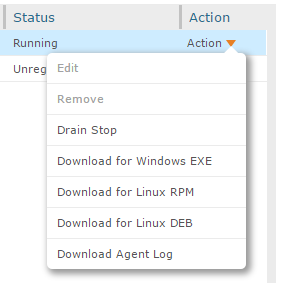
-
Choose Drain Stop to stop the private agent. If you use this option, make sure you have access to the private agent if you would like to restart the agent later. The agent cannot be restarted remotely from the Management Console and must be done manually on the private agent.
-
Choose Download Agent Log to open a prompt to select logs for detailed troubleshooting and auditing purposes. Check the logs you wish to download and click Submit to begin the download.
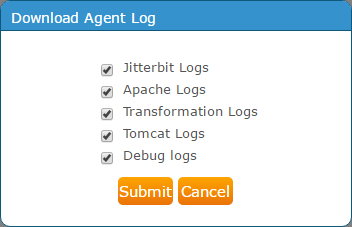
Note
These logs can either be accessed via the Management Console as shown above or can be accessed on a private agent from within a firewall. The agents do not automatically synchronize the logs with the cloud, as they typically include business data. By using a private agent, you can keep that data within a firewall or private cloud infrastructures.
By default, a private agent will store logs for 1 to 14 days depending on the type of log. The private agent can be configured to clean up this data at other intervals by editing the rules in the
jitterbit.conffile within the[FileCleanup]and[ResultFiles]sections (see editing the configuration file). You can also change the number of days all of the files are saved by Editing the Jitterbit file cleanup service rules for private agents.