Agents
Introduction
The Agents page of the Management Console allows Harmony organization administrators the option to set up private agents (formerly known as local agents) as on-premises runtime servers that execute your integration operations. All agents in an agent group will be synchronized the same way so that they execute operations consistently. When you create private agents, you will also need to associate them with a private agent group. For more information, see Agents > Agent groups.
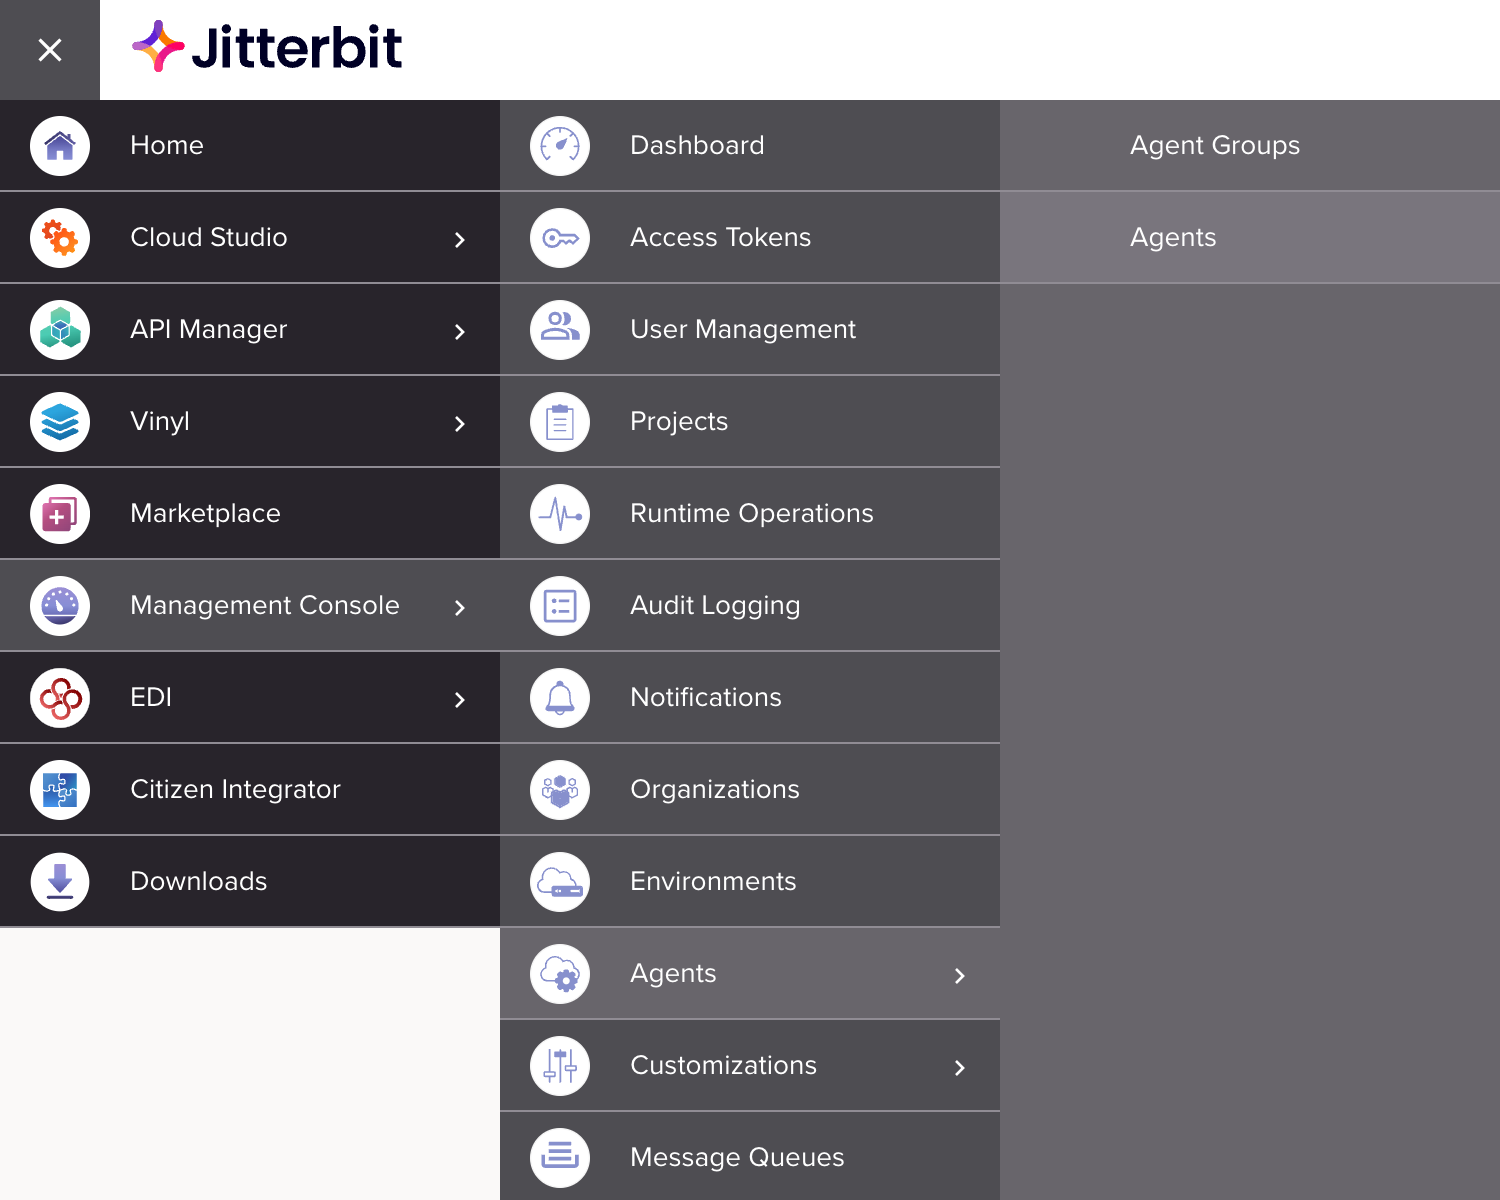
To access the Agents page, log in to the Harmony portal, then click the Harmony portal menu in the top left to hover over Management Console > Agents and select Agents:
Note
Make sure you are accessing the desired organization, which can be changed in the top navigation bar (see Changing the selected organization in Harmony portal).
Manage agents
Administrators of the organization manage the agents for that organization.
View agents
The top section of the Agents page contains a table that shows all of the private agents (formerly known as local agents) within the organization:

This table displays information about each private agent, including its IP address, operating system, agent version, agent status, and the available actions you can take. You can sort this table by clicking on any column header with the exception of the Action header.
Agent status
The private agents table displays statuses for agents based on their current state. This section describes statuses that can be associated with agents.
Unregistered
By default, newly added private agents will have a status of Unregistered and will not be available for executing operations until the agent software is downloaded and installed. After the agent's installation, the Unregistered status functions similarly to the Stopped status.
Note
If deregisterAgentOnDrainstop is set to true in the agent's register.json file, it will be set to the Unregistered status when drain stopped. The DeregisterAgentOnJVMShutdown setting in the [autoscaling] section of the Jitterbit.conf file covers another instance where agents can become Unregistered.
Starting
The Starting status indicates that the agent is transitioning to the Running status.
Running
The Running status indicates that the agent is running and has the ability to execute operations. By default, a heartbeat is sent from the agent every 5 minutes to Harmony to verify that the agent is still accessible. If the agent heartbeat is not detected at within the expected interval, the agent is set to the Unknown status.
Note
The agent heartbeat interval can be changed by modifying the agent.heart.beat.interval setting in the agent's jitterbit-agent-config.properties file.
Stopping
The Stopping status indicates that a drain stop was requested for the agent. The agent is set to the Stopping status during a waiting period (120 seconds by default) prior to transitioning to the Stopped or Unregistered status depending on the agent's configuration settings.
While in the Stopping status, the agent will continue to finish running operations. Any operations still running after the drain stop is complete will be cancelled.
Stopped
The Stopped status indicates that the agent is stopped and unable to execute operations, but is still registered with Harmony.
Unknown
The Unknown status indicates that the agent is in an unknown state. It is caused by the agent not communicating with Harmony using its heartbeat within the expected interval (5 minutes by default) while in the Running status.
View conflicts with the Jitterbit configuration file
If you have remote agent configuration enabled (Agent Management tab of the Organizations page) and there is a conflict between the remote agent configuration and local agent configuration file, you will see  icons next to a private agent name.
Note that if remote agent configuration is enabled, then the remote agent configuration file overrides any settings in the local agent jitterbit.conf configuration file. Thus, these warnings are provided for your information only, and may be expected in circumstances such as when you have made changes to the configuration file remotely via the Agents > Agent groups page.
-
Hover over the
 icon to see a short description of conflicting values.
 -
Click on the
 icon to view the detailed description of any conflicting values.
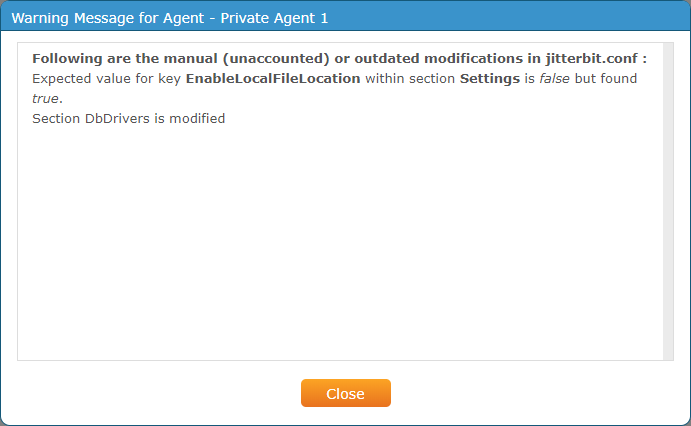
Warning
When you enable remote agent configuration, the current agent configuration (excluding the local PostgreSQL cache database information and local predefined global variables) will be read and stored in the cloud so that you can view and edit it remotely. Once you enable remote agent configuration, any changes you make manually to the local jitterbit.conf file located on the agent will not take effect.
To disable remote agent configuration and again be able to edit the local jitterbit.conf file manually, open the Organizations page, select an organization, select the Agent Management tab, then disable Remote agent configuration. However, note that you will lose the current remote agent configuration that was stored in the cloud. After agent services are restarted, your agent will read from the local jitterbit.conf file.
Add agents and download agent software
To add a new private agent, click  . In the Add Agent dialog box, enter a name for your new agent, and use the Associate Group dropdown to select an existing private agent group you would like to associate with your new private agent.
Note
These special characters are not allowed in the agent name: < > # % { } | \ / ^ ~ [ ] ` ; , : ? @ = &.
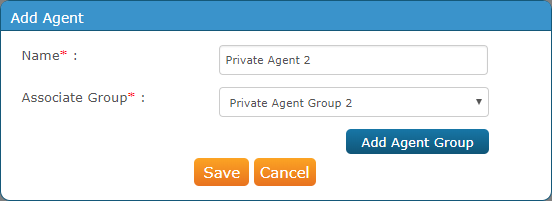
If you do not yet have an existing private agent group you would like to associate, click  to display the Add Agent Group dialog box where you can enter a name for your new agent group, an optional description, and choose whether to enable Cloud Logging. For more information about this option, see Agents > Agent groups.
You should now see your new private agent listed in the table of agents. By default, it will have a status of Unregistered and will not be available for runtime processing until you download and install the agent software on the private agent.
Prior to downloading and installing private agents, please review these pages:
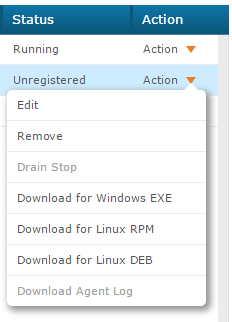
To download the agent software for the same version as the agent selected, use the Action dropdown on the far right and select the appropriate download option for your system.
For further instructions on downloading and installing private agents, see these pages:
You can also add agents and download same-version agent software via the Agents > Agent groups page.
Note
You may be limited to the number of agents you can create based on your subscription plan. If you require more agents, please contact your Customer Success Manager.
Edit and removing agents
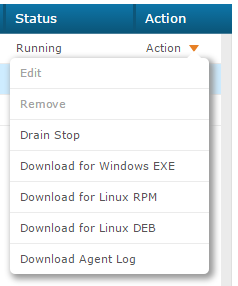
To edit or remove a private agent, use the Action dropdown on the far right. These options will be disabled if your agent is currently in the Running status. The agent must be in the Stopped, Unregistered, or Unknown statuses in order to edit or remove the agent.
- Choose Edit to change the name of your private agent.
- Choose Remove to delete the private agent from the organization.
Stop agents and download agent logs
To stop the private agent or to download agent logs, use the Action dropdown on the far right. These options will be disabled if your agent is currently in the Stopped or Unregistered status. The agent must be in the Running status in order to stop the agent or to download agent logs.
-
Choose Drain Stop to stop the private agent. The agent continues processing existing operations but refuses to accept new ones. When an agent drain stop is initiated, the agent waits 180 seconds for any APIs to finish running before the drain stop is completed. For private agents, the wait time can be configured within the
jitterbit-agent-config.propertiesfile by settingagent.drainstop.api.waitequal to the desired number of seconds.Note
If you use Drain Stop, make sure you have access to the private agent if you would like to restart the agent later. The agent cannot be restarted remotely from the Management Console and must be done manually on the private agent.
-
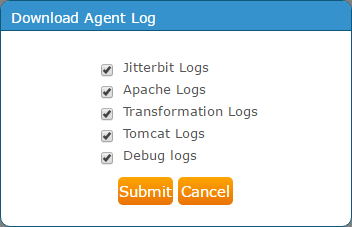
Choose Download Agent Log to open a prompt to select logs for detailed troubleshooting and auditing purposes. Check the logs you wish to download and click Submit to begin the download.
These logs can either be accessed via the Management Console as shown above or be stored on local file storage devices such as file shares or SFTP and accessed from within a firewall. The agent groups and agents do not automatically synchronize these with the cloud, as they typically include business data. By using your own storage devices, you can keep that data within a firewall or private cloud infrastructures.
By default, an agent group will store logs for 1 to 14 days depending on the type of log. The agent group can be configured to clean up this data at other intervals using the CleanupRules defined in the agent home installation directory. See Cleaning up drive space.
Drain stop status
Drain Stop status is reported in the agent log. The log includes each phase of the stopping of the agent, the operations still running, and other details. The default Windows location for the agent log is C:\Program Files (x86)\Jitterbit Agent\log. The default Linux location for the agent log is /opt/jitterbit/log.
Open the agent log and search for entries with Drainstop (one word) or drain stop (two words) as seen here:
2020-03-23 17:03:29,021 +0000 request handler thread #2  INFO org.jitterbit.integration.server.messaging.agent.service.manager.AgentDrainStopManager:94 - Drainstop(109780): Initializing Agent drain stop
2020-03-23 17:03:40,038 +0001 request handler thread #2  INFO org.jitterbit.integration.server.messaging.agent.service.manager.AgentDrainStopManager:221 - Drainstop(109780): Stopping the heart beat service
2020-03-23 17:03:40,038 +0001 request handler thread #2  INFO org.jitterbit.integration.server.messaging.agent.service.manager.AgentDrainStopManager:237 - Drainstop(109780): Updating the status of the agent as stopped
View installed plugins
Plugins are available to any agent within the agent group. This is in order to synchronize all plugins across an agent group. For more information on Jitterbit-provided plugins or to add custom plugins, see Customizations > Plug-ins.
View plugins
The bottom section of the Agents page contains a tab for Installed Plug-ins. This table displays all plugins for the private agent selected in the top portion of the page:
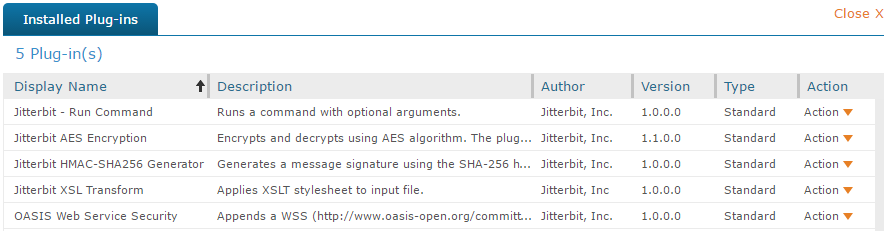
In this table, you can see a description of the plugin, the author, version, type, and available actions you can take. You can also sort this table by clicking on any column headers except Action.
View manifest files
To view the manifest file associated with a particular plugin, use the Action dropdown on the far right:
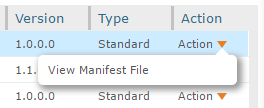
The XML file should display or download.
<JitterbitPlugin SpecVersion="1.0">
<PipelinePlugin SpecVersion="1.0">
<Name>
http://www.jitterbit.com/plugins/pipeline/user/RunCommand
</Name>
<Version>1.0.0</Version>
<DisplayName>Jitterbit - Run Command</DisplayName>
<Author>Jitterbit, Inc.</Author>
<Description>Runs a command with optional arguments.</Description>
<UpdateUrl>NA</UpdateUrl>
<DocumentationUrl>NA</DocumentationUrl>
<!--
 Set the variable $Command with the command you want to run
-->
<Command>[Command]</Command>
<!--
 Set the variable $Arguments with the arguments to your command. Set it to an empty string if the command takes no arguments.
-->
<Arguments>[Arguments]</Arguments>
<DataElements All="false">
<DataElement Name="Command" Type="string" Required="true">
<Documentation>
The command (executable, script etc) to run. This command can not have a user interface and can not wait for user input. If it does the plugin will just hang forever.
</Documentation>
</DataElement>
<DataElement Name="Arguments" Type="string" Required="false">
<Documentation>Optional arguments.</Documentation>
<DefaultValue/>
</DataElement>
</DataElements>
<!--
 The value describes where the plugin can be applied, e.g. Target, Source, WebServiceMethod
         Relative is where in relation to the pipeline position this plugin is executed
-->
<PipelinePosition Optional="true" Relative="Pre" ExecutionOrder="50">Source</PipelinePosition>
<PipelinePosition Optional="true" Relative="Post" ExecutionOrder="50">Source</PipelinePosition>
<PipelinePosition Optional="true" Relative="Pre" ExecutionOrder="50">Target</PipelinePosition>
<PipelinePosition Optional="true" Relative="Post" ExecutionOrder="50">Target</PipelinePosition>
<PipelinePosition Optional="true" Relative="Inside" ExecutionOrder="50">Script</PipelinePosition>
</PipelinePlugin>
</JitterbitPlugin>