Environments
Introduction
The Management Console Environments page allows Harmony organization administrators to set up environments within an organization to define and manage an integration project's lifecycle. You must set up at least one environment in order to create projects within Harmony.
Members of a role that has been granted Read environment access can also access the Environments page. Members of a role that has been granted Write environment access have write access in that environment.
Each integration project is deployed to a specific Harmony environment. Environments can be used to segregate different states of an integration project. For example, a common project lifecycle configuration might have three environments: Development, Test, and Production.
The access that users have in a specific environment depends on the combination of their role's permissions and its environment access:
- A role's permissions are defined by organization administrators on the User Management page.
- A role is granted access to an environment as described under Manage role access to environments later on this page.
In order to access an environment, all roles (even roles with Admin permission) must be granted access to an environment for most apps. This includes being able to access areas of Harmony applications that require an environment to be selected, and the ability to install agents in an environment. The exceptions are the EDI and Vinyl applications, which do not require any environment access levels to be granted to roles; access to these apps is governed by role permissions alone.
When you're ready to move a project between environments, such as from Development to Test, you migrate the project. This can be done from within Cloud Studio (see Project migration) or Design Studio (under File > Migrate Project).
Note
After making changes to an environment, you may need to log out and log back in to the Harmony portal for those changes to take effect in other Harmony applications.
Access the environments page
Users are able to see or edit the Environments page depending on the combination of their organization role's permissions and its environment access:
- Members of a role with only Read permission whose role has been granted access to an environment can see information about the environment on the Environments page but are not able to edit it.
- Members of a role with Admin permission can see and use all actions for all environments on the Environments page (even if they have not been granted role access to the environment).
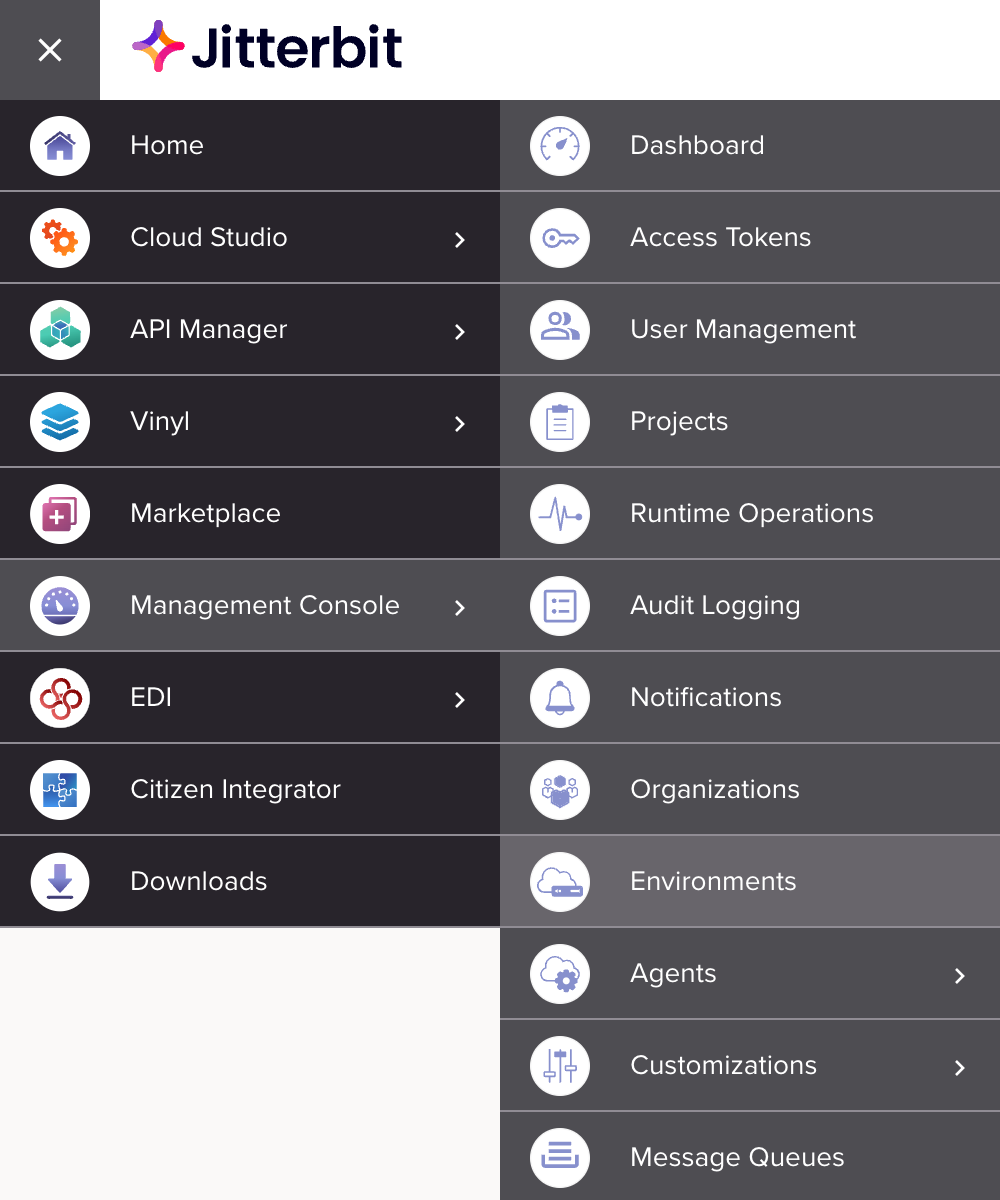
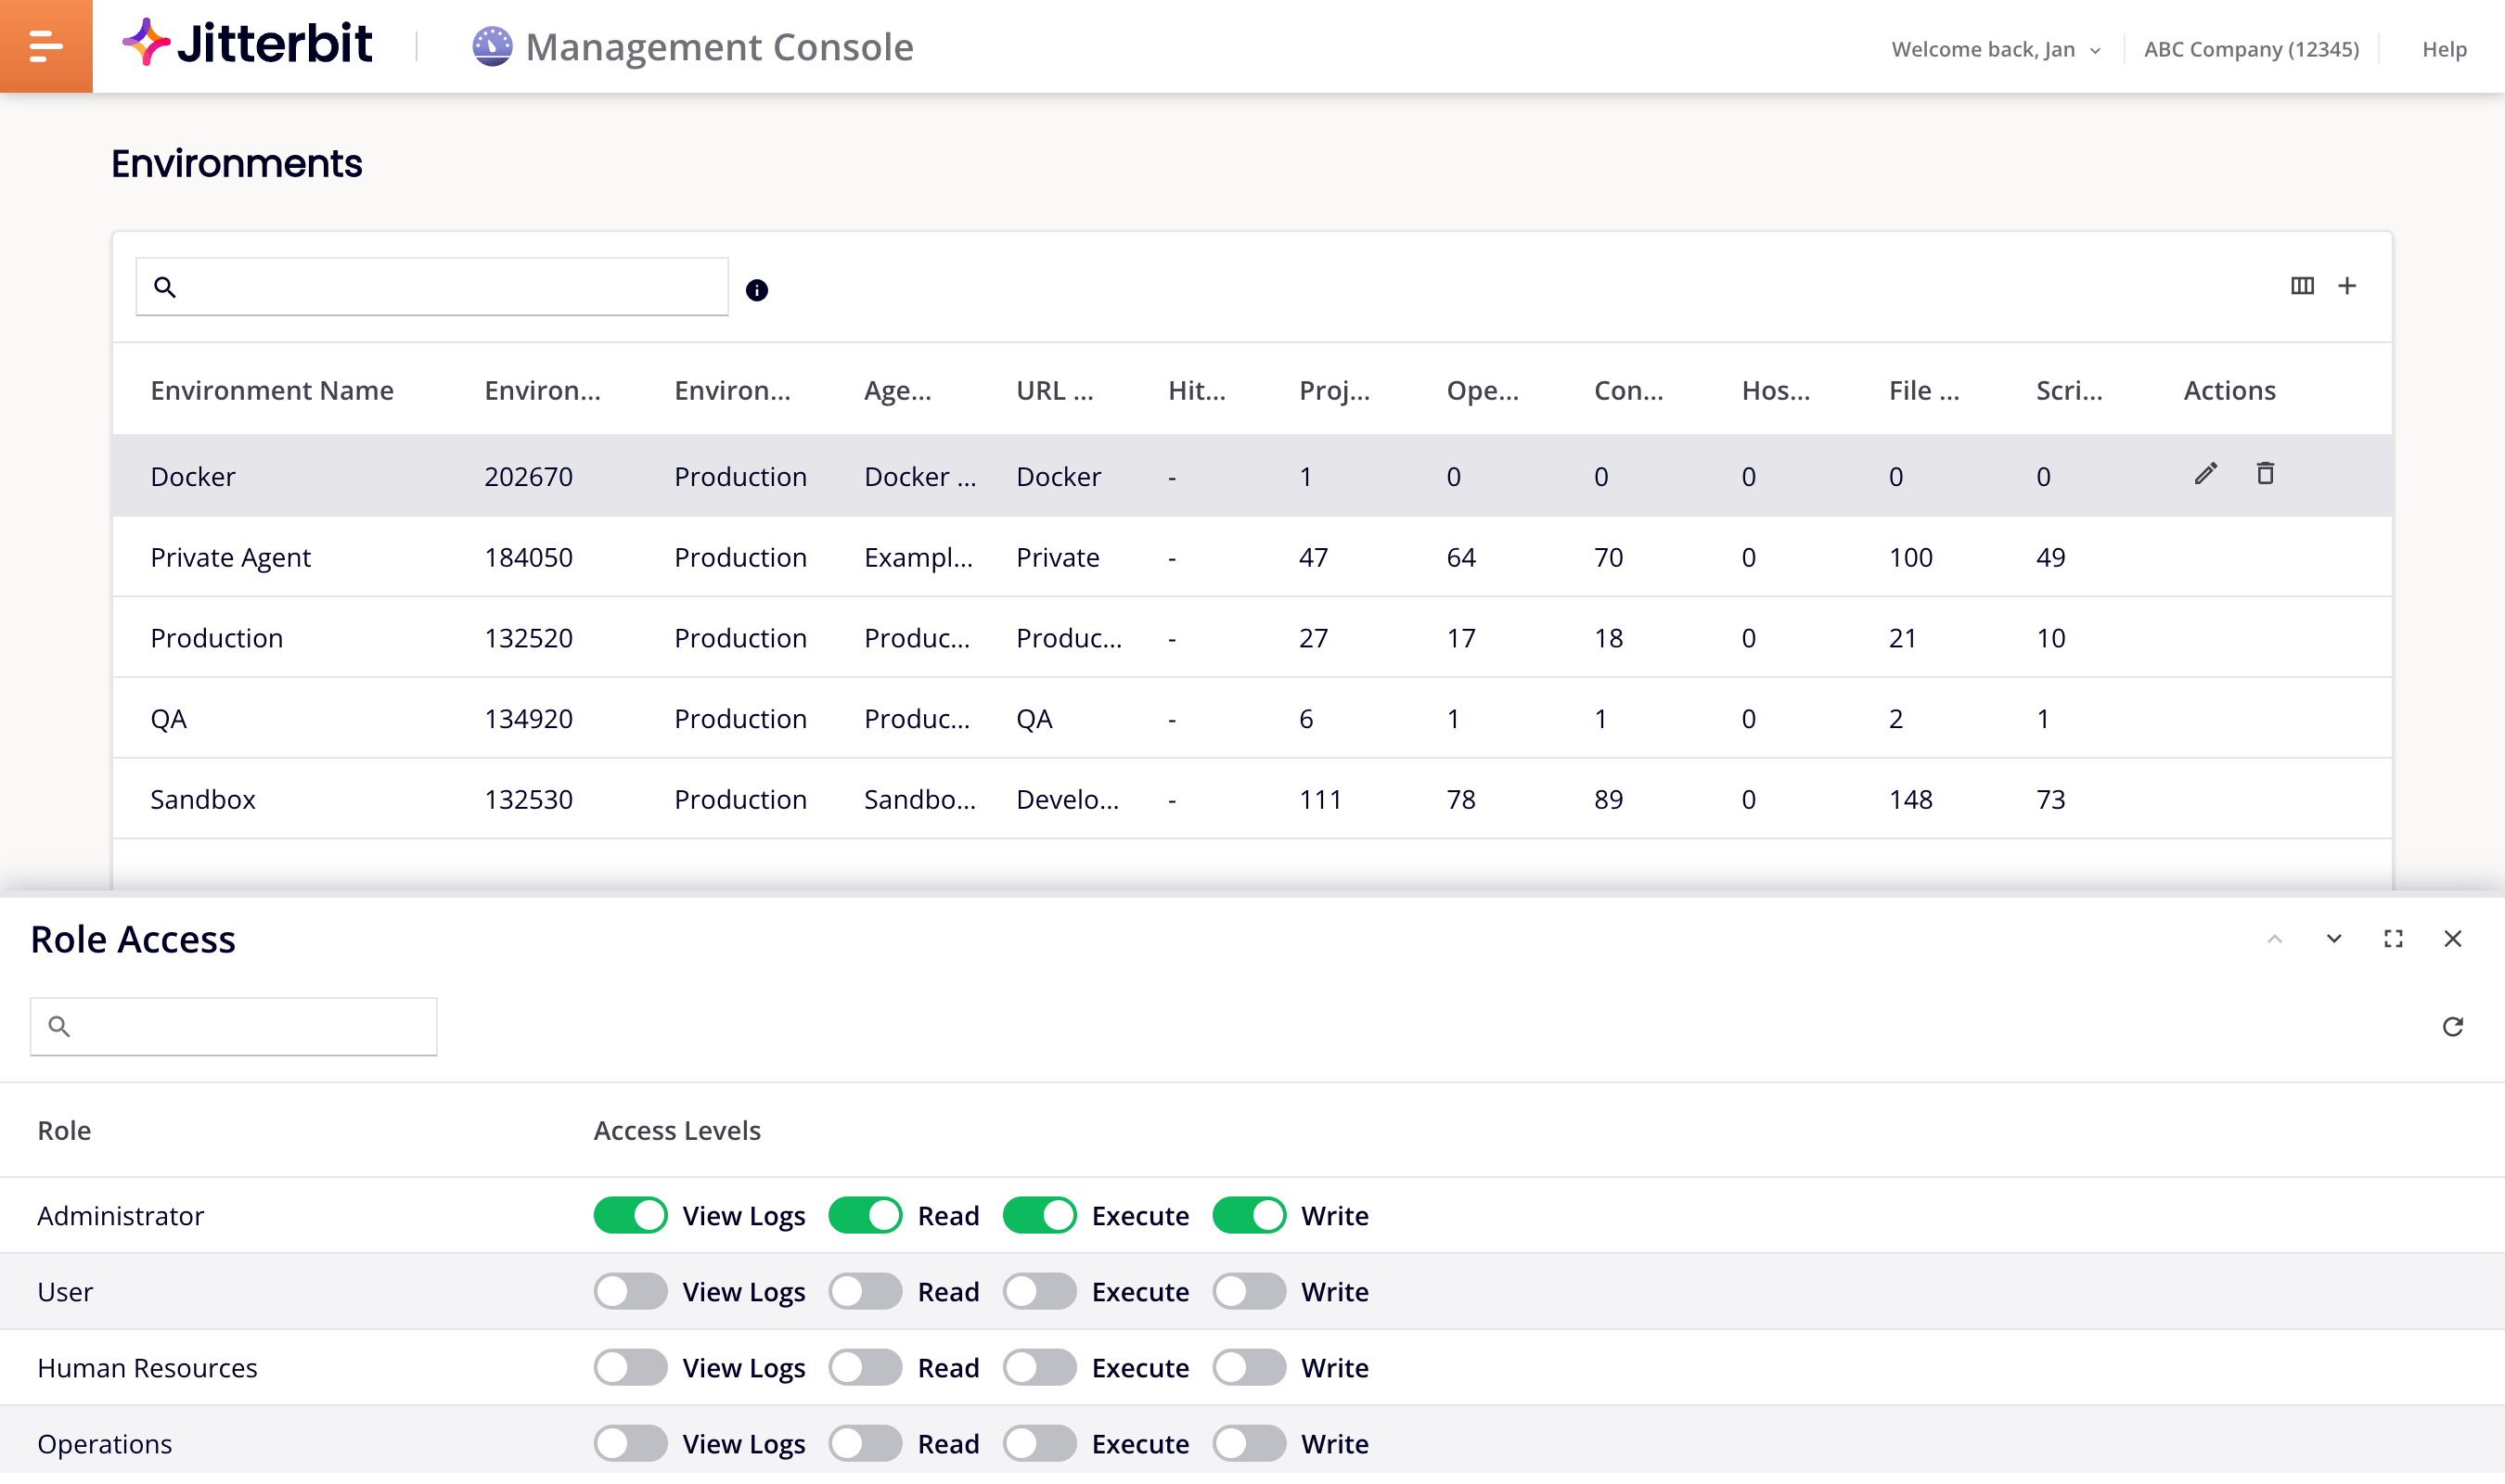
To access the Environments page, log in to the Harmony portal, then use the Harmony portal menu in the top left to go to Management Console > Environments:
Note
Make sure you are accessing the desired organization, which can be changed in the top navigation bar (see Changing the selected organization in Harmony portal).
Manage environments
Harmony organization administrators (members of a role with Admin permission) manage each environment and the agent groups associated with it. Members of a role with only Read permission whose role has been granted access to an environment can see information about the environment but are not able to add, edit, or remove environments.
View environments
The top section of the Environments page contains a table that shows all the environments that you have access to within the selected organization:
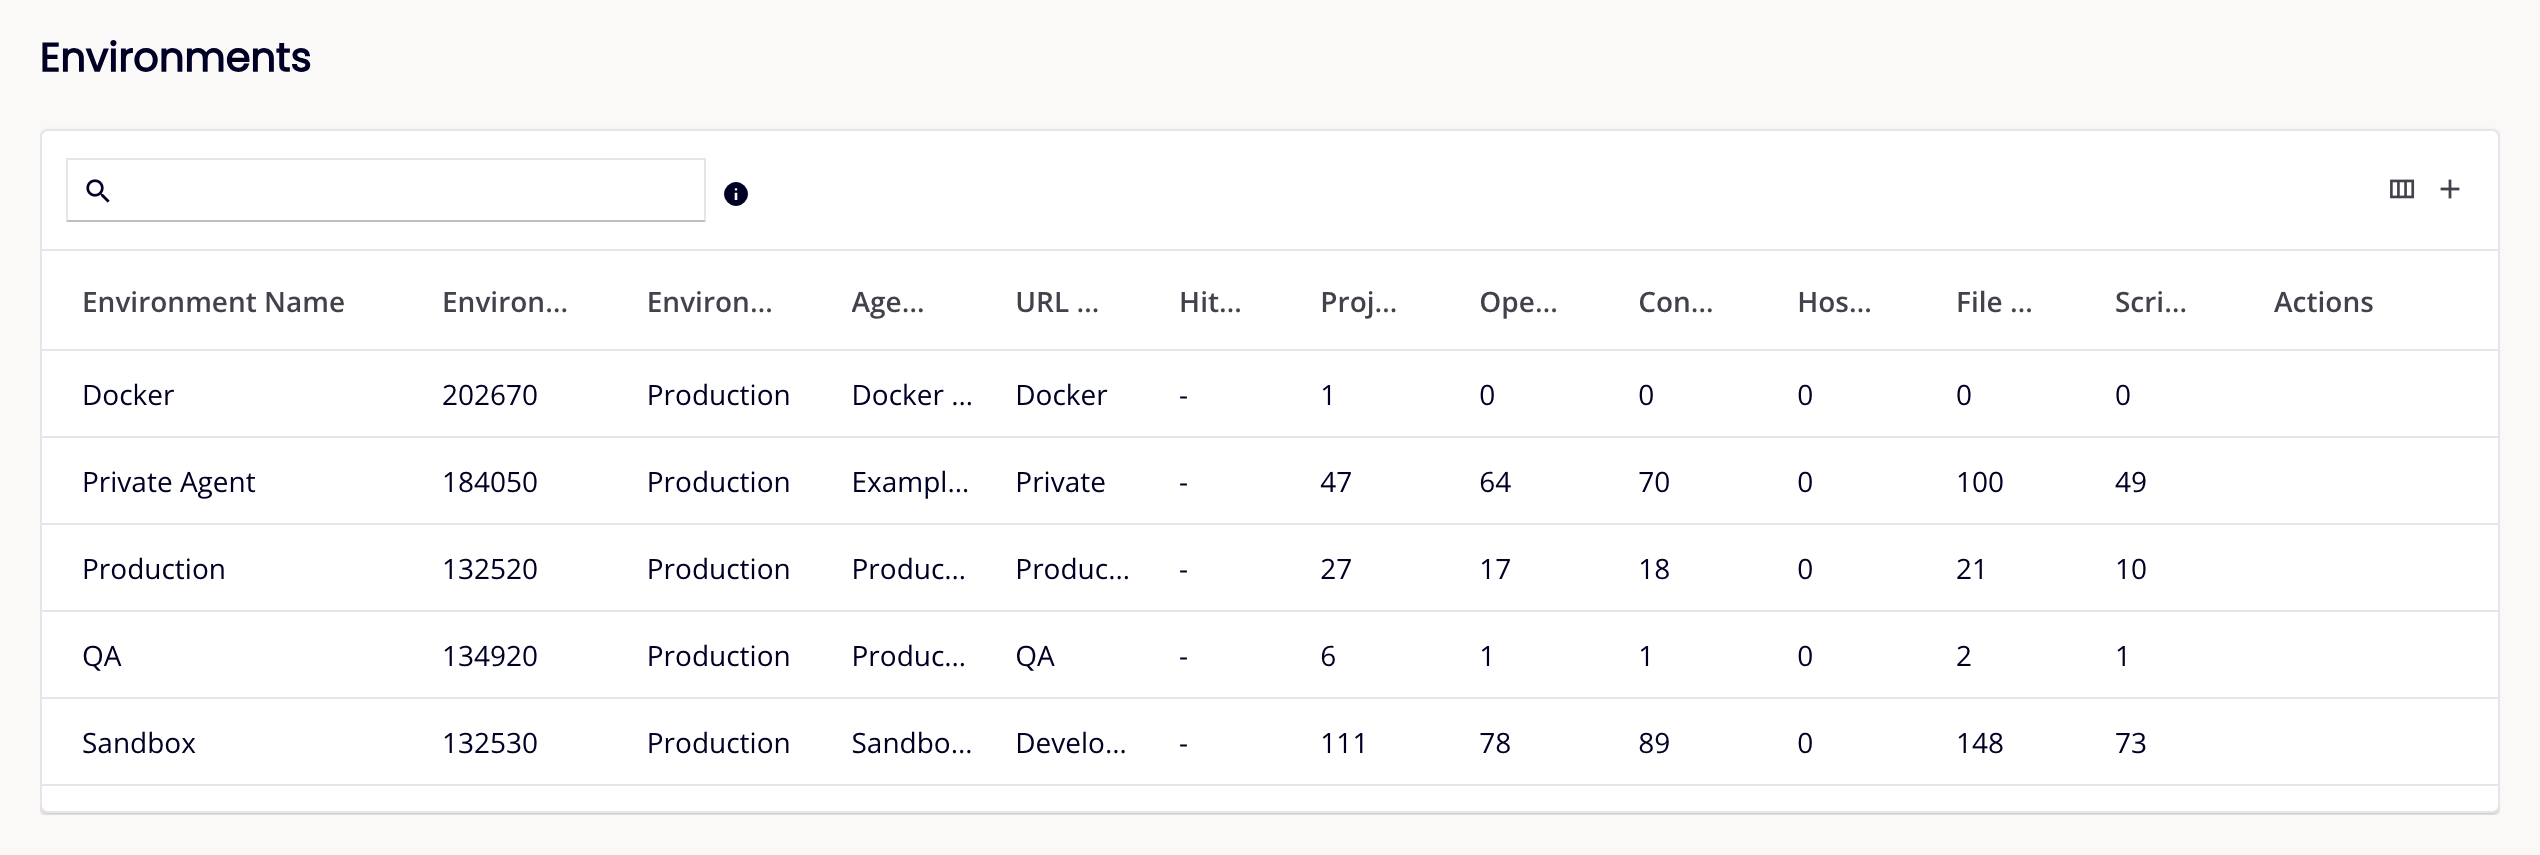
The table displays information for each environment. These fields are configurable as explained in the next sections:
-
Name: The name of the environment.
-
ID: The environment ID.
-
Class: The class of the environment for reporting purposes only.
-
Agent group: The agent group associated with the environment. For more information, see Agents > Agent groups.
-
URL prefix: The environment's URL prefix, to be used with custom, OData, and proxy APIs created with API Manager.
-
Hit limit: The maximum number of API hits per minute within the environment, for use with API Manager.
Other fields in the table contain automatically populated statistics about your environment, including counts of these items:
-
Projects: The combined total number of Cloud Studio projects and Design Studio projects deployed in Harmony for the environment.
-
Operations: The combined total number of Cloud Studio operations and Design Studio operations deployed in Harmony for the environment.
-
Connections: The combined total number of Cloud Studio connections and Design Studio sources, targets, Jitterbit connect wizard, and connector wizard endpoints.
-
Hosted endpoints: The combined total number of Design Studio hosted HTTP endpoints and hosted web service endpoints.
-
File formats: The combined total number of Cloud Studio schema files and Design Studio file formats.
-
Scripts: The combined total number of standalone Cloud Studio scripts (as a project component) and Design Studio scripts (as a project item).
-
Actions: Hover on a row to reveal the following action controls:
-
Edit: Edit the environment.
-
Delete: Delete the environment.
-
To sort the table, click on any of the column headers.
To filter the table, use the search box to enter filter criteria. Hover on the icon to reveal an example of the search syntax.
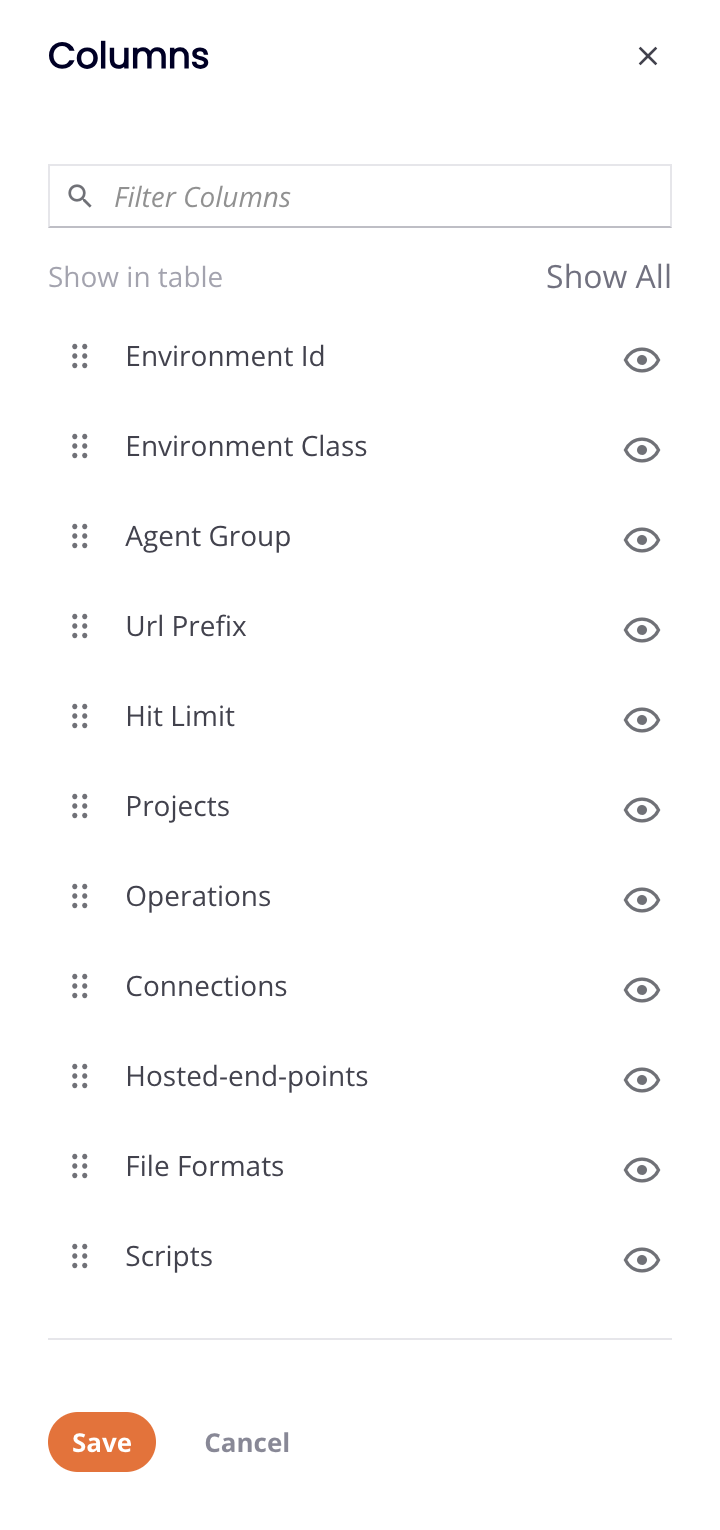
Many columns are hidden when you first open the page. To change the visibility and order of columns click Column Settings. The Columns side drawer opens:
-
Filter Columns: Enter part or all of a column name to reduce the list to those matching the text.
-
Show All: Make all columns visible.
-
Move: Drag and drop to change the position of the column relative to others.
-
Hide: The column is visible. Click to hide it.
-
Show: The column is hidden. Click to show it.
-
Save: Save any changes to the columns.
-
Cancel and Close: Close the columns editor without saving changes.
Add environments
At least one environment must be defined for each organization. You may be limited to the number of environments you can create based on your Harmony subscription plan. If you require additional environments, contact your Customer Success Manager.
To add an environment, click Add Environment. A new row appears in the table:

-
Name: The name of the new environment (for example, Development, Test, or Production).
Note
These special characters are not allowed:
<>#%{}|\/^~[]`;,:?@=& -
Class: The class of the new environment. Use the dropdown to select a class that best describes the environment. This field is for reporting purposes only and does not impact how an environment functions.
-
Agent group associated: The agent group you want to use to service the new environment. Use the dropdown to select an agent group for the environment, choosing from either a private agent group configured through the Agents Groups page (see Agents > Agent groups) or one of the Jitterbit cloud agent groups (available by default).
-
URL prefix: The environment's URL prefix, to be used with custom, OData, and proxy APIs created with API Manager. By default, the name of the environment is used. For more information, see API service URL.
Whether you use the environment default or enter a custom name, the URL prefix becomes an integral part of an API Manager API service URL. The URL prefix is limited to a maximum of 48 characters.
Note
These special characters are not allowed:
<>#%{}|\/^~[]`;,:?@=&In addition, spaces are not allowed.
-
Hit limit: The maximum number of custom API hits per minute within the new environment, for use with API Manager. If left blank, there is no limit to the number of API hits at the environment level and the limit of hits per minute defaults to the organization limit across all APIs in all environments (as stated in your Jitterbit license agreement). For additional information, see Rate limiting at profile level in API Manager security.
-
Description: A description of the new environment.
Click Save to save the settings, or Cancel to cancel.
Edit environments
To edit an environment after it is created, hover on a row and click the Edit button in the Action column:

Editable fields are the same as those when adding an environment.
Delete environments
To remove an environment, hover on a row and click the Delete button in the Action column. The Delete Environment dialog opens:
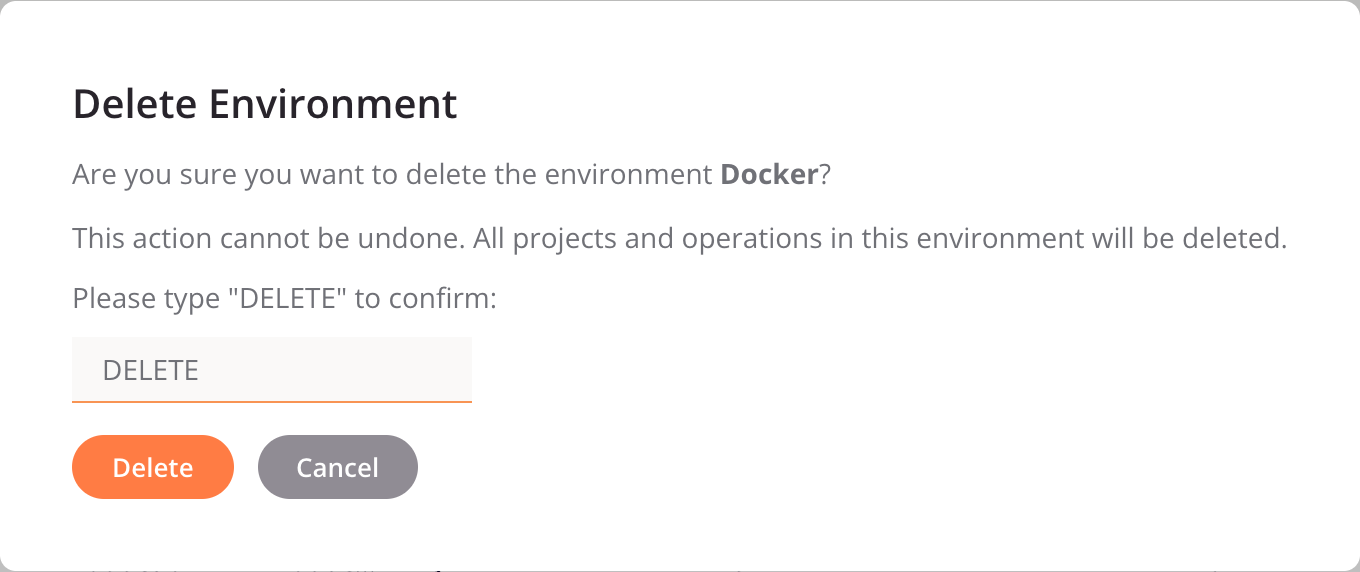
To continue the action, enter the word DELETE in the text field and click the Delete button.
To abandon the action, click the Cancel button.
Manage role access to environments
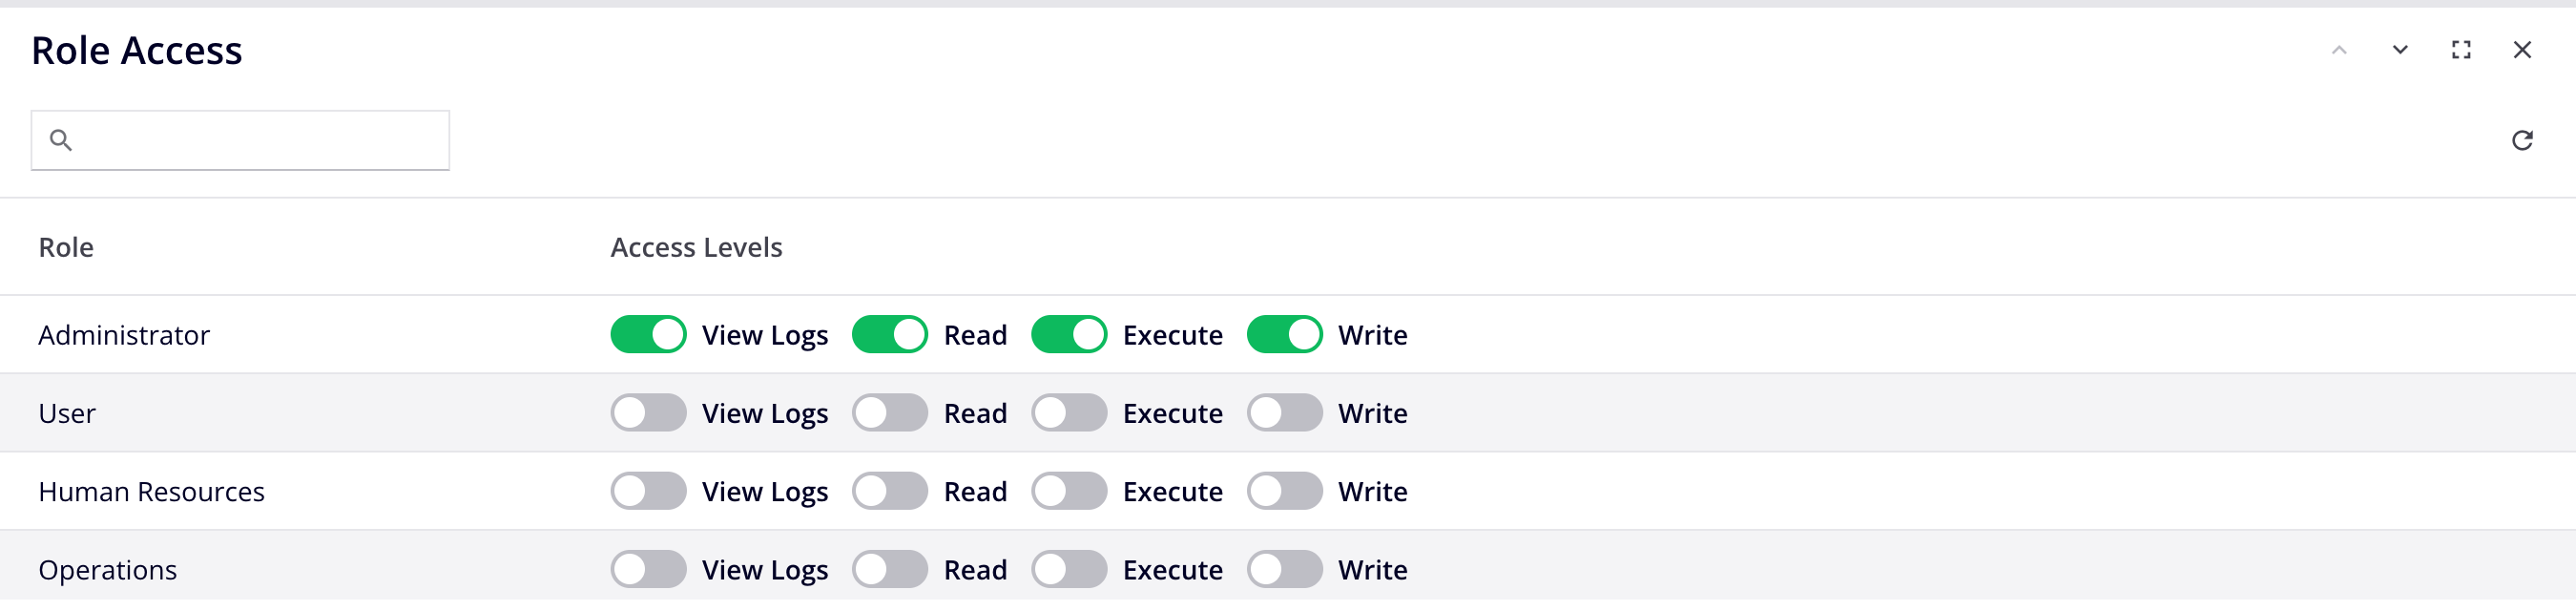
Before granting role access to an environment, you must define the roles that can have access. The individual membership for those roles is defined at the user level. After roles are defined, you can grant roles different levels of access to an environment.
Environment-level access levels are used in combination with role permissions to further the ability of administrators to control what members of a specific role can do in a specific environment. For example, users in an entry-level developer role may have Read, Execute, and Write access in a development environment but only Read access in a test environment and no access in a production environment.
Access levels
When granting a role access to an environment, you can select from one of four cascading environment access levels. View Logs is the lowest level of access, followed by Read, Execute, and then Write as the highest level of access. As you select a higher level of access, all lower access levels are automatically selected and cannot be cleared.
The access levels are independent and different from the permissions assigned to a role. For example:
- A member of a role with Read permission may still be able to make edits in an environment if Write access is granted to the role at the environment level.
- A member of a role with Admin permission but who has only Read access at the environment level is not able to deploy, execute, or edit projects in that environment.
- A member of a role with Admin permission but who has not been granted environment access is not able to access the environment at all.
The four environment access levels are described in the table below.
Note
Access as described below is provided only if the assigned role has Read or Admin permission. If the role has only Agent-Install, ApiConsumer, or App Developer permission, members of these roles do not have access to the pages or actions described here, despite the environment access levels being selected.
Tip
Environment access levels grant no additional access to the EDI and Vinyl applications; access to these apps is governed by role permissions.
| Environment Access Level | Access Level | Environment Access When Granted to a Role with Read or Admin Permission | Notes |
|---|---|---|---|
| View Logs | Lowest | Access to:
| View Logs is automatically selected if any other access level (Read, Execute, or Write) is selected. |
| Read | Low | Access to:
| Read is automatically selected if Execute or Write access is selected. When this access level is selected, the View Logs access level is automatically selected and cannot be cleared. This access level is commonly used to limit access to projects deployed to critical environments, such as a production environment. When granted to a role with ApiConsumer permission, Read access provides access to the API Manager Portal page through a direct link. |
| Execute | High | Access to perform these actions:
| Execute is automatically selected if Write access is selected. When this access level is selected, the View Logs and Read access levels are automatically selected and cannot be cleared. This access level is commonly used to limit access in test environments and is often granted to users who need to support an integration, as they may need to run operations and view operation logs. In organizations whose Harmony subscription has expired, this access level is effectively the same as the Read access level. |
| Write | Highest | Access to and the ability to make edits and perform actions such as deploying (where applicable) on:
| When this access level is selected, the View Logs, Read, and Execute access levels are automatically selected and cannot be cleared. When granted to a role with Agent-Install permission, Write access provides the ability to install agents. In organizations whose Harmony subscription has expired, this access level is effectively the same as the Read access level. |
API Manager portal
These additional criteria must be met before the API Manager Portal page is accessible:
- For each API whose documentation becomes accessible from the Portal page, an organization role that has been granted a minimum of Read access in an environment must be selected in the API configuration (see Step 3: Assign user roles and security profiles in Custom API configuration).
- The API documentation must have previously been generated and published through the Portal Manager page.
In addition to access through the API Manager application, the Portal page can be accessed by:
-
A direct link for API consumers who have both ApiConsumer permission in an organization and a minimum of Read access in an environment. To obtain the direct link, copy either the URL of the API Manager Portal page or the link to View API Documentation on the Portal Manager page.
-
An invitation from a Harmony organization administrator through the Management Console User Management page.
View and edit role access to an environment
To view or edit an environment's role access, select a row in the table. On the bottom section of the Environments page, the Role Access pane displays all roles that can be granted access to the selected environment:
Note
If a role that had previously been granted access to an environment is deactivated or has been deleted (from the User Management page), the role will not be displayed.
To select or clear an access level, enable or disable the access level toggle. A confirmation dialog is displayed.
To clear a role of all access levels, click a role's View Logs access level to toggle off the selection.
The access levels available in an environment are described in detail above under Access levels.
Grant a role access to an environment
Select an environment to reveal the Role Access pane at the bottom of the screen:
-
Search: Search for roles matching the text. Searches are case-insensitive. To show all roles, delete the text.
-
Refresh: Refresh the roles.
-
Previous: Select the previous environment in the table.
-
Next: Select the next environment in the table.
-
Fullscreen: Increase the size of the Role Access pane to fill the browser window.
-
Exit Fullscreen: Return the Role Access pane size to normal.
-
Close: Close the Role Access pane.