Projects
Introduction
The Projects page of the Management Console provides Harmony organization administrators with the ability to manage all of your projects across the various stages of their lifecycle. You can import and delete projects, as well as run operations, create and apply a schedule on an operation, manage project backups, edit project variables, view deploy history, and enable or disable listeners.
Members of a role that has been granted Read environment access can also access the Projects page. Members of a role that has been granted Write environment access have write access in that environment.
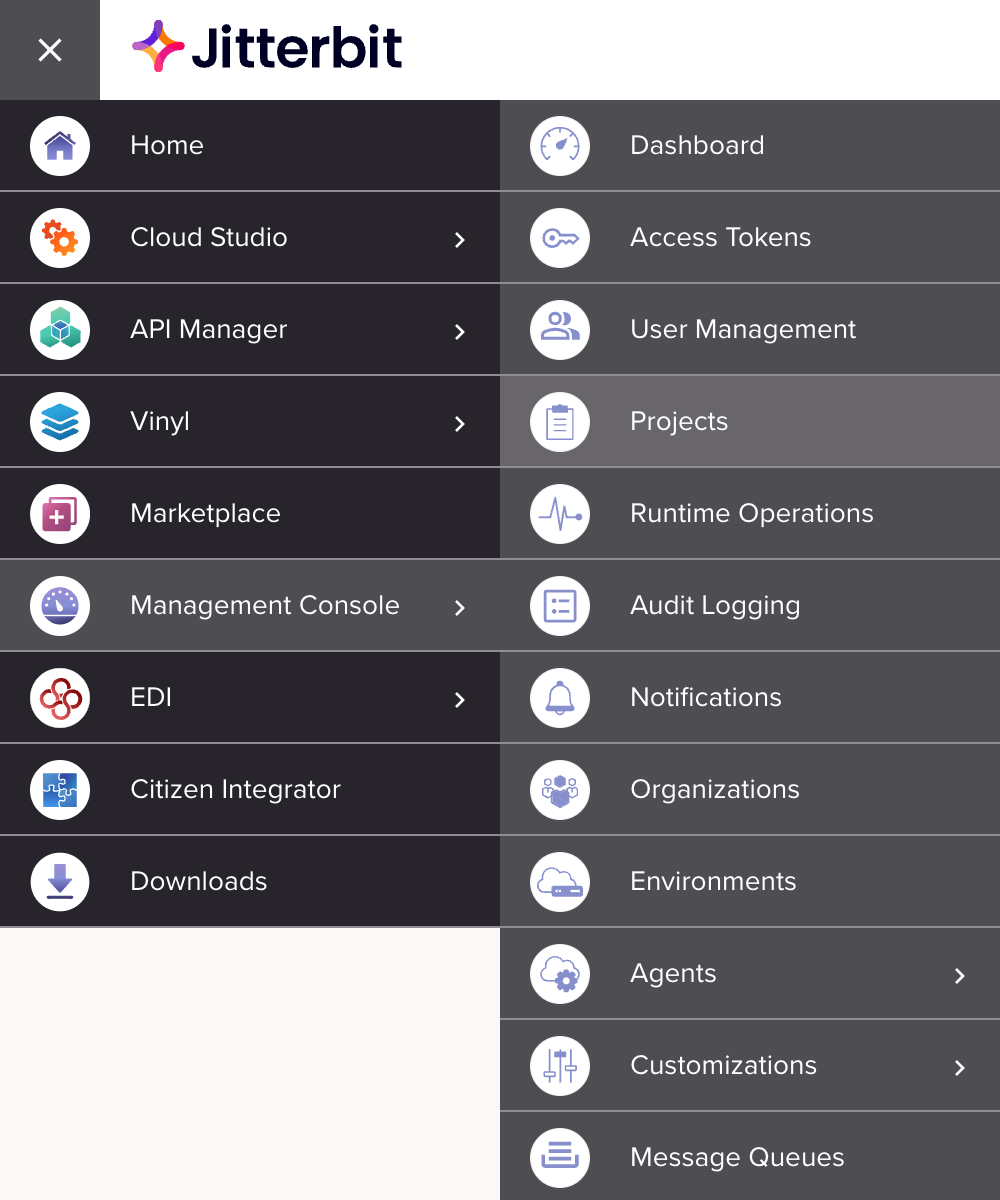
To access the Projects page, log in to the Harmony portal, then use the Harmony portal menu in the top left to go to Management Console > Projects:
Note
Make sure you are accessing the desired organization, which can be changed in the top navigation bar (see Changing the selected organization in Harmony portal).
Projects page header
The header along the top of the Projects page includes these view controls:

-
Filters: Click to open a pane and filter the table by Endpoint Authorization, Environment, and Status:
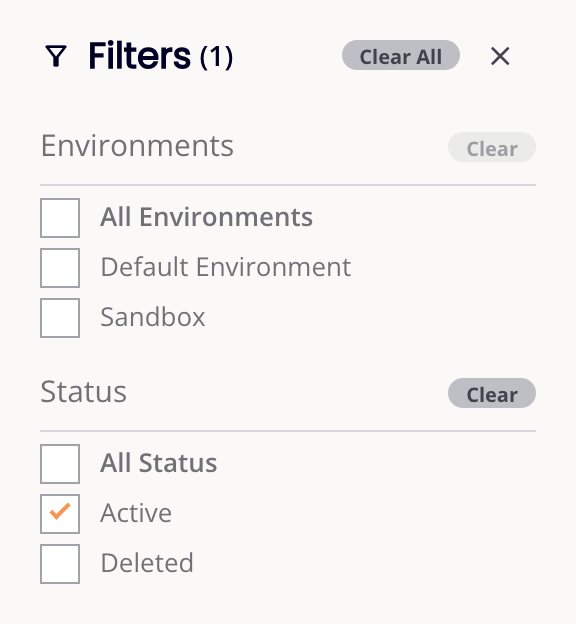
Filters are applied immediately. Use the Clear and Clear All buttons to reset filters, and the Close button to close the pane.
If Expires in next is selected for Endpoint Authorization, a field appears to set a number of days.
-
Search: Enter any part of the project ID, project name, environment, description, or status into the search box to filter the list of projects (alphanumeric characters only). The search is not case-sensitive.
-
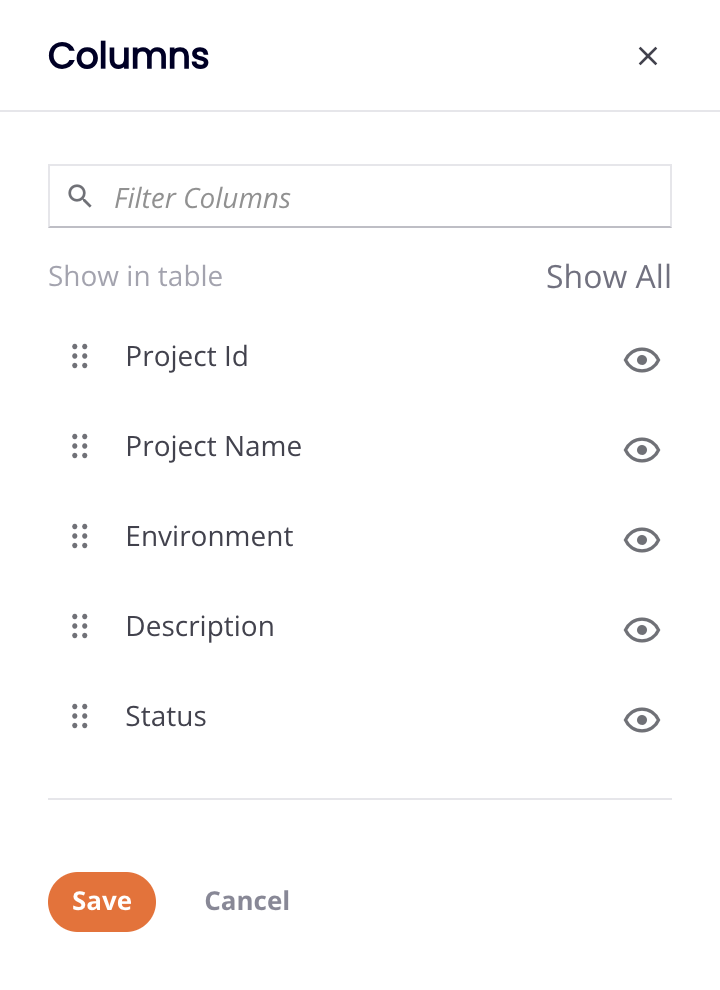
Filter Columns: Click to open a drawer that allows you to reorder the columns or adjust their visibility in the projects table:
-
Filter Columns: Enter part or all of a column name to reduce the list to those matching the text.
-
Show All: Make all columns visible.
-
Move: Drag and drop to change the position of the column relative to others.
-
Hide: The column is visible. Click to hide it.
-
Show: The column is hidden. Click to show it.
-
Save: Save the columns.
-
Cancel: Close the columns editor without saving changes.
-
-
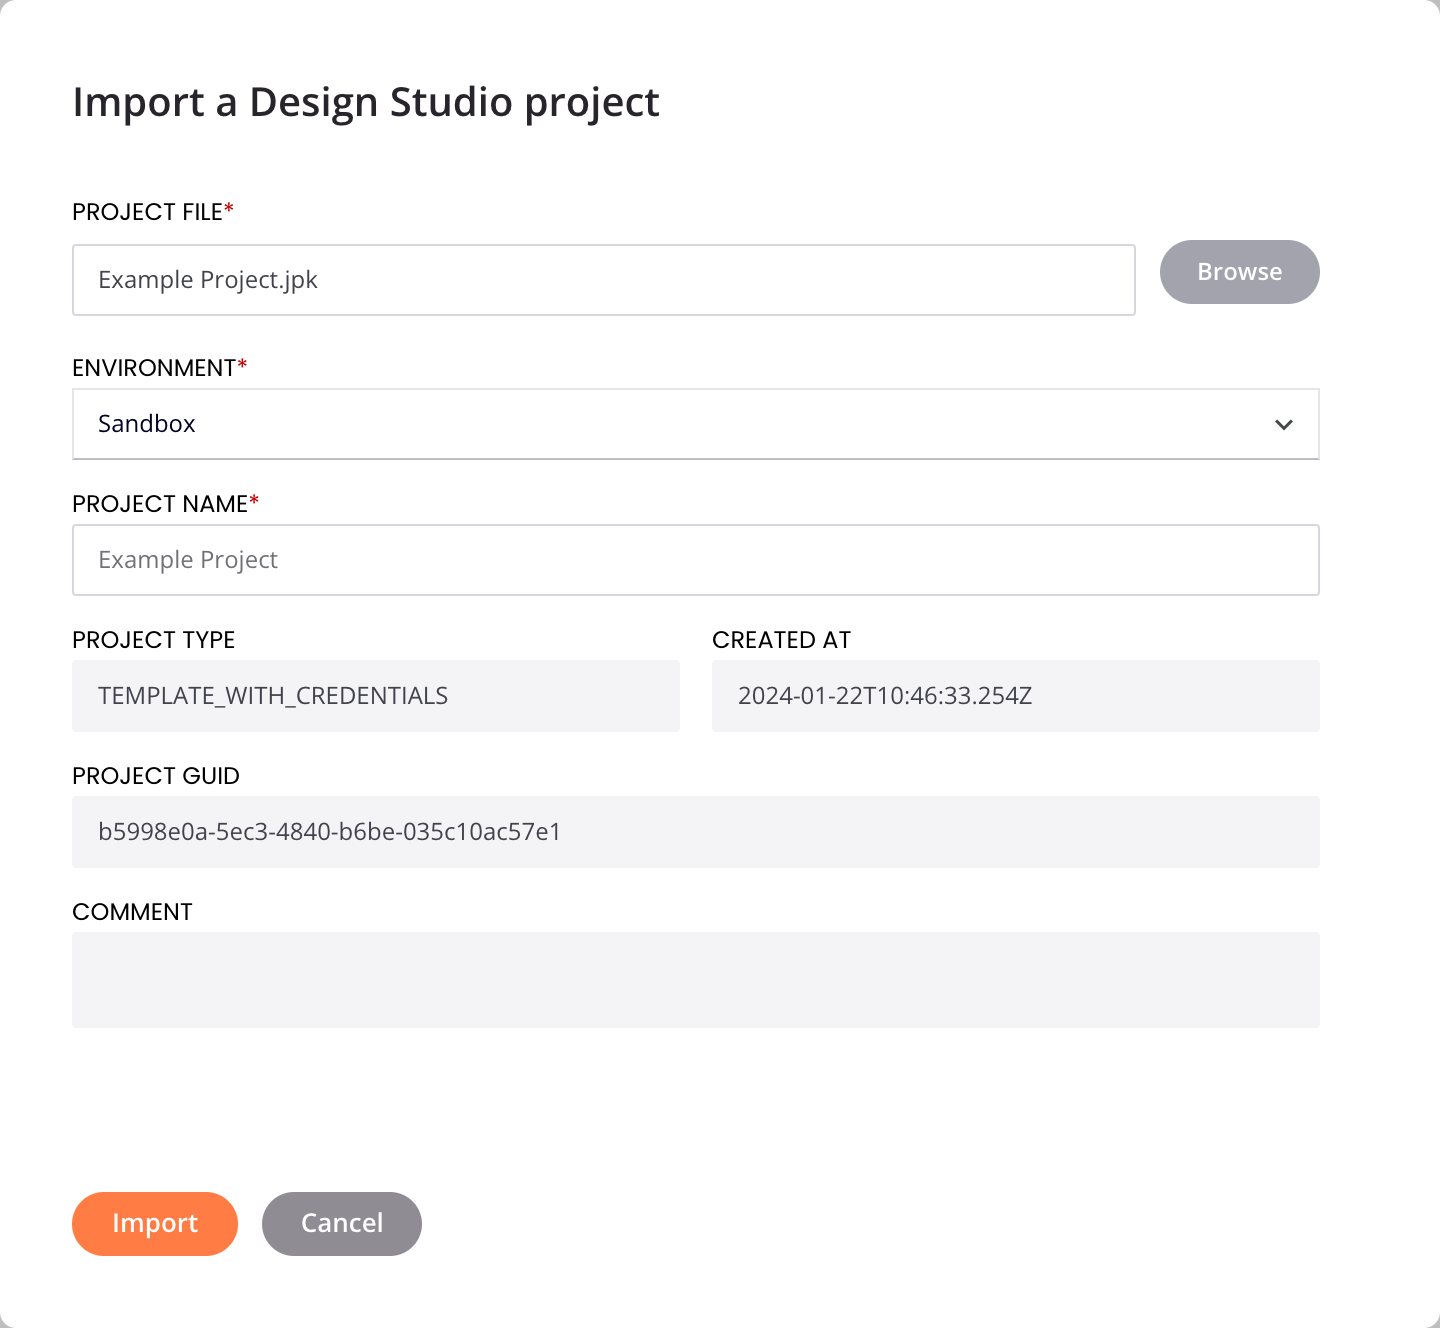
Import Project: Click to import a Design Studio project:
Note
Cloud Studio projects are unable to be imported from the Management Console. To import a project from within Cloud Studio, see Project exports and imports.
-
Project File: Click Browse to select the Jitterpak file (.JPK) to be imported.
-
Environment: Use the menu to select the environment to import the project into.
-
Project Name: The name to give the imported project. By default, the name of the project at the time of export is populated. You can edit the name here.
Note
The Project Name cannot contain any of these special characters:
\ / : ? * " < > |. -
Project Type: The type of project being imported.
-
Created At: The date and time the project was exported (in ISO-8601 format).
-
Project GUID: The GUID of the project being imported.
-
Comment: Any comments provided during the export are displayed here.
-
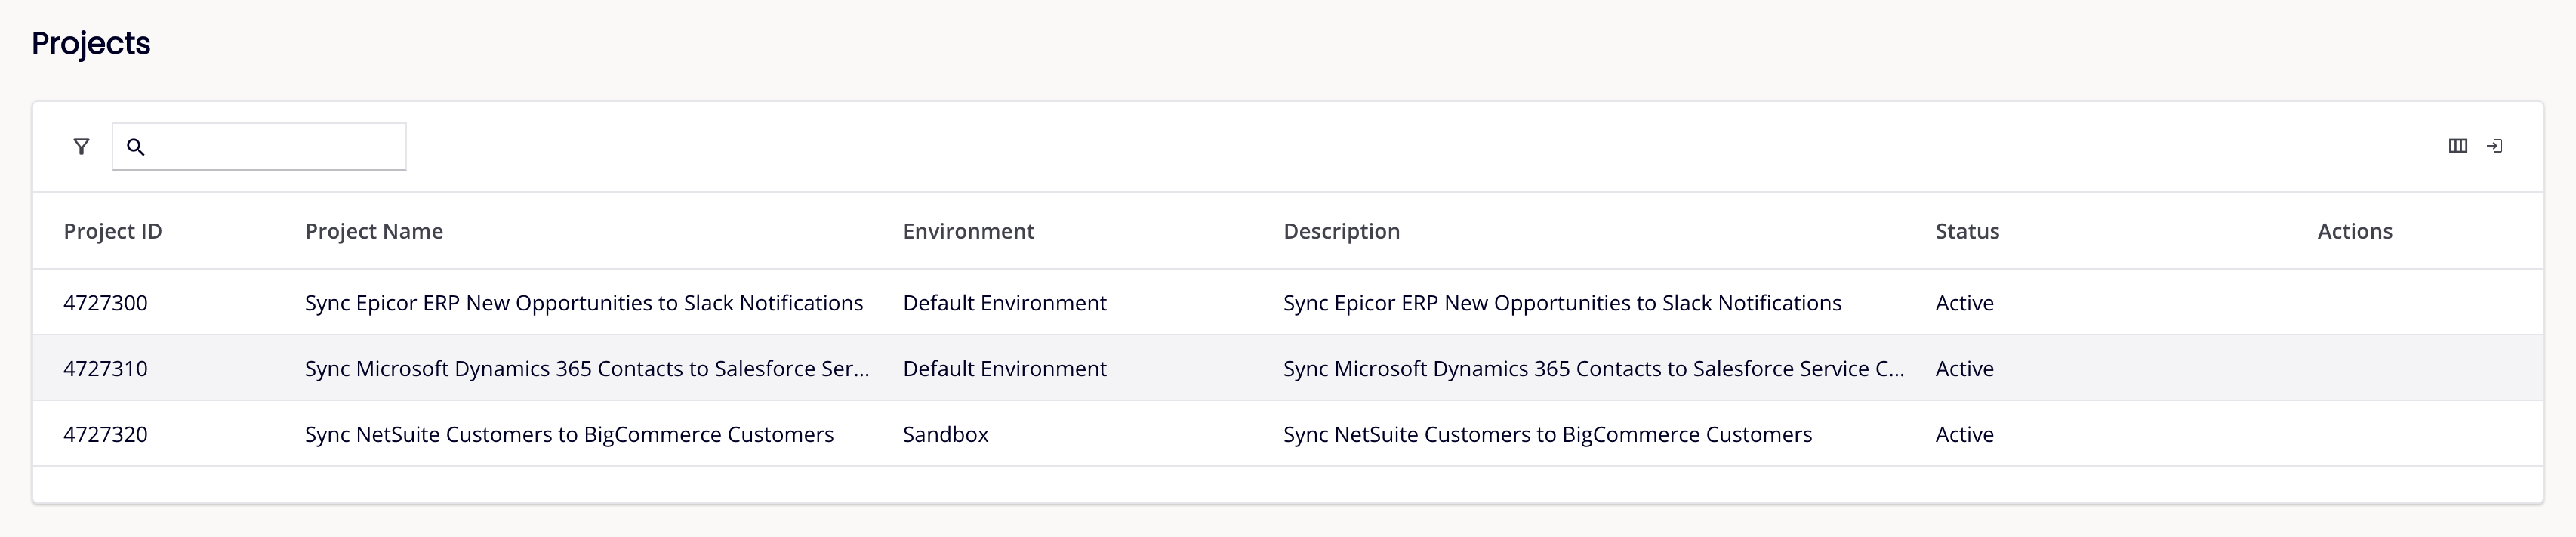
Projects table
The Projects table lists each project, its associated environment, a description (if available), its status, and additional details about project. Both Cloud Studio and Design Studio projects are included:
-
Project ID: The project ID.
-
Project Name: The name of the project. Projects with 3LO-enabled endpoints use the following icons to mark expiring or expired authorizations, and how many of each. Hovering on the icon reveals a message:
-
1 Endpoints will expire soon
-
1 Expired endpoints
-
-
Environment: The environment the project resides in.
-
Description: The description of the project (if provided).
-
Status: The status of the project, either Active or Deleted:
-
Active: Projects have an Active status if they have not been deleted.
-
Deleted: Projects have a Deleted status when they have been deleted either through the Actions menu on this page or when a Cloud Studio project has been moved to the trash or permanently deleted.
-
-
Actions: These actions are available in the Actions column when hovering over an active project's row:
-
Delete: Click to delete the project from its environment. On clicking Delete, a Cloud Studio project is moved to the trash and is kept there for 90 days before being permanently deleted, unless permanently deleted manually.
-
Delete From All Environments: Click to delete the project from its environment. The ability to delete the project and its downstream migration chain from all environments is not currently functional.
Note
Projects that have any operations in an incomplete status, including Submitted, Received, Pending, Running, Cancel Requested, or Delayed Status, cannot be deleted. Incomplete operations can be canceled from these locations:
- The operation (see operation status in Design canvas).
- The operation log table.
- The Runtime Operations page of the Management Console (see Canceling runtime operations).
-
-
Sort Rows: Click the column header in any column to sort the table rows based on the data in that column in descending order. An arrow pointing up will be displayed in the column to the right of the header name. Click the column header twice in any column to sort the table based on the data in that column in ascending order. An arrow pointing down will be displayed in the column to the right of the header name.
-
Resize columns: Drag a column's Resize bar to resize it.
Projects tabs
When an active project is selected in the project table, these tabs at the bottom of the screen become available:
- Operations tab
- Schedules tab
- Backups tab
- Project Variables tab
- Deploy History tab
- Listeners tab
- Endpoints tab
The tab toolbar show the tabs names, the number of items in each, and the following icons:
-
Refresh: Refresh the pane.
-
Previous: Select the previous project in the project table.
-
Next: Select the next project in the project table.
-
Fullscreen: Expand the pane. When expanded, Exit fullscreen returns the pane to its default size.
-
Close: Close the pane.
Operations tab
The Operations tab shows a list of operations within the selected project. From here you can check schedule status, enable or disable an applied schedule, run an operation, or apply or remove an existing schedule:

-
Search: Enter any part of the operation name, schedule name, schedule status, operation status, or effective status into the search box to filter the list of operations (alphanumeric characters only). The search is not case-sensitive.
-
Operation Name: The name of the operation in the project.
-
Schedule Name: The name of the schedule applied to the operation (if applicable).
-
Schedule Status: Indicates if the schedule is enabled or disabled at the schedule level. Enabling or disabling a schedule at the schedule level can be done from the Schedules tab. When a schedule is disabled, an operation that has a schedule applied at the operation level will not run on the schedule.
-
Operation Status: When a schedule has been applied at the operation level, this indicates if the schedule is enabled or disabled. Click to toggle the schedule on or off on the operation. If the operation does not have a schedule applied,
No Schedulewill be displayed. A schedule can be applied or removed on the operation from the Actions column (described below).Caution
If the schedule is enabled at the operation level, but the schedule is disabled at the schedule level (Schedule Status), then the operation will not run on the schedule (the schedule level overrides the operation level).
-
Effective Status: Indicates the effective status of a schedule for the operation, taking into account whether the schedule is enabled at the schedule level and whether it is enabled on the individual operation. If both the schedule and the schedule on the individual operation are enabled, then the operation will run on the schedule. If either the schedule or the schedule on the individual operation is disabled, then the operation will not run on the schedule. If the operation does not have a schedule applied,
No Schedulewill be displayed.For example, if Operation A has a schedule enabled at the operation level (Operation Status is toggled On) and Operation B has the same schedule disabled at the operation level (Operation Status is toggled Off), but the schedule is disabled at the schedule level (Schedule Status is toggled Off), then neither operation will run on the schedule (Effective Status is
Disabled). If the schedule were then enabled at the schedule level (Schedule Status is toggled On and Effective Status isEnabled), then Operation A would run on the schedule and Operation B would not run on the schedule, as it is disabled at the operation level. -
Actions: These actions are available in the Actions column when hovering over an operation's row:
-
Run Operation: Click to place the operation in the queue to run.
-
Apply or Remove Schedule: Click to apply an existing schedule to the operation. If a schedule has been applied to an operation, clicking this icon removes the schedule from the operation.
-
Schedules tab
The Schedules tab provides the ability to create new schedules, search for schedules, update or delete existing schedules, or enable or disable an existing schedule across all operations on which it is currently enabled or disabled.
To display the operation(s) where the schedule has been applied, click the disclosure triangle next to the name of the schedule:

-
Search: Enter any part of the schedule name, schedule status, operation status, or effective status into the search box to filter the list of schedules (alphanumeric characters only). The search is not case-sensitive.
-
Add Schedule: Click to configure a new schedule. A dialog opens to configure the schedule, as described in Add a schedule.
-
Schedule Name: The name of the schedule.
-
Schedule Status: Click to toggle the schedule on or off to enable or disable (respectively) the schedule at the schedule level. When a schedule is disabled, an operation that has a schedule applied at the operation level will not run on the schedule.
-
Operation Status: When a schedule has been applied at the operation level, this indicates if the schedule is enabled or disabled. Click to toggle the schedule on or off on the operation.
Caution
If the schedule is enabled at the operation level, but the schedule is disabled at the schedule level (Schedule Status), then the operation will not run on the schedule (the schedule level overrides the operation level).
-
Effective Status: Indicates whether a schedule for the operation is enabled or disabled, taking into account whether the schedule is enabled at the schedule level and whether it is enabled on the individual operation. If both the schedule and the schedule on the individual operation are enabled, then the operation will run on the schedule. If either the schedule overall or the schedule on the individual operation is disabled, then the operation will not run on the schedule.
-
Actions: These actions are available in the Actions column when hovering over a schedule's row:
-
Edit: Click to edit the schedule. A dialog opens to edit the schedule, as described in Add a schedule.
-
Delete: Click to delete the schedule. Schedules that are assigned to operations cannot be deleted. Schedules can be removed from operations on the Operations tab.
-
Note
Schedule changes take effect immediately without needing to redeploy the project to Harmony.
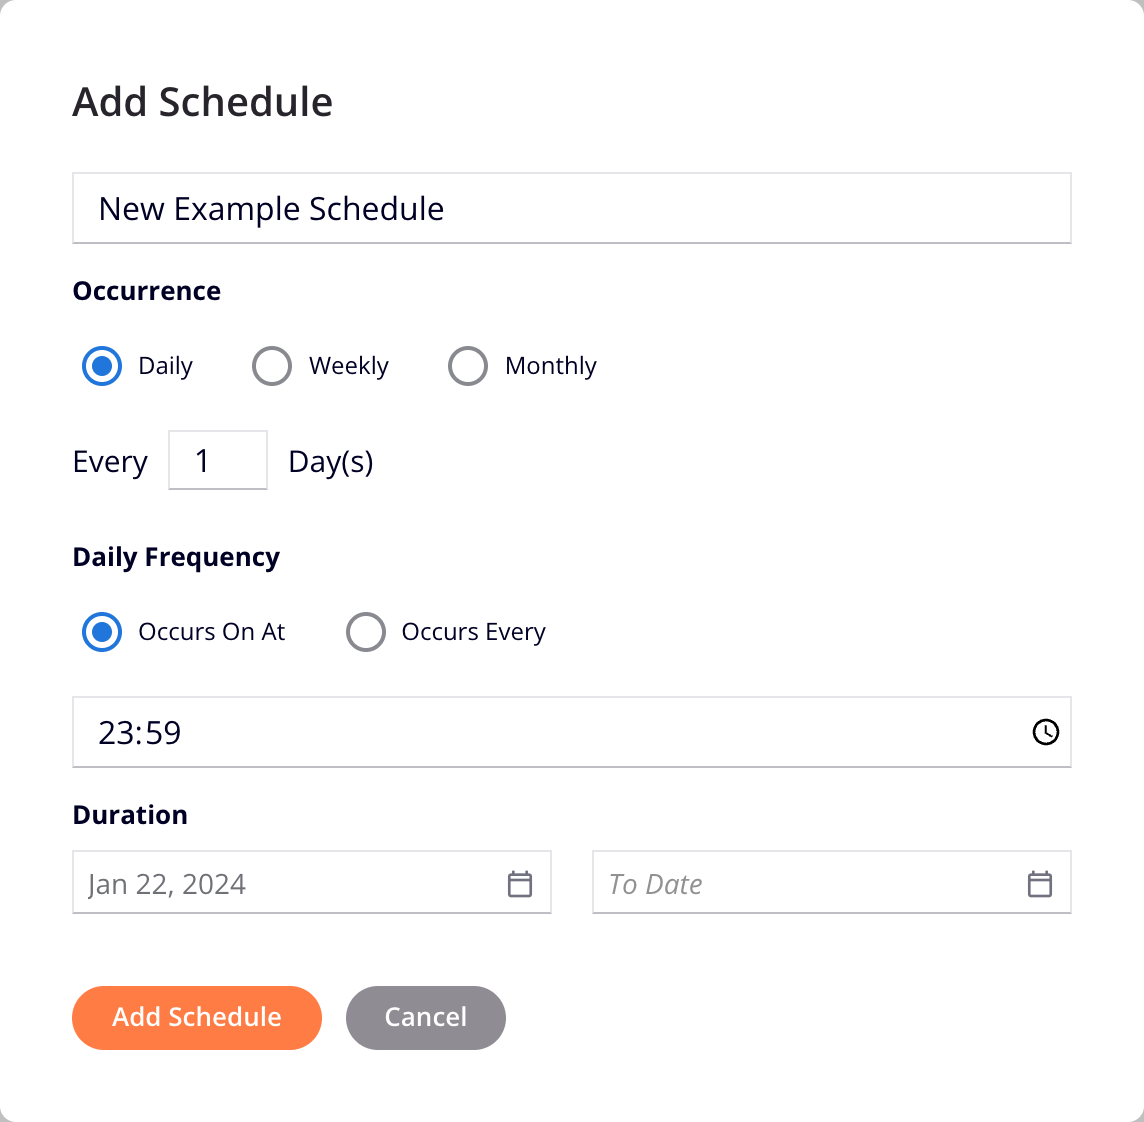
Add a schedule
Click the the Add Schedule icon in the schedules tab to configure a new schedule. A dialog opens to configure the schedule:
-
Name: Enter a unique name for the schedule. You may want to give the schedule a name that is reflective of the schedule frequency or, if used for a specific operation, reflective of the purpose of the schedule, for example, "Every 5 Minutes" or "Contact Sync".
-
Occurrence: Select one of three options for the interval the schedule should run the operation(s) on which it is assigned, one of Daily, Weekly, or Monthly:
-
Daily: The schedule will run the operation every day, or every few days. When this option is selected, this field becomes available to configure:
- Every [#] Day(s): Enter a number of day(s) in between operation runs.
-
Weekly: The schedule will activate the operation during a specified set of days of the week. When this option is selected, these fields become available to configure:
-
Every [#] Week(s): Enter a number of week(s) in between operation runs.
-
[Sun, Mon, Tue, Wed, Thu, Fri, Sat]: Select the checkboxes next to the day(s) of the week on which you want the operation to run.
-
-
Monthly: The schedule will activate the operation on a monthly basis. When this option is selected, choose one of two options that become available to configure:
-
Specific Day: Select to specify a specific day of the month to run the operation.
- Day [#] of Every [#] Month(s): Enter the day of the month and number of month(s) in between operation runs.
-
Periodic: Select to specify an interval for the operation to run.
- The [1st, 2nd, 3rd, 4th, or Last] [Day of Week] of Every [#] Month: Use menus to select which day of the month and enter the number of month(s) in between operation runs.
-
-
-
Daily Frequency: Select one of two options for the times at which the schedule should run the operation, either Occurs On At or Occurs Every. Time zones are discussed below in Operation time zones.
-
Occurs On At: Select for the schedule to run the operation at a specified time. Enter values directly or click the time icon
to open a time selector to set the hour(s), minute(s), and time of day at which the operation should run. -
Occurs Every: Select for the schedule to repeatedly run the operation for the specified period of time throughout the day. Enter a number to correspond with the menu selection of minute(s) or hour(s) at which you want the operation to run. Enter values directly or click the time icon
to open a time selector to set the time that you want to limit the operation to run within.
-
-
Duration: Set the duration for the schedule. Start and end dates in a schedule are inclusive.
-
From Date: By default, the schedule will be active starting on the current date. If you want the schedule to start on another day, enter the desired date or click the calendar icon to open a calendar datepicker and select the desired start date.
-
Ending at: By default, the schedule will run indefinitely. If you want to specify an end date, enter a date that you want the schedule to end or click the calendar icon to open a calendar datepicker and select the desired end date.
-
Operation time zones
When configuring a schedule, the Daily Frequency field does not display the time zone in which the operation will run. The time zone in which the operation will run depends on the agent running the operation, unless the Override Schedule Agent Time Zone setting is enabled in your organization's policies:
-
Agent Time Zone
-
Cloud agents: All cloud agents are in UTC.
-
Private agents: Private agent time zones are determined by the time zone of the operating system of the private agent. It is highly recommended for all agents in a private agent group to be running on the same time zone, or the times at which a configured schedule initiates the operation may be unpredictable depending on the specific agent being used.
-
-
Override Schedule Agent Time Zone
- If the Override Schedule Agent Time Zone setting is enabled in your organization's policies, the selected time zone will determine the time zone in which all current and future schedules across an organization will run.
Backups tab
The Backups tab shows a list of the project's cloud backups for deployed Design Studio projects. From here you can download or remove project cloud backups:

-
Search: Enter any part of the upload date, the uploader's username, or the tag to filter the list of project cloud backups (alphanumeric characters only). The search is not case-sensitive.
-
Upload On: The date and time the project cloud backup was deployed to the cloud (in local browser time).
-
Uploaded By: The Harmony username of the user that deployed the project backup.
-
Tag: The user-provided tag for the project backup.
-
Actions: These actions are available in the Actions column when hovering over a project backup's row:
-
Download: Click to download the project backup as a Jitterpak (.JPK).
-
Remove: Click to remove the project backup from Harmony.
-
Project Variables tab
The Project Variables tab shows a list of any project variables within the project:

-
Search: Enter any part of the project variable's name, value, or description into the search box to filter the list of project variables (alphanumeric characters only). The search is not case-sensitive.
-
Variable Name: The name of the project variable. This value cannot be changed in Management Console, but can be changed in the project within Cloud Studio or Design Studio.
-
Value: The value of the project variable. If Hide Value is set to
Yes, the value is masked. -
Hide Value: Indicates whether the project variable's value is masked in the Value column. If set to
Yes, the value is masked. If set toNo, the value is shown.Caution
Hiding the value does not prevent the value from being accessible in a script. It only hides the display of the value.
-
Description: The description of the project variable (if provided).
-
Actions: This action is available in the Actions column when hovering over a project variable's row:
-
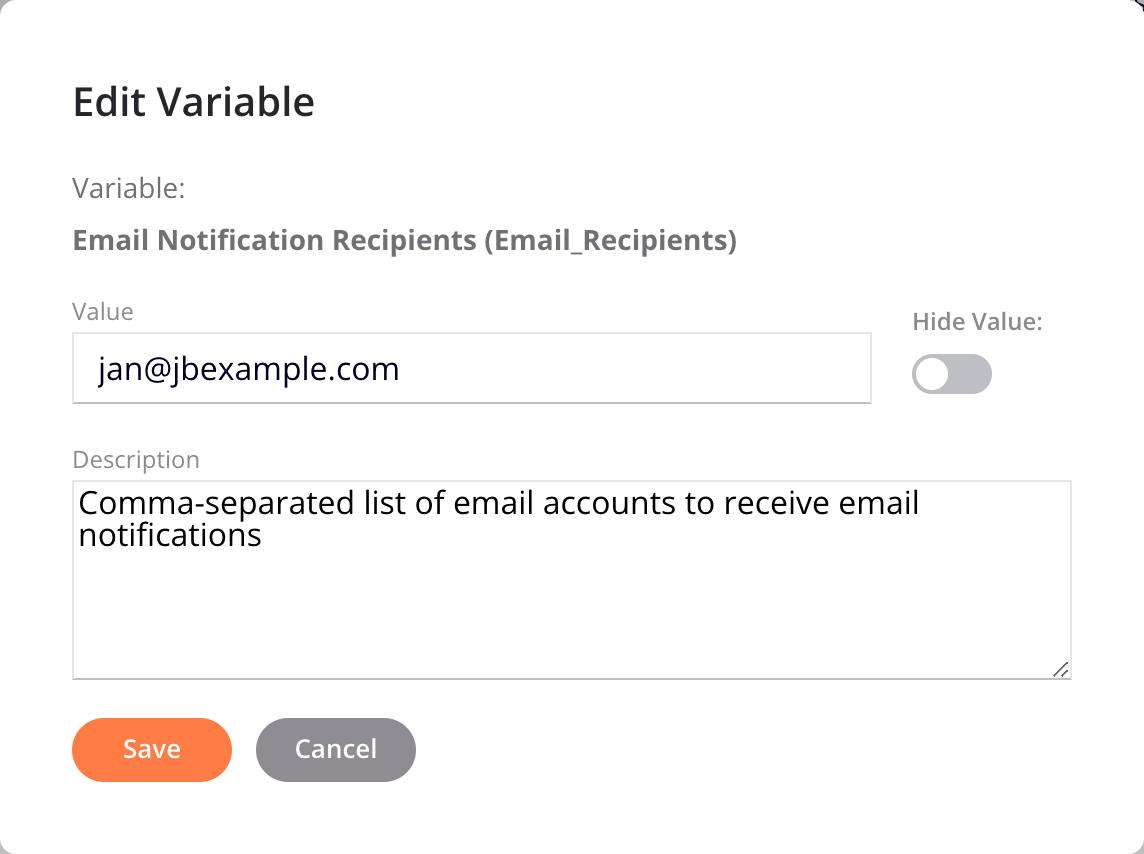
Edit: Click to edit the project variable:
Caution
Any edits to project variables take effect immediately after saving.
-
Variable: The name of the project variable. This value cannot be changed here.
-
Value: The value of the project variable. Use the text box to change the value.
-
Hide Value: Determines whether the project variable's value is masked. When toggled on, the value is masked. When toggled off, the value is shown.
-
Description: The description of the project variable. Use the text box to change the description.
-
Save: Click to save any changes and return to the Project Variables tab.
-
Cancel: Click to discard any changes and return to the Project Variables tab.
-
-
Deploy History tab
The Deploy History tab shows records of the project's deployment history:

-
Search: Enter any part of the deploying-user's username, the deploy date, or deploy zone into the search box to filter the list of deployments (alphanumeric characters only). The search is not case-sensitive.
-
Refresh: Click to refresh the list of deployments.
-
User: The Harmony username of the user to initiate the deploy.
-
Date: The date and time of the deployment (in local browser time).
-
Zone: The zone of the deployment, one of
SQL11-P-APAC(APAC region),SQL11-P-EMEA(EMEA region), orSQL11-P-E(NA region), depending on the region where the deployment occurred. -
Actions: This action is available in the Actions column when hovering over a deployment's row:
-
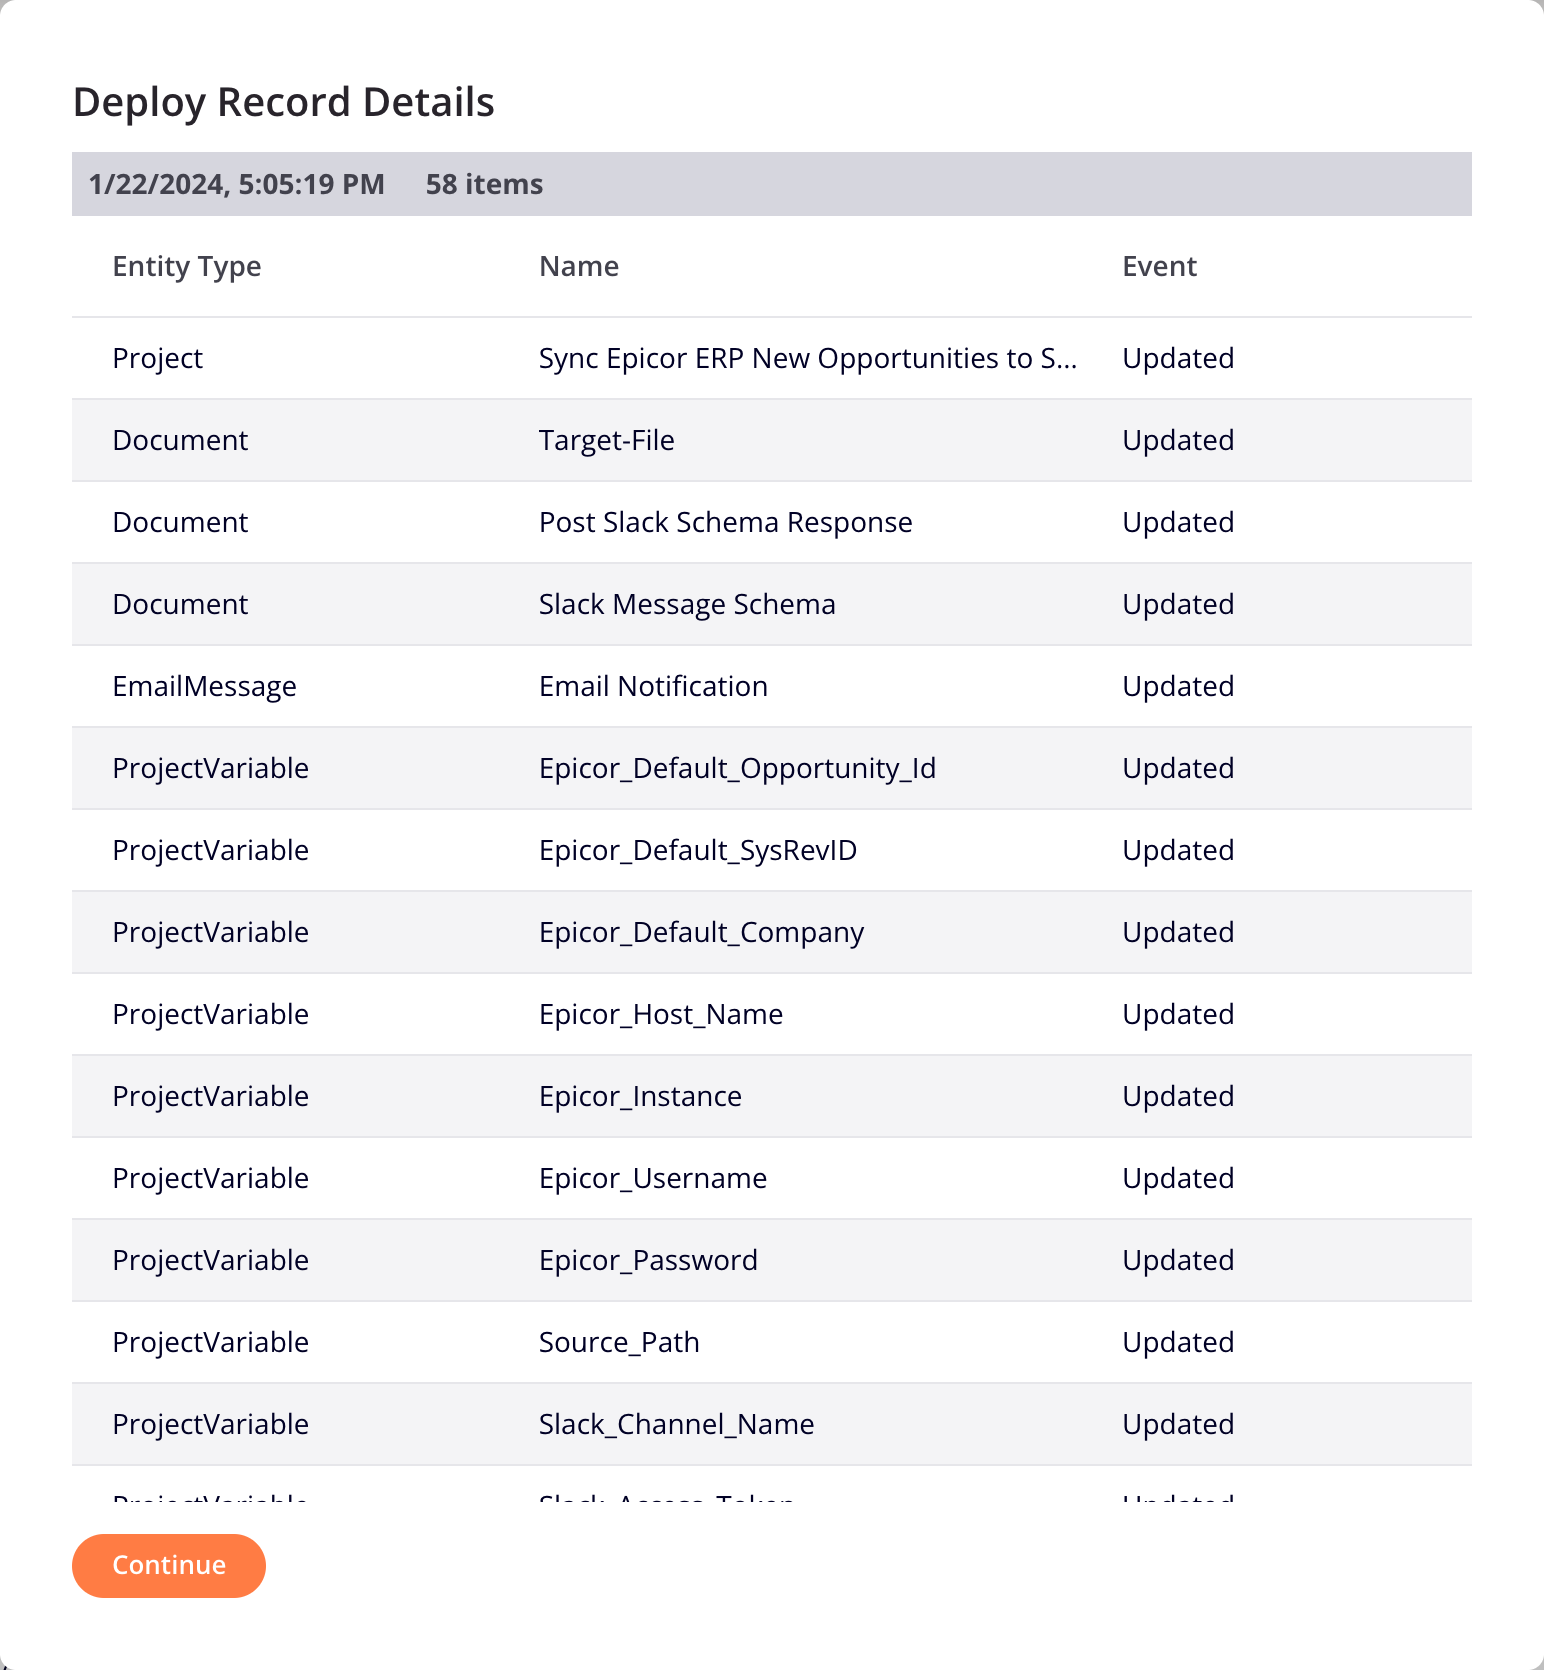
Go to Deploy Details: Click to open a dialog that contains the deployment details:
-
Entity Type: The type of component that was deployed.
-
Name: The name of the component.
-
Event: The deploy event, either
Insertedfor a newly deployed project orUpdatedfor updating an existing deployed project. -
Continue: Click to exit the dialog and to return to the Deployment History tab.
-
-
Listeners tab
The Listeners tab lists any listening activities and the operations they are used in, along with their state:

-
Search: Enter any part of the activity, operation name, or listener status into the search box to filter the list of listening activities (alphanumeric characters only). The search is not case-sensitive.
-
Refresh: Click to refresh the list of listening activities.
-
Activity: The name of the listening activity using a shortened form of the connector activity type followed by the user-provided connection name. The user-provided name of the listening activity is not shown.
Click the disclosure triangle next to the activity to reveal the names of each operation that the activity is used in.
-
Listener Status: The state of listening is provided for each activity and operation. Click to toggle the listening state between On (enabled) and Off (disabled). Note:
-
Disabling event listening for an activity will automatically disable listening for all operations it is used within. However, enabling event listening for an activity does not affect the state of any operations it is used in.
-
Operations can be enabled and disabled for event listening individually.
-
Changing the state is synced with the Cloud Studio UI in both directions. That is, toggling the listening state in the Management Console affects the state in Cloud Studio. Similarly, enabling or disabling events on a Cloud Studio operation affects the state in the Management Console. A refresh may be required to update the display.
-
Endpoints tab
The Endpoints tab lists deployed endpoints created with Connector SDK-built connectors:

-
Search: Enter text to find endpoints by any column values.
-
Endpoint Name: The endpoint's name.
-
Connection Type: The type of connection.
-
Auth Type: The authorization type.
-
Expires: The approximate expiry period for 3LO-enabled endpoints. Hover on the field to reveal the exact expiry date.
-
Authorization Status: The authorization status for 3LO-enabled endpoints, one of the following:
-
Authorization valid: The authorization is valid and no action is necessary.
-
Authorization valid but will expire and requires reauthorization: The authorization is currently valid but about to expire. You should reauthorize the endpoint as soon as possible.
-
Authorization expired: The endpoint is no longer authorized and any connections to it will fail.
-
-
Actions: These actions are available in the Actions column when hovering over an endpoint:
- Go to endpoint: Open the project in Cloud Studio, and open the endpoint's configuration page.
Note
Only endpoints created with a Jitterbit-provided or custom-built Connector SDK connector are shown in this tab. (Whether a Jitterbit-provided connector is a Connector SDK connector is noted in each connector's documentation.)