DocuSign Connection Guide 3.1
Overview
This guide describes the system requirements and instructions for connecting Vinyl to a Docusign Online database server as a prerequisite to being utilized as a service in an application. In order to connect your servers, you must have Vinyl 3.1 installed.
Note
You will need to add further endpoints based on the needs of your application, for more information here is the official DocuSign API Reference guide..
System Requirements
Database Server
DocuSign Developer Account
Client Web Browser
-
Chrome TM 60 or newer
-
Firefox ® 55 or newer
-
Safari ® 11.0.2 or newer
-
Postman v9.10 or newer
Connection Instructions
Acquire Credentials from DocuSign Sandbox
-
Login to DocuSign here: https://account-d.docusign.com/
-
Click on Settings on the top right corner of the landing page
-
On left hand sidebar, scroll down to Integrations and click on Apps & Keys
-
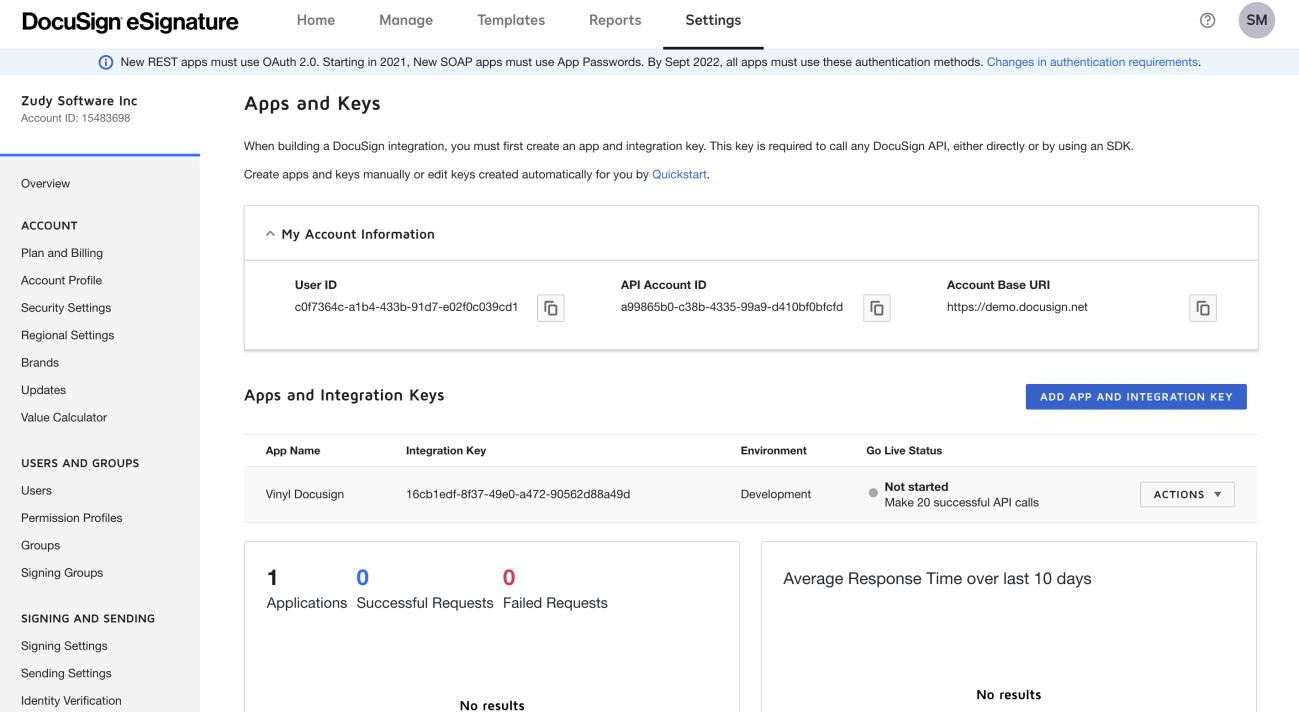
Create an application by clicking the ADD APP AND INTEGRATION KEY button.
-
Type in application name (this example is Vinyl DocuSign)
-
Copy Integration Key and store for next step
- You will also use the API Account ID and the Account's Base URI in later steps
-
Click on + ADD SECRET KEY button under Authentication and copy this value, you need this key and will not be able to view the whole key later.
-
Scroll down to Additional Settings and add this Redirect URI: https://oauth.pstmn.io/v1/callback (This is only applicable when using Postman, if using other API development tool, please reference their documentation)
-
Click Save
-
Click on Templates on the top bar menu
-
Click on New on the top left corner to create a new template to be used during the connection set-up
-
Name your template and upload a document, click Next; optionally, add signature areas to the document, then click Save.
-
Under the name of your new template, Click on TEMPLATE ID, copy and save this value, you will need this in a later step.
Acquire Refresh Token Using Postman
-
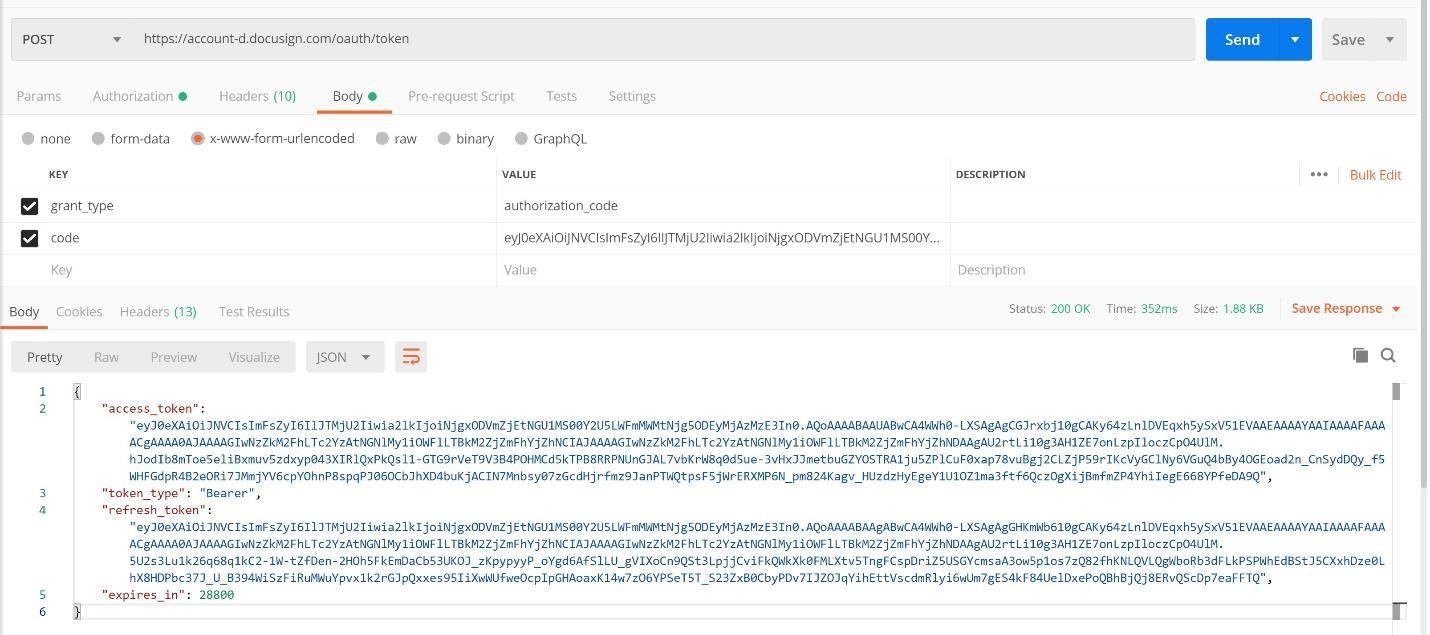
Create a new POST request with the following parameters:
-
URL: https://account-d.docusign.com/oauth/token>/
-
Authorization: Basic Auth
-
Username = Integration Key from previous section
-
Password = Secret Key from previous section
-
-
Body: x-www-form-urlunencoded
-
Key: grant_type
-
Value: authorization_code
-
Key: code
-
Value: *you will get this second value in the next step
-
-
-
In a web browser go to the following website and substitute in the values that are between
<and>, i.e.<value>.https://account-d.docusign.com/oauth/auth?response_type=code&scope=signatureextended&client_id=<Integration Key from DocuSign Sandbox>&state=a39fh23hnf23&redirect_uri=https://oauth.pstmn.io/v1/callback -
After hitting Enter with the above URI, copy what is in the URL field and paste it somewhere you can see the whole URL (it is extremely long). Copy the value after code= and before &state=, this is your code value, paste it into the Value from step 1 in this section and click Send in Postman. **This step needs to be done quickly, the refresh token from the web browser only lasts about 2 minutes. **
Set Up Refresh Token API in Vinyl
-
From the Connect menu, click on the Connect to your enterprise link
-
Click Data Servers on the left-hand side and click Create
-
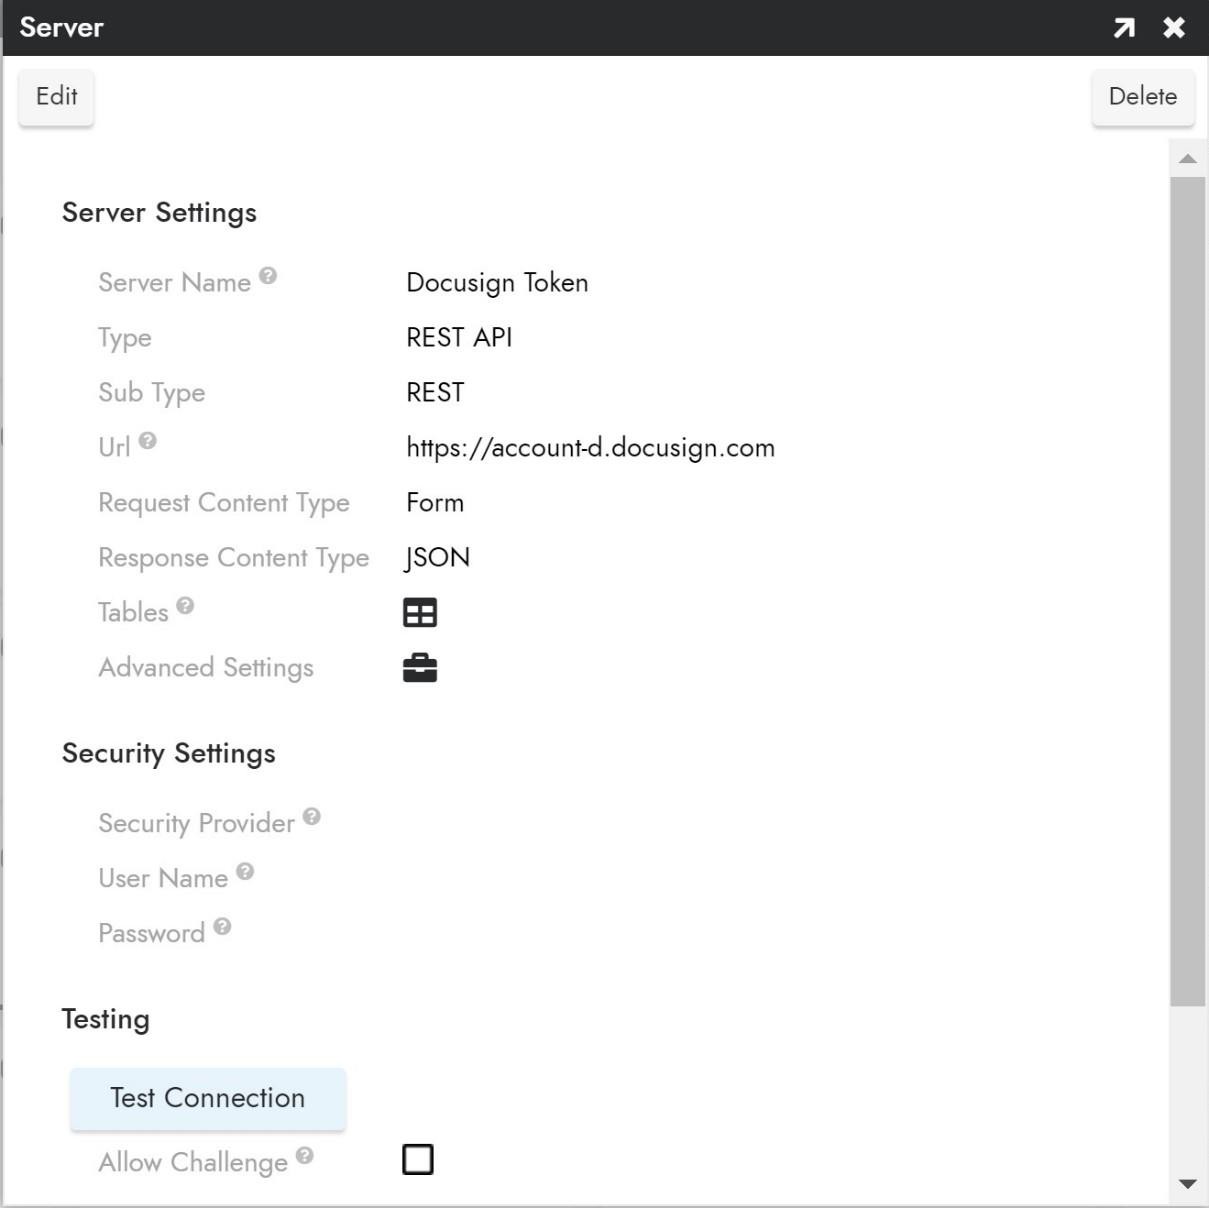
Configure server as follows:
-
Name: Recognizable name
-
Type: REST API
-
Request Content Type: Form
-
Response Content Type: JSON
-
-
Click Save.
Add an API Endpoint
-
Close out of the Create Data Server pop-up, then click on the name of the Server you just created in the list of data servers.
-
In the Endpoints panel on the bottom left, click Create
-
Add the following details:
-
Name: Name your endpoint
-
Endpoint: /oauth/token
-
Method: POST
-
-
Next you will add the following endpoint parameters by clicking Create in the Endpoint Parameters panel in the top right and add the following details:
-
Parameter 1
-
Name: Authorization
-
Data Type: String
-
Test Value: Basic {Authorization from Postman}
This value can be found in Headers tab in Postman after the POST call to retrieve refresh token. It will say basic followed by a long ID. (You might have to look in hidden headers)
-
Type: Header
-
Direction: Input
-
-
Parameter 2
-
Name: grant_type
-
Data Type: String
-
Test Value: refresh_token
-
Type: Query
-
Direction: Input
-
-
Parameter 3
-
Name: refresh_token
-
Data Type: String
-
Test Value: The refresh token you retrieved in Postman in the previous step
-
Type: Query
-
Direction: Input
-

-
-
Click Save
-
Click Test Connection to get access token for next step
-
Add to the sample input the Query parameters as follows:
{ "grant_type": "refresh_token", "refresh_token": "<refresh token from postman>"} -
Click Import
Configure Vinyl for DocuSign
-
From the Connect menu, click on the Connect to your enterprise link
-
Click Data Servers on the left-hand side and click Create
-
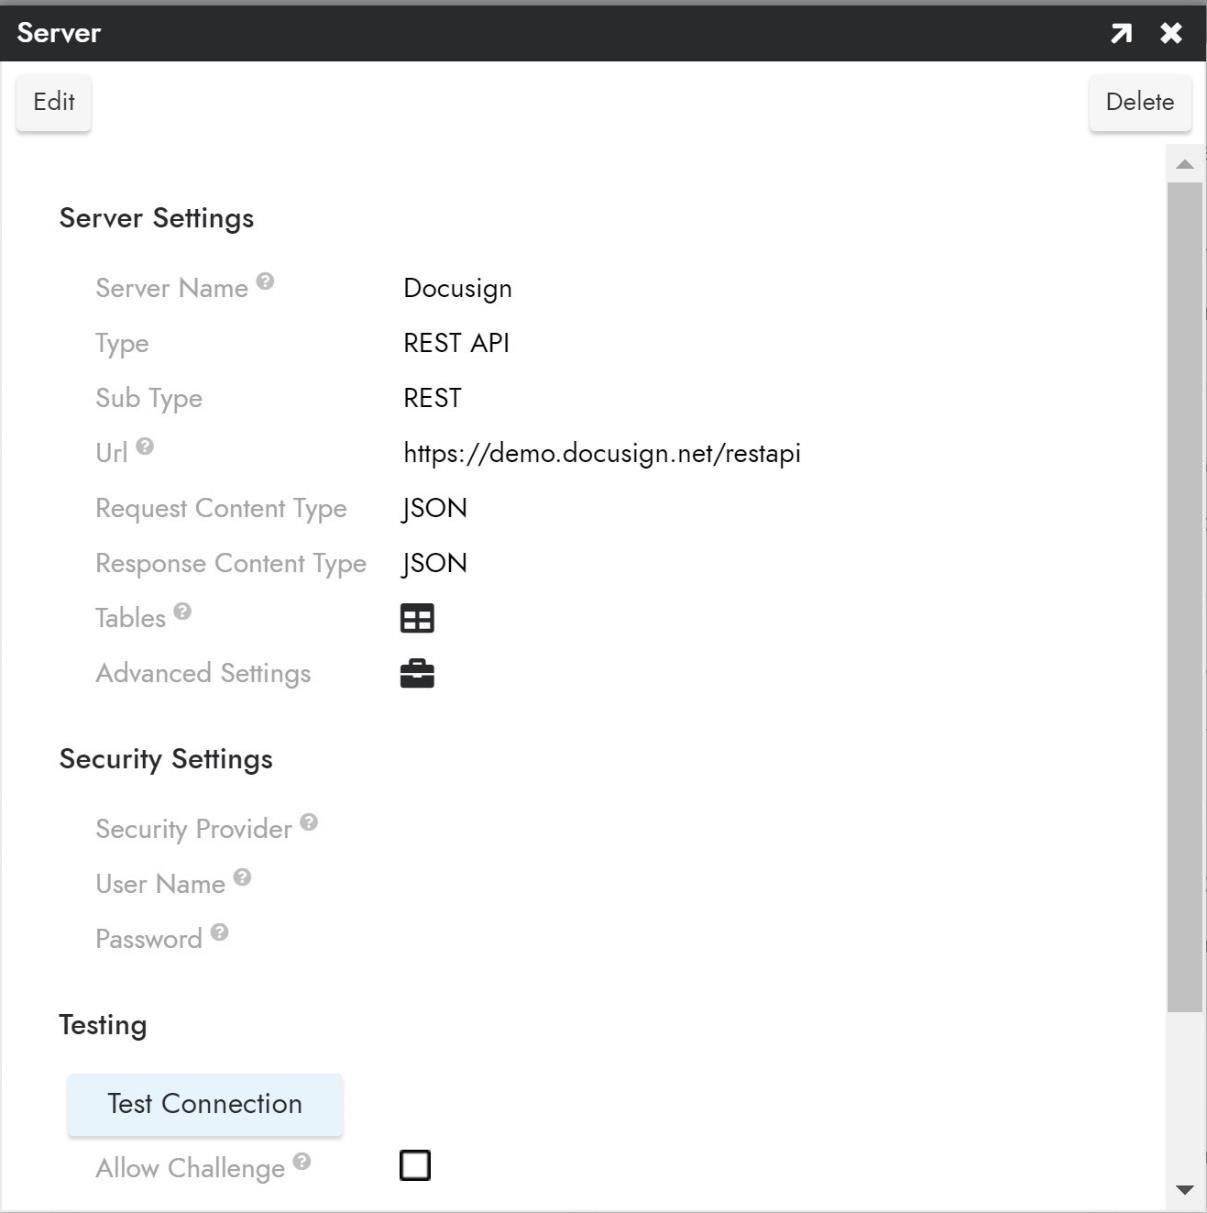
Configure server as follows:
-
Name: Recognizable name
-
Type: REST API
-
URL: https://demo.docusign.net/restapi (This is from the DocuSign Sandbox, reference first section)
-
Request Content Type: JSON
-
Response Content Type: JSON
-
Add an API Endpoint for DocuSign Template
-
Close out of the Create Data Server pop-up, then click on the name of the Server you just created in the list of data servers.
-
In the Endpoints panel on the bottom left, click Create
-
Add the following details:
-
Name: Name your endpoint
-
Endpoint:
/v2/accounts/<AccountID>/envelopes -
Method: POST
-
-
Next you will add the following endpoint parameters by clicking Create in the Endpoint Parameters panel in the top right and add the following details:
-
Parameter 1
-
Name: AccountID
-
Data Type: String
-
Test Value: API Account ID from DocuSign Sandbox (reference first section)
-
Type: Query
-
Direction: Input
-
-
Parameter 2
-
Name: Authorization
-
Data Type: String
-
Test Value: Bearer
<Returned Access Token from the Token API> -
Type: Header
-
Direction: Input
-
-
Parameter 3
-
Name: EmailBody
-
Data Type: String
-
Test Value: Email body of your choice, in this example, "A document needs signing"
-
Type: Query
-
Direction: Input
-
-
Parameter 4
-
Name: EmailSubject
-
Data Type: String
-
Test Value: Email subject of your choice, in this example, "Signing"
-
Type: Query
-
Direction: Input
-
-
Parameter 5
-
Name: status
-
Data Type: String
-
Test Value: sent
-
Type: Query
-
Direction: Input
-
-
Parameter 6
-
Name: TemplateID
-
Data Type: String
-
Test Value: The Template ID from the first section
-
Type: Query
-
Direction: Input
-
-
-
Click Test Connection to ensure parameters have been input correctly and to view test results, the EnvelopeID will be used in the next step.
-
Click the back button on the top left to return to Web Service to add additional endpoint
Add an API Endpoint for Document Status
-
In the Endpoints panel on the bottom left, click Create
-
Add the following details:
-
Name: Name your endpoint
-
Endpoint:
/v2/accounts/<AccountID>/envelopes/<EnvelopeID> -
Method: GET
-
-
Next you will add the following endpoint parameters by clicking Create in the Endpoint Parameters panel in the top right and add the following details:
-
Parameter 1
-
Name: AccountID
-
Data Type: String
-
Test Value: API Account ID from DocuSign Sandbox (reference first section)
-
Type: Query
-
Direction: Input
-
-
Parameter 2
-
Name: Authorization
-
Data Type: String
-
Test Value: Bearer
<Returned Access Token from the Token API> -
Type: Header
-
Direction: Input
-
-
Parameter 3
-
Name: EnvelopeID
-
Data Type: String
-
Test Value: Envelope ID that was returned when testing the previous endpoint
-
Type: Query
-
Direction: Input
-
-
-
Click Test Connection to ensure parameters have been input correctly and to view test results
Make DocuSign Tables Public for Later Use
-
From the Vinyl IDE, Click on Build Your Application
-
Click on the Data Storage Layer and under Web Services find the DocuSign Rest API you created in the previous step
-
Click on the Tables cog icon
-
For each table, double click on the table and click on Edge Case Settings
-
Under Public Access Click on Allow Read and Allow Write
-
Perform the same steps for the DocuSign Token REST API and any other endpoints you created for DocuSign Information.
Configure Vinyl Rules for DocuSign
Add Columns for DocuSign Information
-
From the Vinyl IDE, Click on Build Your Application
-
Click on the Business Logic Layer and find the Datasource in which you wish to store DocuSign information
-
On the Business Layer Data Source panel on the right-hand side, click Link Sources and add the DocuSign REST API you created in the previous step *ensure you have marked tables as Allow Read/Write*
-
Click on the Business Objects icon and find the table where you would like to store DocuSign settings (this example will use ParamDocusign)
-
On the table, create the following columns:
-
DocusignBaseURL (NVarchar(50))
-
DocusignGrantType (NVarchar(50))
-
DocusignRefreshToken (NVarchar(-1))
-
DocusignClientIDSecretID (NVarchar(-1))
-
-
After columns are created, click Results and add values to the following columns:
-
DocusignBaseURL: The Base URL from the DocuSign sandbox
-
DocusignGrantType: The literal string value 'refresh_token'
-
DocusignRefreshToken: The refresh_token endpoint parameter in the Token REST API (the first REST API you created)
-
DocusignClientIDSecretID: The Authorization endpoint parameter in the token REST API
-
-
You can also add other columns to edit them in the UI, such as Email Body, Email Subject, and Role (these are DocuSign Template parameters).
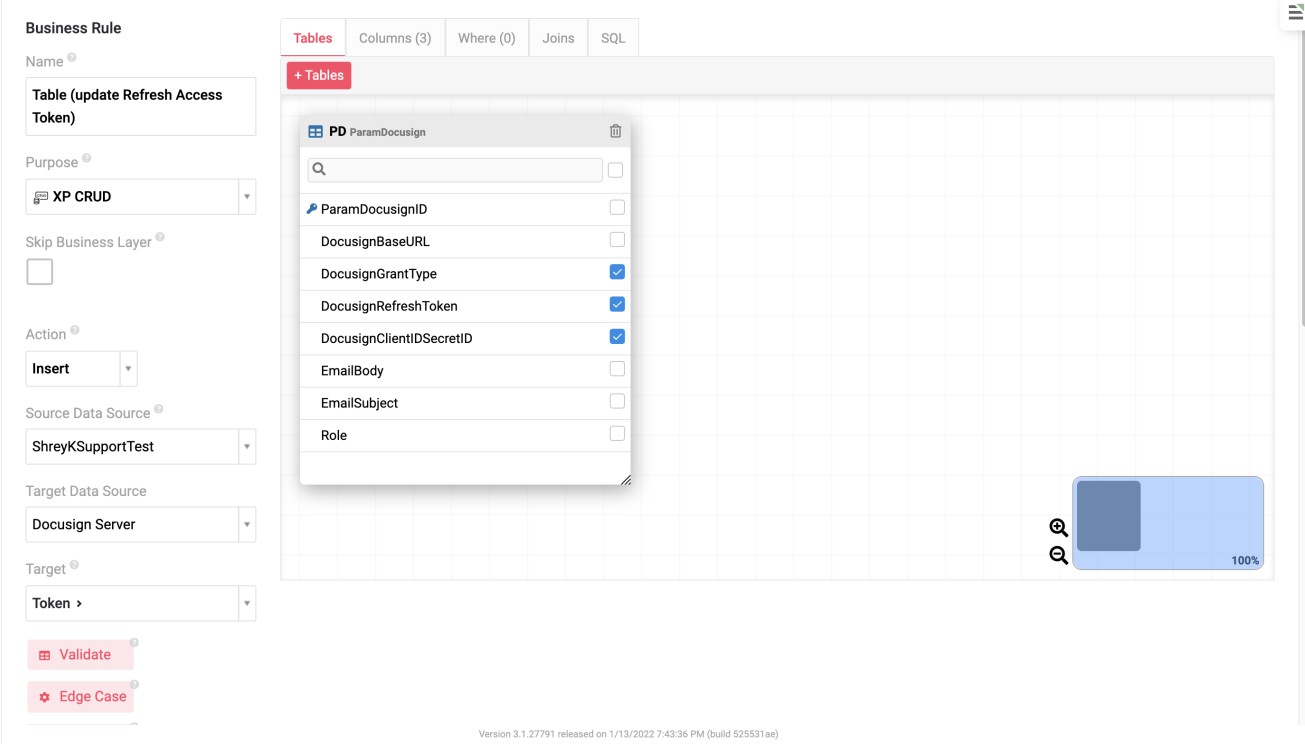
Create XP Insert Rule to Insert Credentials to Token POST Call
-
From the previous step, navigate back to the App Workbench
-
On the middle panel click Add a Business Rule to create a new Business object.
-
Fill out the following details:
-
Name: Table (Insert Refresh Access Token)
-
Purpose: XP CRUD
-
Uncheck "Skip Business Layer"
-
Action: Insert
-
Source Date Source: Database where the table with the DocuSign information is stored
-
Target Data Source: The first REST API you created to refresh Access Token
-
Target: Table from refresh Token API (in this example, Token)
-
-
In the Tables panel, click +Tables and add the Table from your source data source where the DocuSign information is being stored. In this case, ParamDocusign.
-
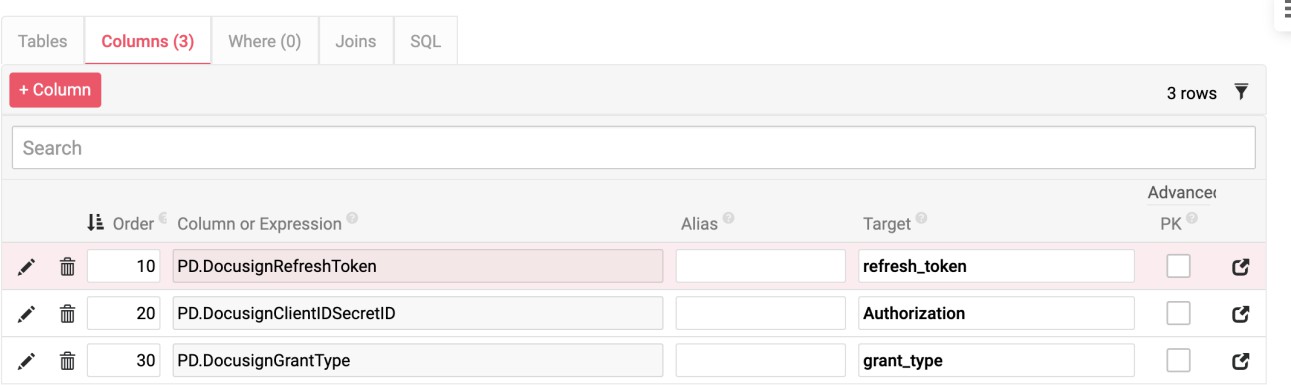
In the columns tab find the columns you designated to store the refresh token, the ClientID/SecretID, and the grant type, target them to their corresponding columns in the Token table as shown below.
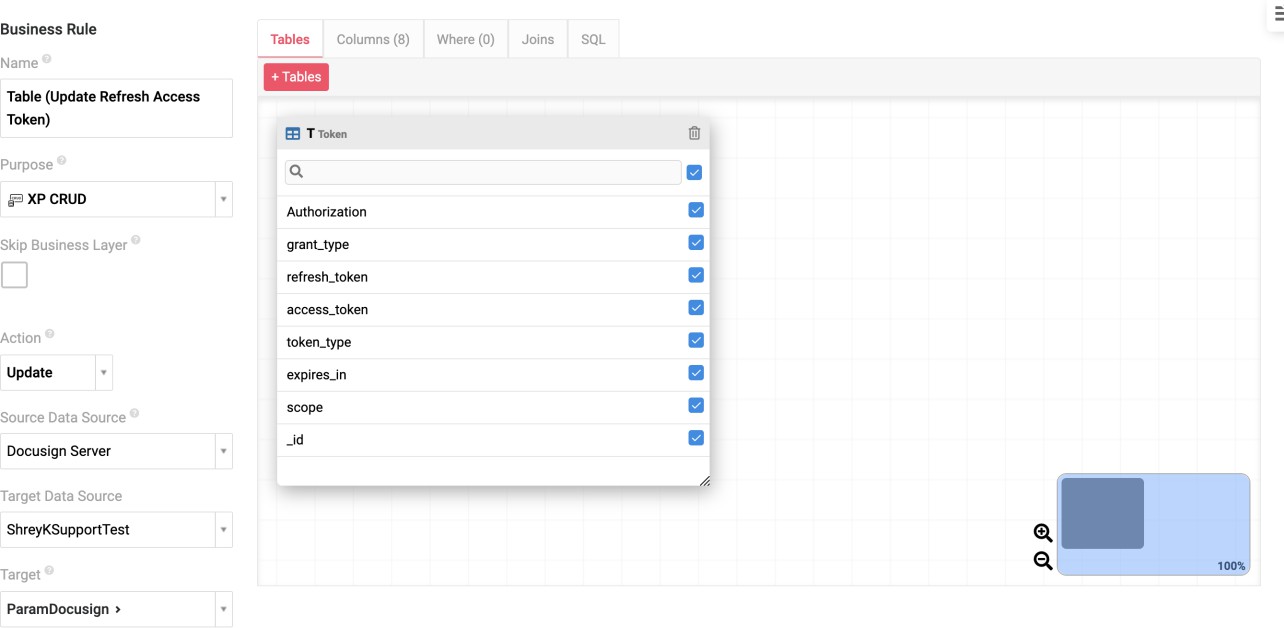
Create XP Update Rule to Refresh Access Token
-
From the previous step, navigate back to the App Workbench
-
On the middle panel click Add a Business Rule to create a new Business object.
-
Fill out the following details:
-
Name: Table (Update Refresh Access Token)
-
Purpose: XP CRUD
-
Uncheck "Skip Business Layer"
-
Action: Update
-
Source Date Source: The first REST API you created to refresh Access Token
-
Target Data Source: Where table with DocuSign information is located
-
Target: Table where DocuSign information is stored, ParamDocusign in this example
-
-
In the Tables panel, click Create and add the Table with the access token (this is the name of the endpoint you created in the first REST API).
-
Click All to add all columns from the table
-
Find the column called access_token and target it to the DocusignClientIDSecretID column you created in the table.
-
Add API Account ID to ParamDocusign as a column and input its value
-
Add API Account ID as a parameter on the Refresh Token Endpoint and input its value
-
In the Update Rule, Set the Refresh Token's API Account ID to Target the ParamDocusign's AccountID on type binding, and set it as PK. This has the added benefit that if you decide to add more DocuSign accounts to the application this will help accommodate that configuration.

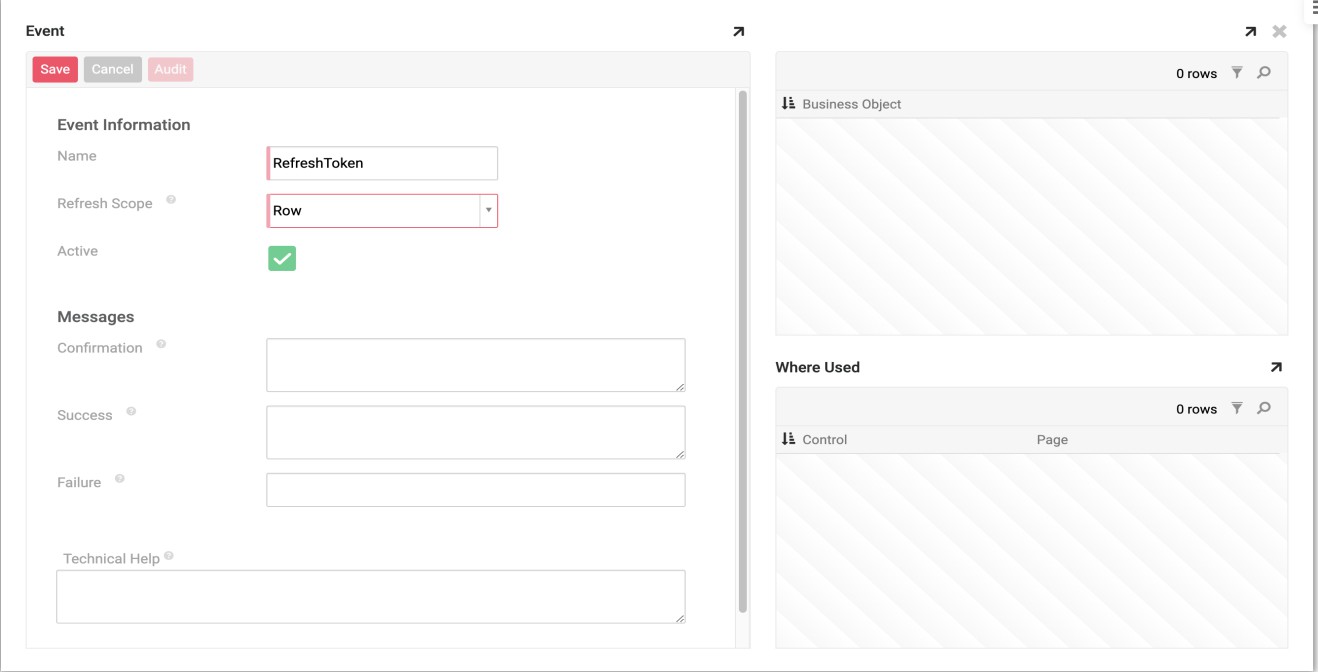
Create Schedule to Run Refresh Access Token Event
-
Because the Access Token expires and needs to be updated regularly, add this rule to an event and create a schedule.
-
Create the event by navigating to the business Logic layer and Under Events popup for ParamDocusign, click on +Table Event.
-
Name: RefreshToken
-
Refresh Scope: Row
Note
Make sure under Edge case the Execution Type it is set to Launch Via Schedule with Max Concurrency: 1.
-
-
Under Actions, click on Register Existing and add the previously created CRUD rule: Table (Update Refresh Access Token).
-
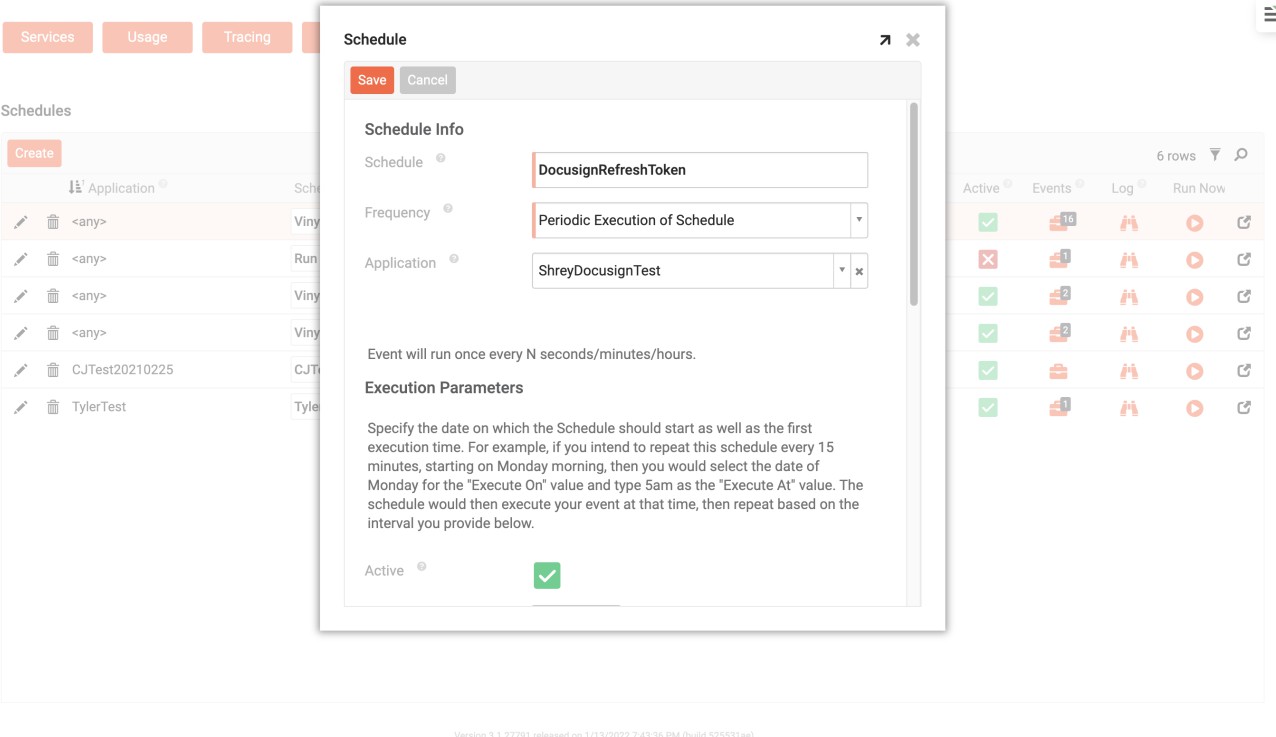
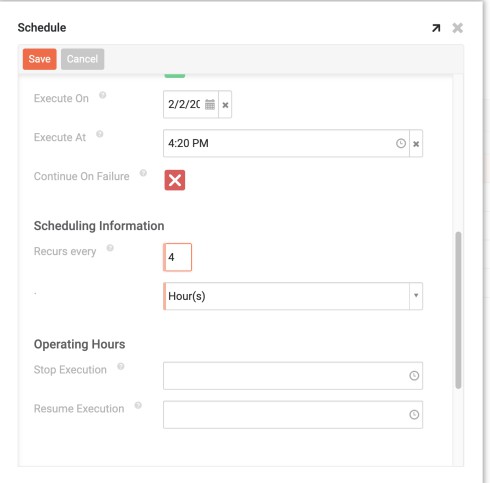
Next, navigate to Vinyl Monitor (in the bottom left corner) Schedules. Name your schedule and choose the Application where the event you created for the rule is created. Leave Frequency as is at "Periodic Execution of Schedule". Under Scheduling Information, set frequency for the schedule to run, 4 hours is recommended.
Now that you are refreshing your access token on a schedule, you can maintain a connection to your DocuSign API. Create other XP CRUD rules as needed to send or retrieve information from the connected DocuSign account, such as the Document Status and Template endpoints created in the second REST API.
Some capabilities may incur costs, such as returning a file using a webhook. Another option is using the HTTP retriever plugin.
Promoting Application to DocuSign Production
When the endpoints and CRUD rules you have created are working consistently, you are ready to promote this application to DocuSign Production. To do this, you will need to have the API reviewed in DocuSign. To pass the review, you must have 20 successful API calls in a single day.
-
Navigate to the DocuSign Sandbox link the first step and click on Admin, then click on Apps & Keys on left hand side menu
-
Under Apps and Integration Keys find the app you created in the first step and click Actions, then select Start Go-Live Review and enter a date with 20 or more successful API calls
-
A DocuSign administrator will manually review and authenticate the request, this can take up to 3 business days.
-
After Go-Live is authenticated, the previous steps will need to be repeated with the Production DocuSign credentials. The Integration Key will remain unchanged, but the other credentials will be different and need to be updated in Postman and Vinyl.
-
Changes to steps from above:
-
In Postman, create a new GET call with the URL: https://account.docusign.com/oauth/userinfo
-
In the response of the GET call, copy the "base_uri" to use in the POSTs, GETs, and HTTP Retrieve URLs for the production environment.
-
When creating the Refresh Token API for production, the URL is https://account.docusign.com
-