Installing Vinyl in AWS (Windows)
Introduction
This manual will cover several suggested methods of installation of Vinyl in AWS using Windows and SQL Server. There are many methods of configuring the underlying architecture for web hosting, networking and security aspects below can be tailored as needed.
This guide is primarily intended to help with a new blank AWS account, or an existing one that can be adapted to meet the basic requirements.
Two general methods of using AWS for hosting Vinyl on Windows are:
- PaaS: ElasticBeanstalk - .NET as a platform (With and without High-Availability)
- IaaS: VMs Ec2 instances - (Similar to on-premise)
This document focuses on using ElasticBeanstalk (EB), as this is the easiest method in AWS for long term management and ease of upgrades. For Ec2-only, see our VM/on-premise doc. In addition, this document will also focus on using RDS (Relational Database Service) for the DB.
Note
You may save on cost and increase simplicity by placing all objects in Public subnets (Subnets that are in a Route Table where the default gateway ((0.0.0.0/0)) is an Internet Gateway.); Negating the need for a NAT Gateway and Bastion host. Just note that the Security Groups will then be the only barrier from outside access and you will not be able to have a reliable outbound IP from Vinyl which to whitelist on external systems. (NAT Gateways have a static eIP which will be the outbound IP).
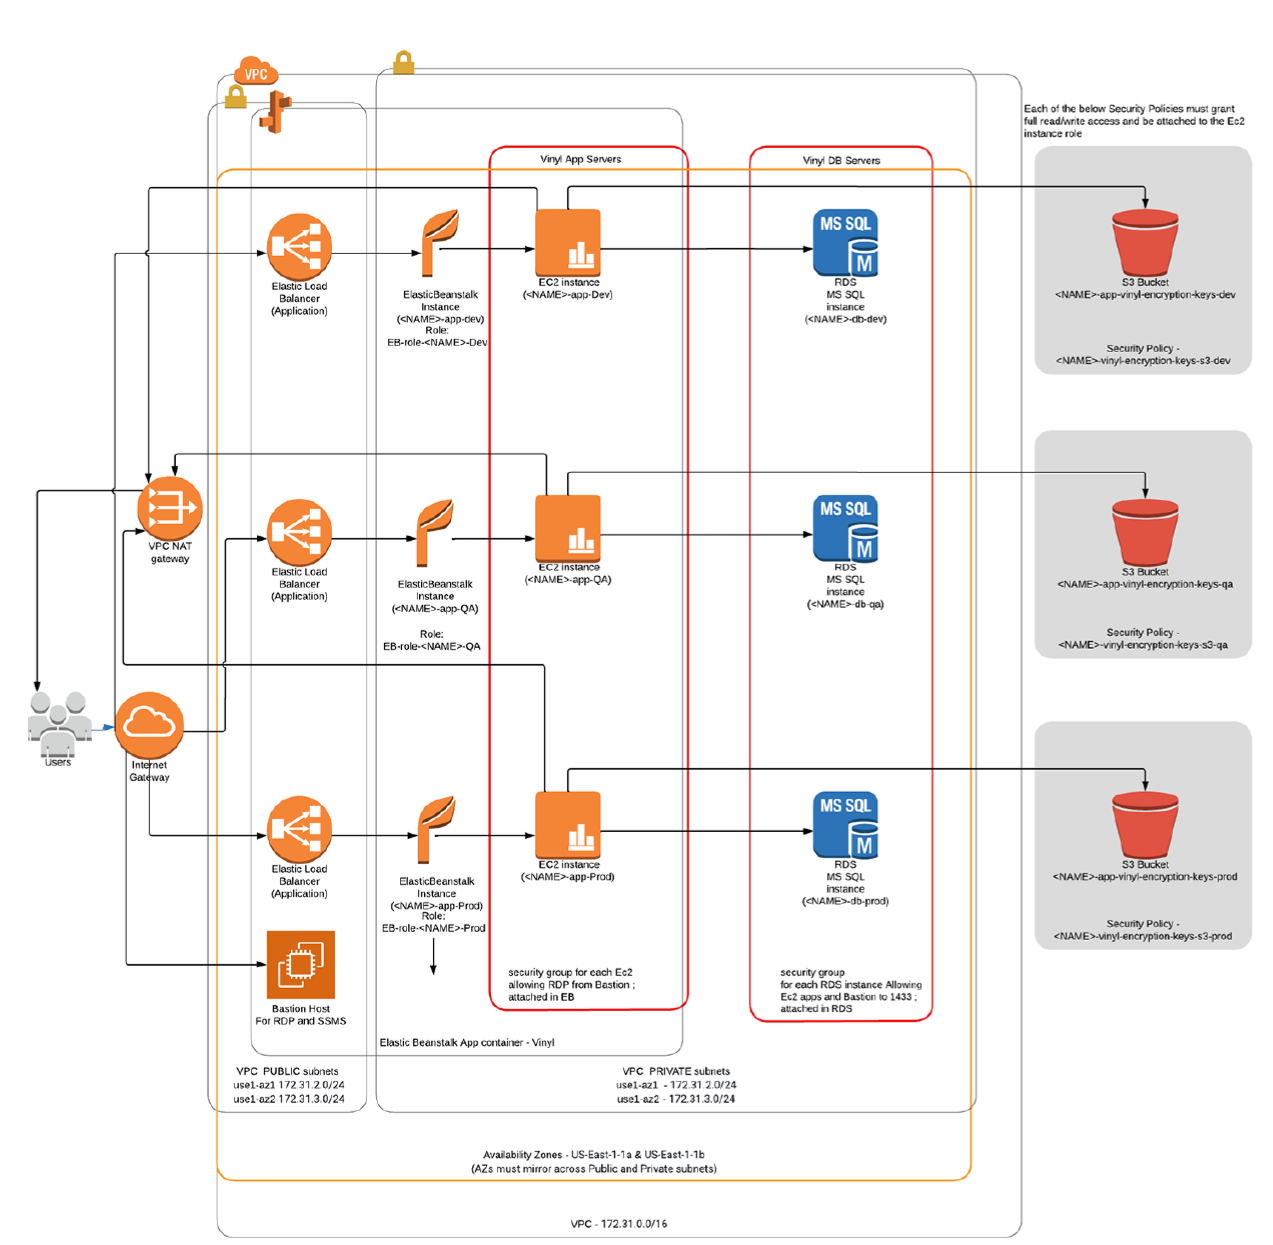
AWS Elements
- VPC with 4 or more subnets; Two or more associated with a route table containing an Internet Gateway as the default route (public) – Two or more associated with a route table using a NAT gateway as the default route (Private) Availability zones must mirror across Route Tables (IE: using Public: 1a,1b - Private: 1a,1b)
- Certificate – You will need to create or import a cert to use SSL
- IAM: Users, Roles*, Policies* – Granting service permissions
- Security Groups* – Granting inbound and cross-server permissions
- Ec2, Bastion host – Jump server for App server and DB admin access
- S3 Bucket* - configured to allow Vinyl read/write access for the purpose of creating and sharing security keys
- Database* - Can be run using RDS or installed on EC2 instances
- Elastic Beanstalk* - Manages Vinyl Ec2 instances
*One per instance
Basic Networking
VPC example:
Default VPC: 172.31.0.0/16
NAT Gateway (Optional): Subnet as public, Connectivity as Public, allocate eIP.
Subnets:

Public Route Table:

Private Route Table:

S3 Setup for Data Encryption Keys
Create an S3 bucket in your desired region; this will be used to store session state metadata and Vinyl column encryption:
Example name: *companyname*-vinyl-encryption-keys-*dev*
*Deny public access
IAM
Policies
S3 Access Policy:
Create new Policy with this JSON, edit Resource with above name:
{
  "Version": "2012-10-17",
  "Statement": [
    {
      "Effect": "Allow",
      "Action": "s3:*",
      "Resource":
        "arn:aws:s3:::companyname-vinyl-encryption-keys-dev/*"
    },
    {
      "Effect": "Allow",
      "Action": [
        "s3:ListAllMyBuckets",
        "s3:GetBucketLocation",
        "s3:ListBucket"
    ],
    "Resource": "*"
    }
    ]
}
Example Name: *companyname*-vinyl-encryption-keys-s3-*dev*
Example Desc: Grants EC2 access to S3 Bucket
Roles
Create new Role: Type=EC2 -> Add policies:
<S3 Policy Above>AWSElasticBeanstalkMulticontainerDockerAWSElasticBeanstalkWebTierAWSElasticBeanstalkWorkerTier
Name: *companyname*-eb-*dev*
EC2
Within the EC2 service, go to each of the below sections and create the following:
Security Groups:
Create at least two groups, one for EC2/EB (Applied in EB) and one for RDS. The EB group will be added as a source in the RDS group, as seen below. The these grant permissions to RDP to the EC2 instance and for the EC2 instance to access the RDS instance:
| Security Group Configuration | ||||
|---|---|---|---|---|
| Name: EB-DEV (Allows ports to Ec2) | ||||
| RDP | TCP | 3389 | <VPN Endpoint> | Company VPN |
| RDP | TCP | 3389 | <Yourself> | RDP |
| RDP | TCP | 3389 | sgr-091a912ec59ae4184 | Bastion |
| Name: RDS-DEV (Allows ports to RDS) | ||||
| MSSQL | TCP | 1433 | <VPN Endpoint> | Company VPN |
| MSSQL | TCP | 1433 | sgr-082d6e34327ee6b9c8 | (EB-DEV) |
| MSSQL | TCP | 1433 | <Yourself> | RDS |
| MSSQL | TCP | 1433 | sgr-091a912ec59ae4184 | Bastion |
| Name: Bastion (Optional) (Is added to above to allow it access to instances on Private Subnets) | ||||
| MSSQL | TCP | 1433 | <VPN Endpoint> | Company VPN |
Key Pairs:
Create key pair -> <companyname-%dev%> -> PEM -> Create
Instances: Create a Bastion host (Optional)
Launch a Windows 2019 basic instance for use as an RDP jump-host if using private subnets for Vinyl instances.
Create a Database using RDS
- Open the RDS service in the AWS console
- Choose Subnet groups > Create DB subnet group > Label either private or public, depending on if you want the ability for outside access (security groups permitting) > Choose your VPC and add select the Availability Zone pair you used when setting up the subnets for the VPC above > Now select the correct two subnets that are both either the private, or the public set. > Create
-
Choose Create Database > Microsoft SQL Server > Choose license:
- SQL Server Express Edition *(Acceptable for small DBs under 10GB and instances sized 'large' or smaller.)
- SQL Web Edition (For DBs > 10GB; for instance sizes > 'large')
- SQL Standard Edition (For Multi-AZ; Very expensive)
-
DB instance identifier: IE: companyname-db-dev
- Master username: Vinyl
- Master password: Generate a strong random pass that excludes symbols (IE: zpZvLtLmRmrrE68T)
- Instance size: T3.Medium or greater, depending on workload (M5.Large or > for sustained high CPU.)
- Allocated storage: 20GB to start for dev; recommend 200GB or more for Prod due to greate IOPS allocation
-
Subnet group: Choose the one you created above.
- Public access: Yes if above group used Public Subnets; otherwise no.
- Existing VPC security groups: Choose the RDS group created earlier.
Set remaining values as desired (Keep 1433 as the DB port).
Note
If hosting Vinyl with Jitterbit, SQL Server Express is not a supported database option.
Elastic Beanstalk Setup (EB)
- App Name:
Vinyl - Env Name:
*companyname*-app-*dev* - Platform: .NET on Windows; IIS 10 Windows 2019, Latest platform
- Upload Vinyl .zip package with the '-eb' filename ending. For example:
vinyl-3.3.12345-win-eb.zip -
Select Configure More Options - Scroll to top of page Select: Custom configuration For the below, click Edit on each section and save in the following order:
Elastic Beanstalk Setup Capacity: Load Balanced; min 1/max 1 (See High-Availability manual for higher);
Instance Type: T3.medium or greater (Depending on load);
AMI ID: Use default AMI IDNetwork: Select created VPC
Load balancer subnets: Select 2 Public Subnets
Instance Subnets: Select 2 Private Subnets
Database Subnets: UnusedInstances: Size: 150GB; Groups: EB group created in EC2 section. Load Balancer: Type: Application -> Processes; Edit default;
HTTP code: 200; Path /ping
For SSL: (See Configuring HTTPS) Add listener - 443/HTTPS - Your Cert - TLS-1-2-Ext-2018-06Security: <EC2 Key pair from above>; IAM Instance profile as created above. Leave Service Role as-is (autogenerated) -
Create!
EB Post Configuration
The environment will take approximately 15 to 20 minutes to come up.
Once EB has completed standing up the components, it's normal for the status to be red at this phase, as need to update the default EB environment properties.
In the ElasticBeanstalk Environment: Go to: Configuration -> Software -> Edit:
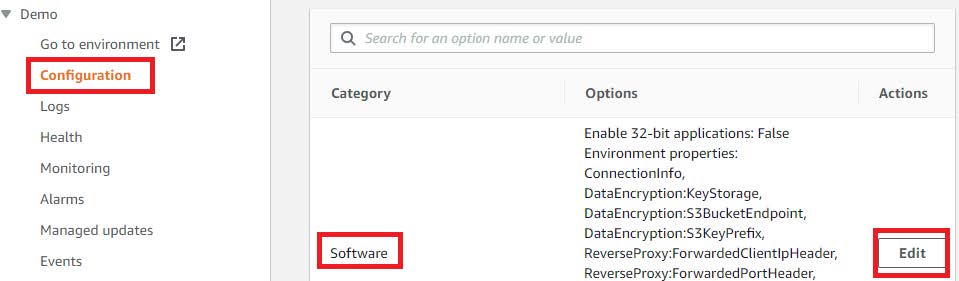
Scroll down to Environment properties:
| Property Name | Default | Example |
|---|---|---|
| ConnectionInfo | DatabaseType=SQLServer;HostName=;DatabaseName=Vinyl;UserName=vinyl;Password=password | DatabaseType=SQLServer;HostName=example-db-dev.cmpgei1x4tzz.us-east-1.rds.amazonaws.com;DatabaseName=Vinyl;UserName=vinyl;Password=P@SSW**RD~!! |
| DataEncryption:S3BucketEndpoint | https://{bucket}s3{-aws-region}.amazonaws.com | https://companyname-vinyl-encryption-keys-dev |
| DataEncryption:S3KeyPrefix | {elastic-beanstalk-environment-name} | Companyname-app-Dev |
ConnectionInfo: Edit string portions to match your db hostname, username and password.DataEncryptionKeyS3BucketEndpoint: Set to the bucket name created earlier.DataEncryptionKeyS3KeyPrefix: Set to the Elastic Beanstalk environment name.
After these steps are applied and the updates complete, go to the Vinyl site URL in EB. This will trigger a database installation or upgrade if required.
Configuring HTTPS
By default, new Elastic Beanstalk environments are not configured for HTTPS. As noted in the Vinyl documentation, HTTPS is strongly recommended for all new Elastic Beanstalk environments.
Elastic Beanstalk environments terminate the HTTPS connection at the Elastic Load Balancer.
Note
For the below process, you must have created or imported a certificate in to the Certificate Manager service already.
Configuring Elastic Beanstalk to accept HTTPS requests
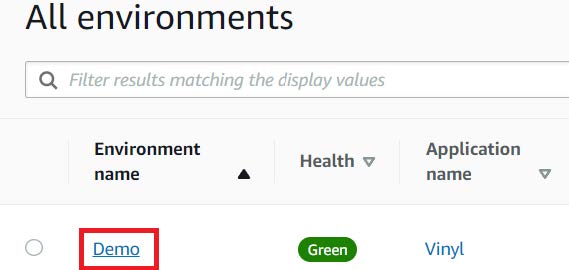
- Log into the Amazon Web Services Console
- Under Services, choose Elastic Beanstalk
- Select the environment you are updating
- Select Configuration on the left menu
- At Load Balancer choose Edit
-
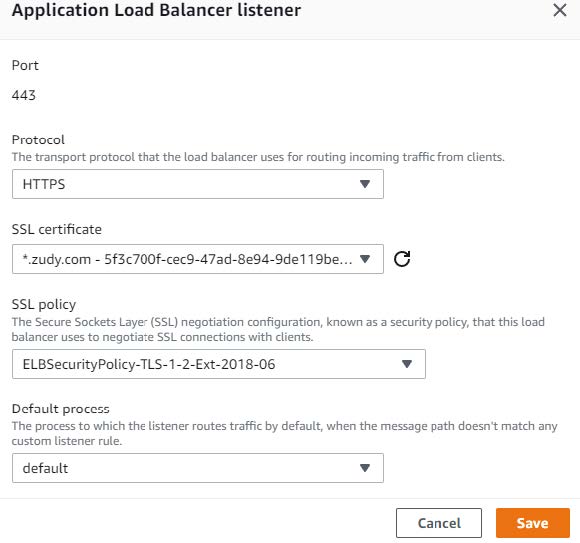
If not present, add Listener Port 443, HTTPS:
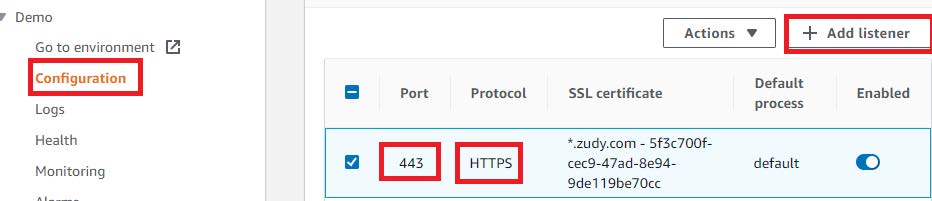
-
Select the SSL Certificate ID that is applicable *For the 'SSL policy'; As for Windows 2019, TLS 1.2 must be used
-
Click the Save button, and then Apply on the Load Balancer page:
Enforce HTTPS and FQDN Redirect
Ensure you have created and tested a DNS CNAME entry for your domain with your registrar or current Name Servers before configuring the below. The ElasticBeanstalk URI will be the target value your DNS entry must use. It must also match the SSL Certificate you are using.
Example
- Host/Name:
demo1.companydomain.com - Type:
CNAME - Target/Value:
demo1.us-east-1.elasticbeanstalk.com
- From Vinyl, go to the IDE > Security Providers
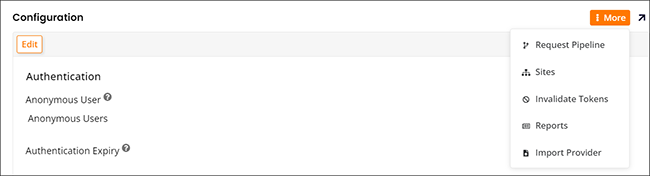
-
From the Configuration panel, click the More button and select Sites:
-
Double-click the default entry
- Click the Edit button
- Enter your FQDN url with https in the URL field
- Check to enable Redirect
-
In the Redirect If Header Exists field, enter X-Forwarded-For:
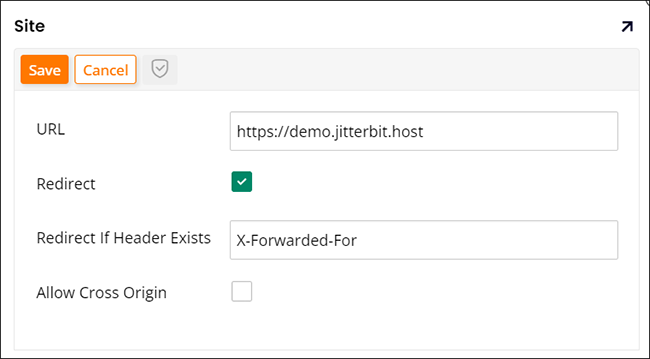
-
Click Save