Installation Guide for Microsoft Windows
This guide describes the system requirements and instructions for installing Vinyl 3.3+. For installing Vinyl versions 3.2 and earlier, please see this Installation Guide.
To complete the installation, you will need a copy of the Vinyl software. The Vinyl software is distributed as a archive file. The file is typically named Vinyl-{version}.zip where {version} is the Vinyl version number.
See the Resources section for reference links when installing Vinyl.
Please refer to the Upgrade Guide if you are upgrading an existing instance of Vinyl.
Note
This article gets updated regularly. To save it as a PDF document, press Ctrl+P and set the Destination to Save as PDF.
Overview
Vinyl is a web application. A typical Vinyl environment is composed of two servers, a web server and a database server. However, it is possible to run Vinyl on a single server.
The Vinyl software will be installed on the web server. This server will need to be accessible to all clients on ports 80 and 443.
The Vinyl system and application databases will be hosted on the database server. The database server needs to be accessible from the web server.
We recommend that the Vinyl application server and database Servers are both configured with the same timezone. These servers need to be in sync. Future versions of Vinyl may refuse to run if the clocks between the application server and database server are out of sync.
We also recommend Vinyl is the only application residing on the app server.
Web Server Configuration Requirements
Note
See the appropriate Vinyl version Hardware Requirements guide for Web Server, Database Server, and Client information.
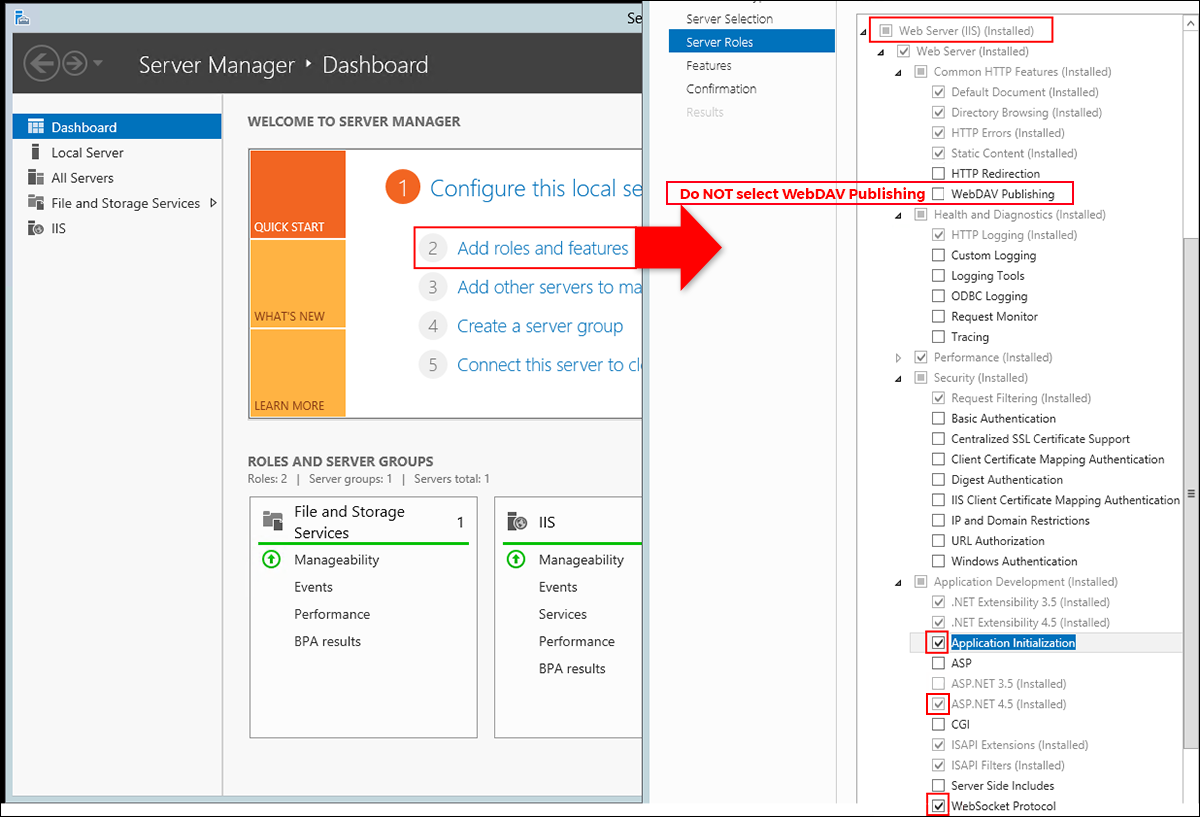
Internet Information Services (IIS)® 8.5 or greater with the following configuration settings:
-
Install the Web Server (IIS) role with the IIS Management Console feature
-
Install the ASP.NET 4.5 role service (under Web Server → Application Development) and dependent features
-
Install the WebSocket Protocol (Under Web Server → Application Development)
-
.NET Extensibility 4.5
-
Application Initialization
-
ASP.NET 4.5
-
ISAPI Extensions
-
ISAPI Filters
-
WebSocket Protocol
-
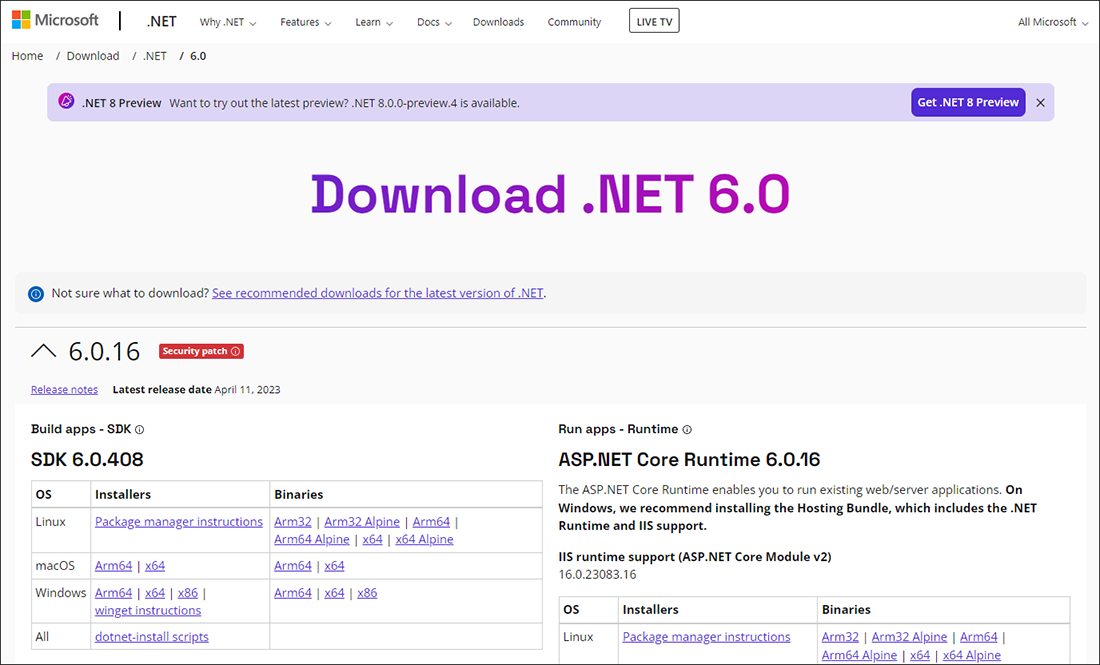
Microsoft .NET 6 Hosting Bundle is required for Vinyl 3.3+
-
Microsoft .NET Framework 4.8 is required for Crystal Reports
-
Powershell command to check .NET version:
Get-ChildItem "HKLM:SOFTWARE\Microsoft\NET Framework Setup\NDP\v4\Full\" | Get-ItemPropertyValue -Name Release | ForEach-Object -
If Powershell command does not work, follow Microsoft's How to: Determine which .NET Framework versions are Installed
-
-
SSL Certificate
-
ASP.NET Core Runtime Hosting Bundle for 6.0. Download Hosting Bundle.
Installation Instructions
These instructions assume that all Windows Updates have been applied and that IIS and SQL Server have already been installed and configured.
Deploy the Vinyl Application
To deploy Vinyl to a directory beneath the Default Web Site:
-
Copy or download the archive to the web server.
-
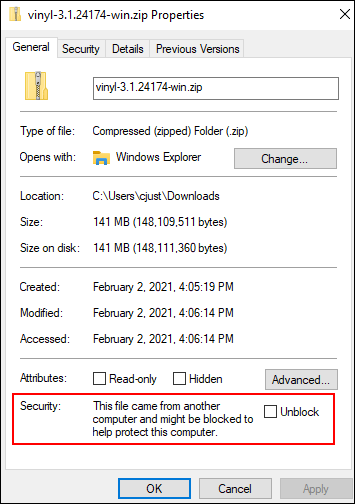
After moving the file to the web server, ensure that the "mark of the web" (MOTW) is removed from the zip file, by right clicking on the file and checking properties and selecting "Unblock" if necessary.
-
Create a directory beneath the Default Web Site's web root in which to host Vinyl (e.g.
C:\inetpub\wwwroot\Vinyl). This will be the Vinyl application root directory. -
Extract the archive to a temporary directory (e.g.
C:\Users\Administrator\Downloads\Vinyl-0.1.2345). -
Copy the contents of the temporary directory to the Vinyl application root directory (e.g.
C:\inetpub\wwwroot\Vinyl).Note
In Vinyl 3.1+, we now copy the files from the root of the unzipped folder (this is different than version 3.0 and earlier).
-
Delete the temporary directory (e.g. C:\Users\Administrator\Downloads\Vinyl-0.1.2345).
Configure the IIS Application
Create an Application Pool
-
Launch the Internet Information Services (IIS) Manager:

-
Select Application Pools from the Connections panel.

-
Click the Add Application Pool... link in the Actions menu.

-
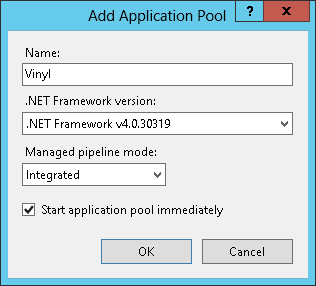
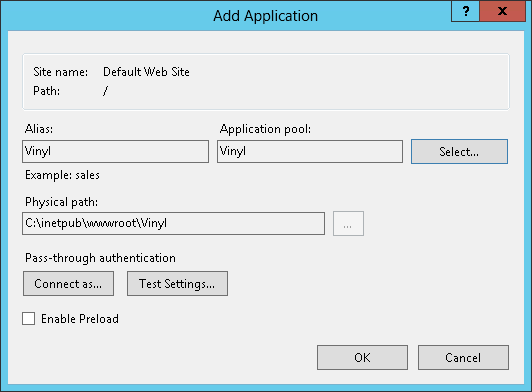
In the Add Application Pool dialog box, provide the following:
-
Name: Vinyl
-
.NET CLR Version: .NET CLR Version v4.0.30319
-
Managed Pipeline Mode: Integrated
-
Start application pool immediately: Checked
-
-
Click the OK button to close the dialog box and create the application pool.
Create an Application
Assuming that Internet Information Services (IIS) Manager is still open:
-
Locate the Vinyl directory beneath Sites → Default Web Site.
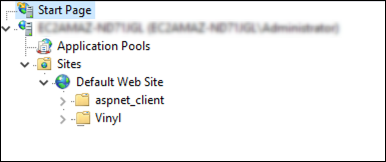
-
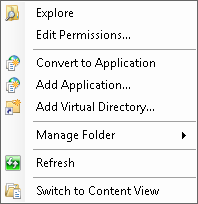
Right click the Vinyl directory and choose the Convert to Application... option.
-
Select the Vinyl application pool.
-
Click the OK button to close the dialog box and create the application.
Configure Authentication
Assuming that Internet Information Services (IIS) Manager is still open:
-
Locate and select the Vinyl application beneath Sites → Default Web Site.

-
Double-click the Authentication icon.

-
Select Anonymous Authentication and click the Edit... action.

-
Select Application pool identity.

-
Click the OK button to close the dialog box.
Set Permissions
Assuming that Internet Information Services (IIS) Manager is still open:
-
Locate and expand the Vinyl application beneath Sites → Default Web Site.
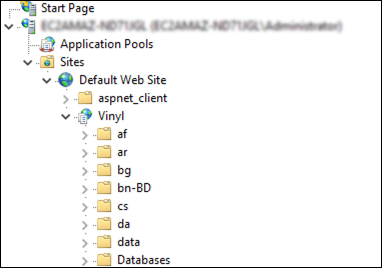
-
Right click the data directory and choose the Edit Permissions... option.

-
Select the Security tab.

-
Click the Edit button to launch the Permissions for data dialog box.
-
Click the Add... button to launch the Select Users or Groups dialog box.

-
Provide the name IIS AppPool\Vinyl.

-
Click the OK button to close the Select Users or Groups dialog box.
-
Select the Vinyl user.

-
Check Allow checkbox for the Full control permission.
-
Click the OK button close the Permissions for data dialog box.
-
Click the OK button close the data Properties dialog box.
-
Repeat steps 2-11 for logs, keys
Prerequisites for Crystal Reports
- Vinyl requires Crystal Reports runtime installed on the app server
- Crystal Reports SP21 is the minimum for Vinyl 3.3, and SP21-SP32 are supported
Enable Crystal Reports
On Windows systems, Vinyl supports Crystal Reports. Crystal Reports is hosted out-of-process in a COM server. Follow these steps to register the Crystal Reports COM server.
-
Launch Windows PowerShell as an administrator.
-
Switch to the Scripts directory beneath the Vinyl installation directory.
-
Run the RegisterCrystalReports.ps1 script.
Example
cd C:\inetpub\wwwroot\Vinyl\Scripts

.\RegisterCrystalReports.ps1
Note
To execute unsigned PowerShell scripts, administrators need to change the default PowerShell execution policy.
Set-ExecutionPolicy RemoteSigned
Create a Connection File
Assuming that Internet Information Services (IIS) Manager is still open:
-
Locate and expand the Vinyl application beneath Sites → Default Web Site.
-
Right click the bin folder and choose the Explorer option.
-
Locate and open the Sample_Connection_Files directory.

-
Select an appropriate connection file and click the Copy icon.

-
Click the Back icon to return to the main Vinyl directory.

-
Click the Paste icon to copy the connection file to the main Vinyl directory.

-
Locate and select the pasted connection file.
-
Click the Rename icon.

-
Provide the name Connection.xml.
-
Click the Edit icon to launch Notepad.

-
Replace the example values with the information necessary to connect to the Vinyl database.
-
Choose File → Save.
Configure the SQL Server
-
Launch SQL Server Management Studio and connect to the server.
-
Locate and expand the Security folder.

-
Right click the Logins folder and choose the New Login... option.

-
Provide Vinyl for the Login name.

-
Select the SQL Server authentication option.
-
Provide a value for the Password and confirm it.
-
Uncheck the Enforce password policy option.
-
Select the Server Roles page.

-
Check the "sysadmin" role.
-
Click the OK button to close the Login - New dialog box.
Upon startup, Vinyl will automatically create all tables and populate any required data for the Vinyl database.
Test
-
Launch a web browser.
-
Assuming your are testing from the web server, navigate to
http://localhost/Vinyl/.- On first run, Vinyl will create the databases. This may take several minutes.
-
Log in with the following credentials:
-
User name: admin
-
Password: P@55w0rd
Note
The user name and password are both case sensitive.

-
Configuration
After Vinyl has been successfully installed, there are several configurations changes that should be made.
Configure Security Providers
Vinyl security model supports multiple, configurable security providers. If your organization is looking to configure security provider(s), please see the Providers page.
Ensure Scheduled Events Run after the Application Pool is Recycled
Once Vinyl is installed and configured, you want to ensure the application pool is always running, and that any event that may cause the application pool to stop will restart the application immediately. When the Vinyl application is not running, scheduled events are not executing. This is important as IIS will shut down the application pool when idle (often during off hours), causing nightly scheduled routines to be ignored. In order to automatically start Vinyl after an application pool recycles, or a server restarts, you will configure the IIS ApplicationInitialization component.
Note
IIS ApplicationInitialization is not compatible with sites that use Windows Integrated Authentication. Using Windows Integrated Authentication requires Anonymous Authentication to be disabled in IIS. The IIS ApplicationInitialization component requires anonymous access.
There is a workaround for this scenario involving the Windows Scheduler to ping Vinyl every 5 minutes in order to ensure that it starts back up after the application pool is recycled.
Install and Configure Application Initialization
The steps vary depending on the version of IIS. Choose the a link below:
Test Always Running Behavior
As noted, the Application Pool should always be running. The following guide steps through how to test for always running behavior:
By default IIS is set to restart every 29 hours (so that the Application Pool is restarting at different times every day). You should configure a specific time of day when the Application Pool restarts, and be sure that this time does not interfere with scheduled background jobs.

Specify a date and time to recycle the application pool in IIS Manager, here you would set 11:42:00 to a time that doesn't conflict with scheduled background jobs
Troubleshoot Auto Start Behavior
If you are experiencing issues with Auto Start behavior, please see this troubleshooting guide:
Vinyl Installation Troubleshooting
Vinyl fails to start with a 500 error that indicates a configuration section is locked.

Ensure that the ASP.NET 4.5 feature is installed. It is located under Web Server IIS → Web Server → Application Development.
Vinyl starts up but doesn't create any databases on the SQL Server.

Ensure that the connection file is named correctly. In particular, make sure the extension is .xml and not .txt.
Cannot upload license file. Get "An unknown error occurred." Detailed message includes "405 POST Method not allow". Or "Failed to deserialize license (d3fc6d4e835e)" error message.

WebDAV on IIS can interfere with Vinyl. If not needed uninstall / disable WebDAV. If WebDAV is required contact Vinyl support.
To uninstall WebDAV:


"Name not found" when granting application pool user permission to data directory
The Windows Server 2008 permissions editor is not able to find application pool identities. Administrators can use the command line instead. Start by launching the command prompt as an administrator. Switch to the Vinyl installation root directory, e.g. C:\inetpub\wwwroot\Vinyl. Then, run the following command:
ICACLS data /grant "IIS AppPool\Vinyl":F

ICACLS keys /grant "IIS AppPool\Vinyl":F

ICACLS logs /grant "IIS AppPool\Vinyl":F
This example assumes that the Vinyl application pool is named "Vinyl".
Appendix
Connection Files
This section contains connection file examples for supported configurations.
SQL Server - Default Instance
<ConnectionInfo DatabaseType="SQLServer" HostName="localhost" DatabaseName="Vinyl" UserName="Vinyl" Password="P@55w0rd"/>
SQL Server - Named Instance
<ConnectionInfo DatabaseType="SQLServer" HostName="localhost" InstanceName="SQLEXPRESS" DatabaseName="Vinyl" UserName="Vinyl" Password="P@55w0rd"/>
Increased Timeouts - Default Instance
The defaults for ConnectionTimeout is 15 seconds, and 30 seconds for command timeout... The following sets the limits to 300 seconds = 5 minutes
<ConnectionInfo DatabaseType="SQLServer" HostName="localhost" DatabaseName="Vinyl" UserName="Vinyl" Password="P@55w0rd" ConnectionTimeout="300" CommandTimeout="300"/>
Multiple Instances on the Same Server
If multiple instances are run on the same app server, create a different app pool identity for each instance to ensure they are properly isolated. Also, along with the steps provided regarding the creation of the Vinyl app pool, enable the "Load User Profile" option for each application pool used by Vinyl:

Resources
The following links are references and resources for installing Vinyl on Microsoft Windows: