Microsoft Dynamics 365 Connection Guide
Overview
This guide describes the system requirements and instructions for connecting Vinyl to a Microsoft Dynamics 365 Business Central database server. Microsoft Business Central is an accounting system that we will configure with OAuth 2.0 to authenticate from Vinyl. Microsoft Azure will be used to configure the OAuth authentication flow.
This guide assumes you have an existing Microsoft Dynamics 365 Business Central accounting system that you are looking to connect to Vinyl.
For the configuration steps happening in Microsoft Azure and Dynamics 365 Business Central, this guide will provide high level information.
To connect your servers, you must have Vinyl 3.3+ installed.
System Requirements
Database Server
-
Dynamics 365 Business Central
-
Azure Active Directory
Client Web Browser
-
Chrome: 84+
-
Firefox: 73+
-
Safari: 13.0.1+
-
Edge: 84+
Connection Instructions
Register an App in Microsoft Azure
The method used to authenticate from Vinyl to Microsoft Business Central and Dynamics 365 is OAuth 2.0. We will configure the OAuth flow using Microsoft Azure.
-
Navigate to the Azure Active Directory admin center portal
-
Under Manage, select App registrations > New registration
-
Provide a Name. This value may be displayed at times by users of the app. For example: Vinyl Business Central
-
Select who can use the application
-
Click Register
When the registration is complete, the Azure portal will display the app registration on the Overview screen, along with the Application (or client) ID which is a unique value identifying the application.
Add a redirect URI
The redirect URL represents the location where Microsoft will redirect the user's client and pass
the security tokens after authentication.
-
Navigate to the registered app in Azure Active Directory
-
Click Add a Redirect URI to enter the value. For example:
http://localhost/auth-response
Add a Client Secret
Client secrets are also referred to as an application password. The registered app in Microsoft Azure requires a client secret record to be created for each Vinyl environment the connection is being used in. If your Vinyl configuration has a development, QA, and Production environment you will need 3 corresponding client secret records.
Client secrets have an associated Expires date, and the maximum length they can be set for is for 2 years.
Generating a client secret record provides you with a client secret Value and Secret ID. The Value is encoded and only available to copy and use once (otherwise a new token would need to be generated to capture a new Value).
-
Navigate to the registered app in Azure Active Directory
-
Under Manage, select Certificates & secrets
-
Click New client secret
-
Provide a Description. For example: Vinyl Production
-
Select an Expires value. For example: 730 days (24 months)
-
Click Add
-
Note the Value as it will become encoded
App Endpoints
After an app has been registered in Microsoft Azure, the Endpoints screen provides endpoint values required for OAuth 2.0 authentication. When configuring the Security Provider in Vinyl, you will need to reference some of these Endpoint values.
-
Navigate to the registered app in Azure Active Directory
-
Click the Endpoints tab. The following values are required in Vinyl:
-
OAuth 2.0 authentication endpoint (v2)
-
OAuth 2.0 token endpoint (v2)
-
Assign API Permissions
The registered app in Microsoft Azure needs permissions assigned to Business Central. This should be configured based on how you want to integrate it with Vinyl. One method to configure permissions is a user type flow, where you authenticate in Azure and your permissions in Business Central dictate the same permissions set in Vinyl.
-
Navigate to the registered app in Azure Active Directory
-
Under Manage, select API permissions
-
Click Add a permission
-
Click Dynamics 365 Business Central
-
Select Application permissions
-
Click Add a permission and define permissions per your business requirements
For more detail, see Quickstart: Register an application with the Microsoft identity platform
Link the Registered App to Business Central
For this configuration step, you should have the Application (client) ID value for the app registered above copied somewhere handy for usage, like your clipboard. In Business Central you also define application permissions.
-
Navigate to Dynamics 365 Business Central
-
Go to Azure Active Directory Applications
-
Click New
-
Enter the Client ID value from the registered app. This is the Application (client) ID value in Microsoft Azure.
-
Enter the Description. For example: Vinyl Business Central Integration
-
Select the State value to indicate if the connection is Enabled or Disabled
-
Define any Permission Sets that the application has in Business Central
For more detail, see Register Business Central On-Premises in Azure AD for Integrating with Other Services
Business Central Web Services
Within Business Central, you can take advantage of Web Services to expose additional data if it isn't available, or already exposed, by default. Web Services allow you to expose a page or Query in Business Central as an Endpoint, similar in concept to an API. Any limitations and restrictions in place in Business Central carry over to the data retrieved from Web Services. Web Services cannot perform callbacks.
-
Navigate to Dynamics 365 Business Central
-
Go to Web Services
-
Click New
-
Select the desired Object Type. For example: Page
-
Select the desired Object ID
-
Assign a Service Name. This represents the Endpoint you would call it at. For example: PaymentTerms
-
Place a check in Published
-
The corresponding OData V4 URI can be used to access this data, once the proper configuration is in place
For more detail, see Business Central Web Services.
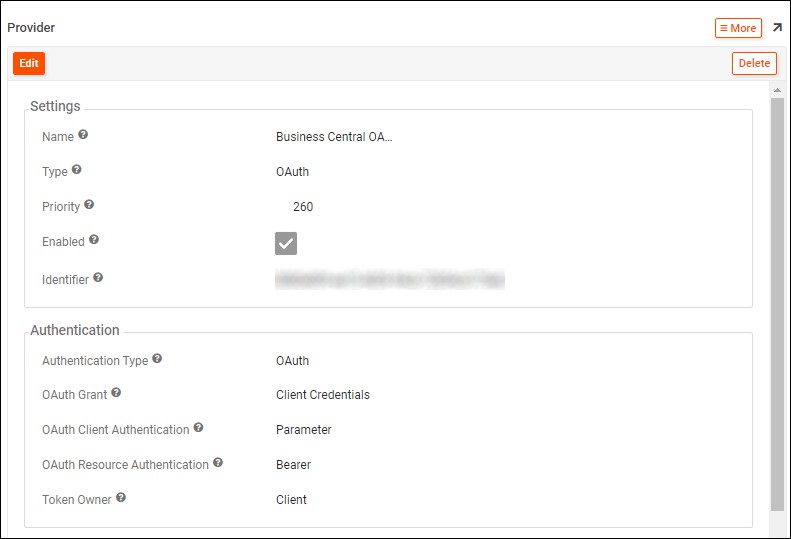
Create an OAuth Security Provider in Vinyl
-
Navigate to the Vinyl IDE
-
From the Connect menu, click the Security Providers button
-
Click + User Authentication
-
Provide a Name. For example: Business Central OAuth
-
Select Type as OAuth
-
Confirm Enabled is selected
-
Set Authentication Type to OAuth
-
Set OAuth Grant to Client Credentials
-
Set OAuth Client Authentication to Parameter
-
Set OAuth Resource Authentication to Bearer
-
Set Token Owner to Client
-
Click Save
-
Next, configure 2 Endpoints by clicking + Endpoint:
-
Type = Authorization Endpoint, URL = value from the Azure portal Endpoints
-
Type = Token Endpoint, URL = value from the Azure portal Endpoints
-
-
Click + Credential
-
Type = Client
-
User Name = Client ID from the Azure portal
-
Password = Client secret from the Azure portal
-
Click Save
-
-
Click + Property
- Parameter = Scopes, Value = default value from Business Central. For example:
https://api.businesscentral.dynamics.com/.default
- Parameter = Scopes, Value = default value from Business Central. For example:
Create a Data Source in Vinyl
-
Navigate to the Vinyl IDE
-
From the Connect menu, click the Data Servers button
-
Click + Server
-
Assign a Server Name. For example: Dynamics 365 Business Central
-
Set the Type as Dynamics 365 Business Central
-
Provide the Url as the base Url to access Dynamics 365 in Business Central (includes tenant ID in the string). For example:
https://api.businesscentral.dynamics.com/v1.0/xxxxxxxx-xxxx-xxxx-xxxx-xxxxxxxxxxxx/ODataV4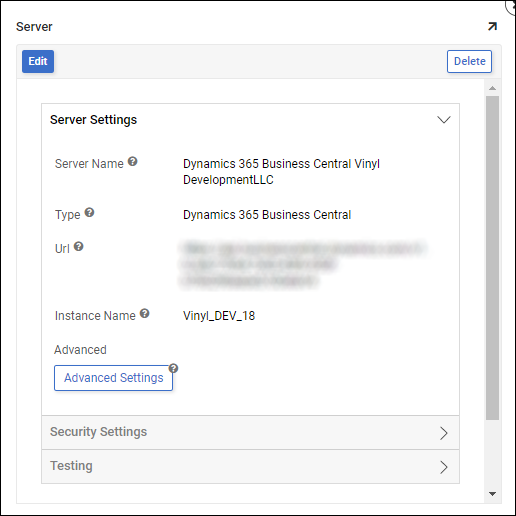
-
Provide the Instance Name to connect to. This represents the company in Business Central.
-
Business Central limits connections to one company at a time
-
If multiple companies are required to connect to, multiple Data Server connections must be configured along with Business logic developed against each unique Data Server connection
-
-
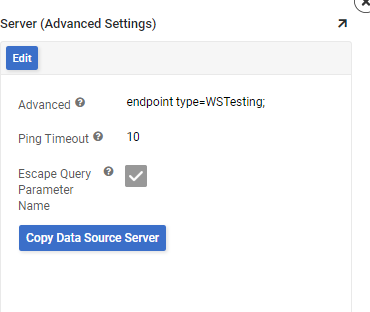
Click the Advanced Settings button
-
If needed, provide any additional connection information in the Advanced field
-
Click Save
-
-
Under Security Settings, set Security Provider to the Business Central provider configured
-
Click Save
Test the Connection
Under Testing, click the Test Connection button and ensure the configuration is working as expected.
Import the Endpoint Data
After configuration is established, you can import any Endpoint data desired from Business Central to Vinyl. After it's been imported you can expose, interact with, and manipulate the data as you normally would in Vinyl, any permissions from Business Central will apply.
-
Navigate to the Vinyl IDE
-
From the Connect menu, click the Data Servers button
-
Locate the Dynamics 365 Business Central data server connection created and select it
-
Click the Details button from the Dynamics 365 Business Central data server entry in the right-hand panel
-
Click the Import button
-
Provide the Endpoint value from Web Services in Import Pattern that you want to match. For example: PaymentTerms
-
Click the Import button. Vinyl will import the schema.
Resource Links
-
Microsoft Azure App Registration: https://learn.microsoft.com/en-us/azure/active- directory/develop/quickstart-register-app
-
Microsoft Business Central Setup Registered Application: https://learn.microsoft.com/en-us/dynamics365/business-central/dev- itpro/administration/register-app-azure
-
Microsoft Business Central Web Services: https://learn.microsoft.com/en- us/dynamics365/business-central/dev-itpro/webservices/web-services
-
Microsoft Dynamics 365 Business Central: https://learn.microsoft.com/en- us/dynamics365/business-central/