Quickbase Connection Guide
Overview
This guide describes the system requirements and instructions for connecting Vinyl to a Quickbase database server.
Editing data and record deletions are both supported for Quickbase integration with Vinyl 3.3 and will immediately update Quickbase, when performed from Vinyl. Record creation from Vinyl into Quickbase is not a currently supported option with Vinyl 3.3.
To connect your servers, you must have Vinyl 3.3+ installed.
System Requirements
Database Server
Quickbase Database Server
Client Web Browser
-
Chrome: 84+
-
Firefox: 73+
-
Safari: 13.0.1+
-
Edge: 84+
Connection Instructions
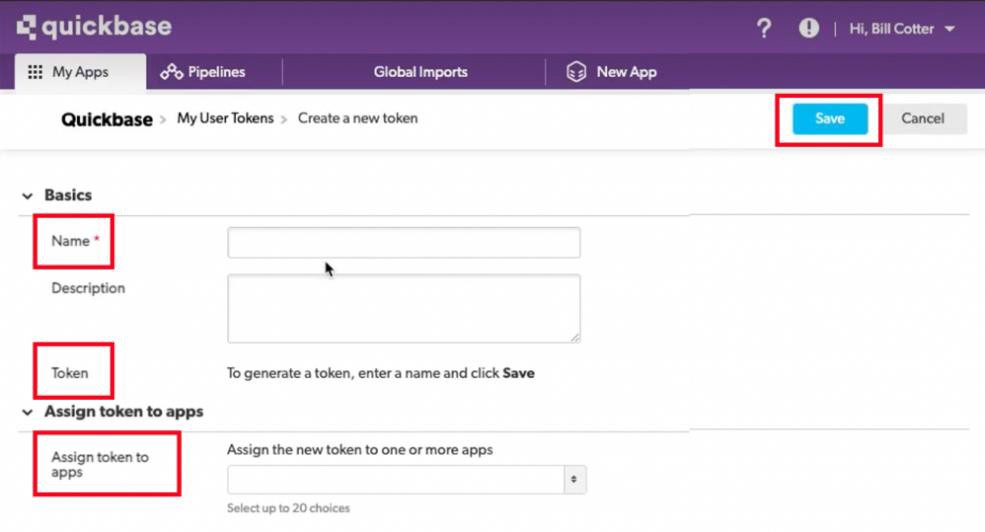
Configure Quickbase User Token for Vinyl
-
Navigate to Quickbase Console. For example:
https://example.quickbase.com -
Click the user dropdown on the Global bar, then click My Preferences
-
Select Manage User Tokens link on My User Information
-
Click the + New User Token button
-
Assign a Name
-
Select the application to grant access under Assign token to apps
Note
If you have more than one application it is recommended to create a token by application
-
Click the Save button
-
Copy the Token generated by Quickbase
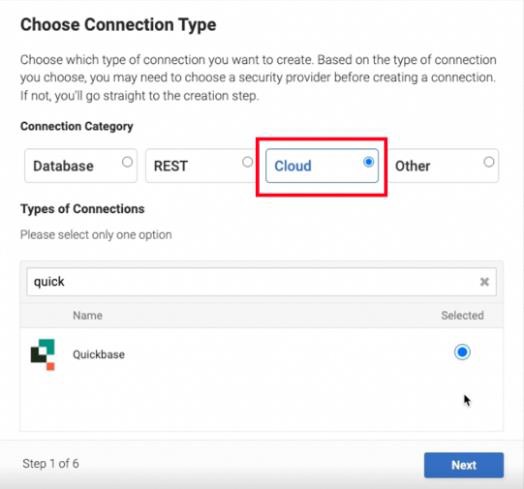
Adding a Server
-
Navigate to the App Workbench for your Vinyl application
-
Select the Data Sources tile
-
Click the + Source button
-
Select New Connection for Add a Source to Your Application
-
Click the Next button
-
Search for Quickbase under the Cloud category
-
Select the radio button for Quickbase
-
Click the Next button
-
Assign a Name for Server Name on Server Settings
-
Assign the API Key for Security Settings by pasting in the Quickbase Token
-
Assign the Domain Name for Security Settings with the Quickbase URL. For example:
https://example.quickbase.com
-
Click the Next button
-
Click the Done button
-
Confirm the new Source has been created for Quickbase under Data Sources
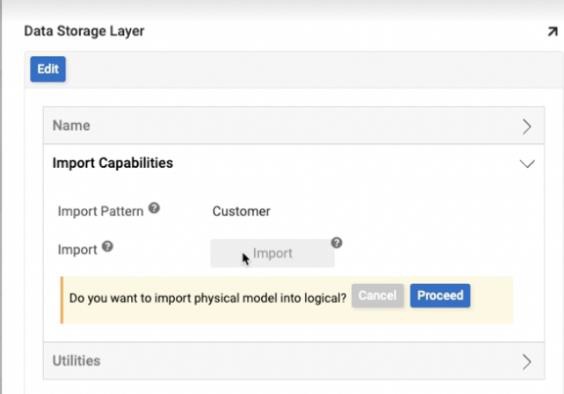
Import a Data File
-
Navigate to the App Workbench for your Vinyl application
-
Select the Data Sources tile
-
Select the Quickbase Data Source entry under Data Sources
-
Expand Import Capabilities
-
Click the Edit button
-
Populate your Table Name in Import Pattern
Note
Clicking Import without providing an Import Pattern will import all tables
-
Click the Save button
-
Click the Import button
-
Click the Proceed button
Note
The import process will run in the background
Test the Connection
-
Click the Logic button
-
Confirm the expected file populated under Tables
-
Click the Results button for your table
-
Confirm the expected information has populated for the table