QuickBooks Online OAuth Connection Guide
Prerequisites
- You must be on Vinyl version 3.2 or later
- If you are on Vinyl 3.3, use Vinyl version 3.3.33529 or later
- You must have an Intuit Developer Account
Configuration in Intuit Developer
- Log into your Intuit Developer account.
- From the menu at the top right of the page, select Dashboard.
- Create a new app by clicking on the + Create App button.
- Select Quickbooks Online and Payments as the platform you want to develop for.
-
Provide an app name, and select the scopes for the APIs you wish to access.

-
Once the app has been created, navigate to the Keys & Credentials page from the left side menu. Here you can find your Client ID and Client Secret, make sure to take note of these values.
-
On the same page you will also configure the Redirect URI for the security provider on the Vinyl instance. If you know the name of your provider you can go ahead and configure this, and if not, we can return to this later. In this example the provider name is QBOnlineSupport. The format of the redirect URL should be
https://<Vinyl-Instance>/signin-<Security-Provider-Name>.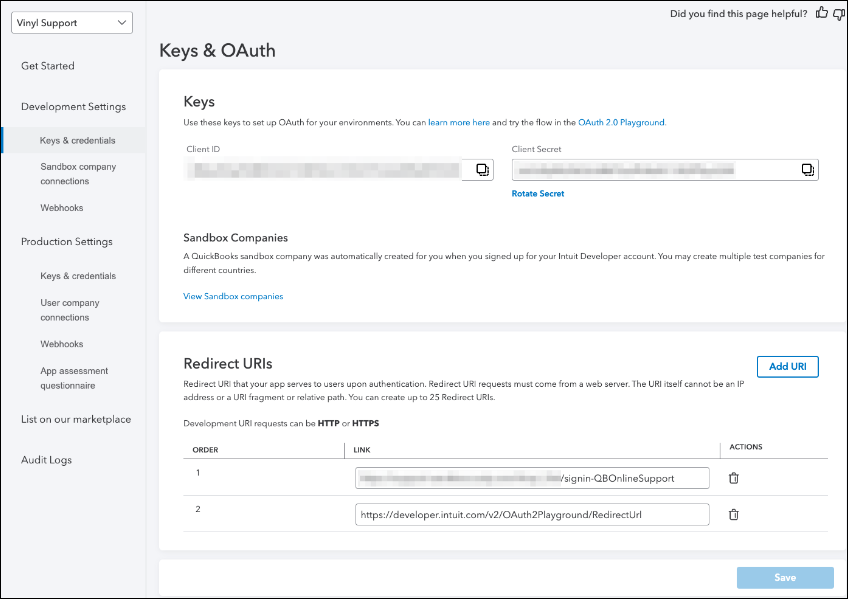
Configuration in Vinyl
Create a Security Provider
After creating a custom OAuth app in the Intuit developer portal, you will create a security provider in Vinyl.
- Navigate to the Security Providers section from the IDE, and create a new security provider using the + Data Source Authentication button.
- Provide the following details:
- Name - Identifies the Security Provider and appears in the URL. Example: QuickBooksOnline
- Type - OAuth
- Authentication Type - OAuth
- OAuth Grant - Authorization Code
- OAuth Client Authentication - Basic
- OAuth Resource Authentication - Bearer
- Token Owner - User
- Redirect on Challenge - True
- Click + Endpoints and configure the following 2 endpoints:
- Authorization Endpoint -
https://appcenter.intuit.com/connect/oauth2 - Token Endpoint -
https://oauth.platform.intuit.com/oauth2/v1/tokens/bearer
- Authorization Endpoint -
- Click + Credential:
- Type - Client
- User Name - Client ID from custom OAuth App
- Password - Client Secret from custom OAuth App
- Under the Properties section, click the + Property button to add a new property.
- The Value should be
com.intuit.quickbooks.accounting.
- The Value should be
- If you did not configure the Redirect URI in the custom OAuth app in the Intuit Developer portal for this security provider name, go ahead and do so. (Step 7 from the section above - The property name should be Scopes.
- This completes the Security Provider setup.
Create QuickBooks Online Datasource
Now that you have created a custom OAuth app and security provider, you will create the QuickBooks Online Datasource.
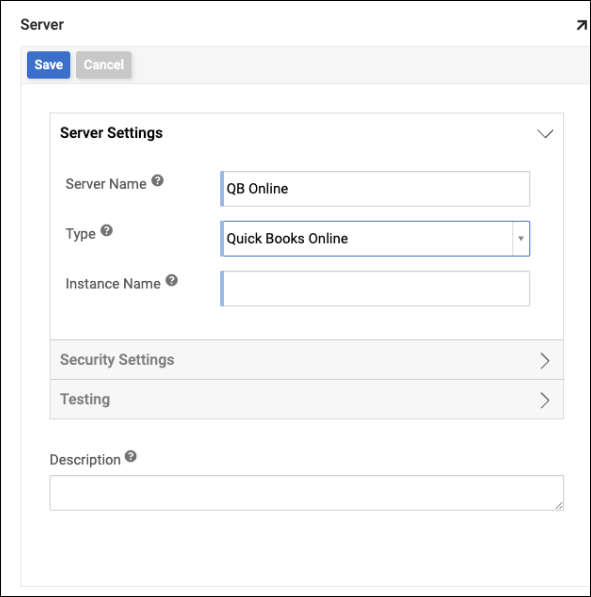
- From the IDE, click on Data Servers.
- Click the + Server button.
-
Give the server a name, and select the Type as Quick Books Online.
-
For the Instance Name, we will need to navigate back to the Intuit Developer portal. The Instance Name is found on your company's sandbox page.
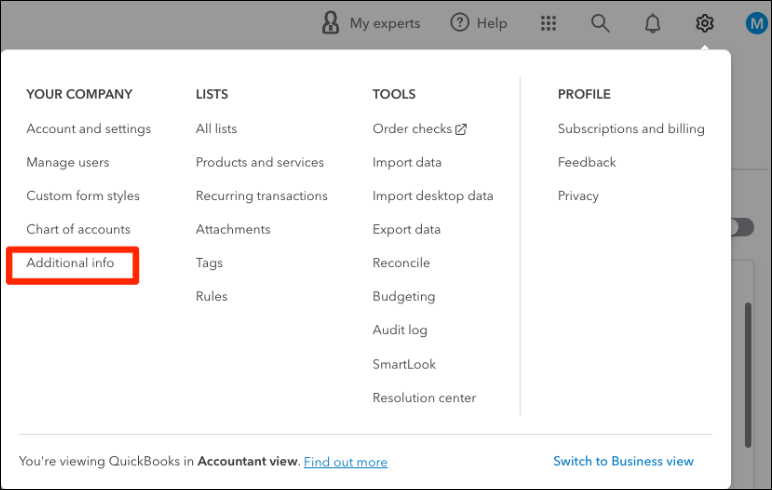
- On the top right page in the Intuit Developer portal, click on the User icon, and then Sandbox.
- This should open the Manage sandbox companies page, which you can then click on your sandbox.
-
On the sandbox page, click on the gear icon located in the top right of the page, then click on Additional info.
-
Here you will find the Company ID which is what we will use for the Instance Name in Vinyl.
-
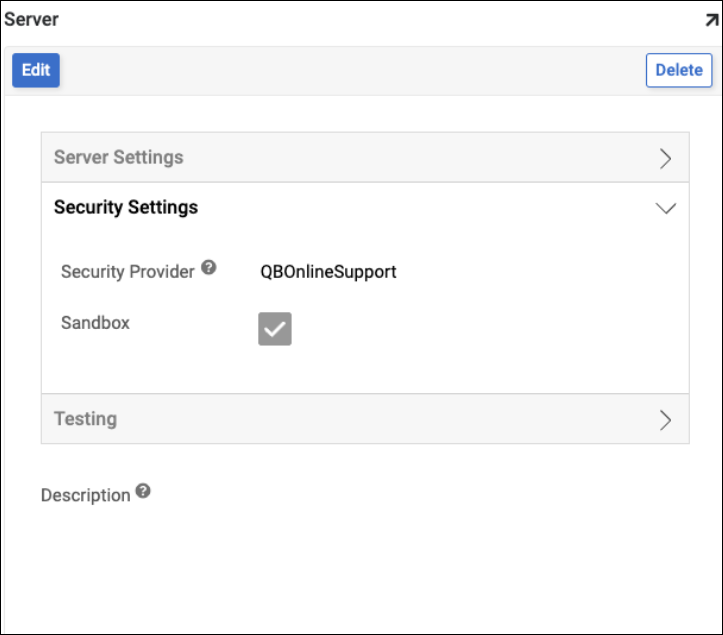
Going back to Vinyl, configure the Instance Name, add the Security Provider we created under the Security Settings section.
-
Now that we have created the custom OAuth app, security provider, and datasource we are ready to test.
- Test the connection using the Test Connection button, and check the Allow challenge field.
- If everything has been configured correctly, you should see a success message. Now you are ready to import tables and work with this datasource.
Troubleshooting
If you are using Vinyl 3.2, and you see the following error when testing the connection you need to adjust the connection string:
Warning
[3100] message=ApplicationAuthorizationFailed; errorCode=003100; statusCode=403.
Adjusting the Connection String (only applicable to Vinyl 3.2 versions)
- Navigate to the IDE.
- Click on Additional Settings on the bottom of the page.
- From the Internal Settings tile, click on Database Type Providers.
- Scroll or search for Quick Books Online.
- Using the pencil icon, edit the Connection String to remove the space on
"use sandbox={{ Sandbox }}"so it looks like:"usesandbox={{ Sandbox }}". - Save the changes and test again, it should be successful now, assuming everything else is configured correctly.