Webhooks
Overview
Vinyl supports the ability to invoke an event in response to an email, text message, or an API call to a Vinyl endpoint using Webhooks. Webhooks are user-defined HTTP callbacks, and are typically triggered by an event. When the specified event occurs, the source site makes an HTTP request to the URL configured for the Webhook.
An example of a Webhook in Vinyl is if a Vinyl application sends an email to a user asking her to approve or reject a transfer. The user would reply to the email, typing either "approve" or "disapprove" in the message body. If the user replies with "approve" Vinyl invokes one event; "disapprove", another event is invoked. This feature allows the user to respond to the email or text message without leaving the application.
How to Configure a Webhook
In this example we have a Vinyl application that is used for order management. The user wants to be able to create a new order via an API call and receive the order number in the API response. The purpose for the Webhook will be to generate a new Order record, calculate the order number, and return that order number in the response.
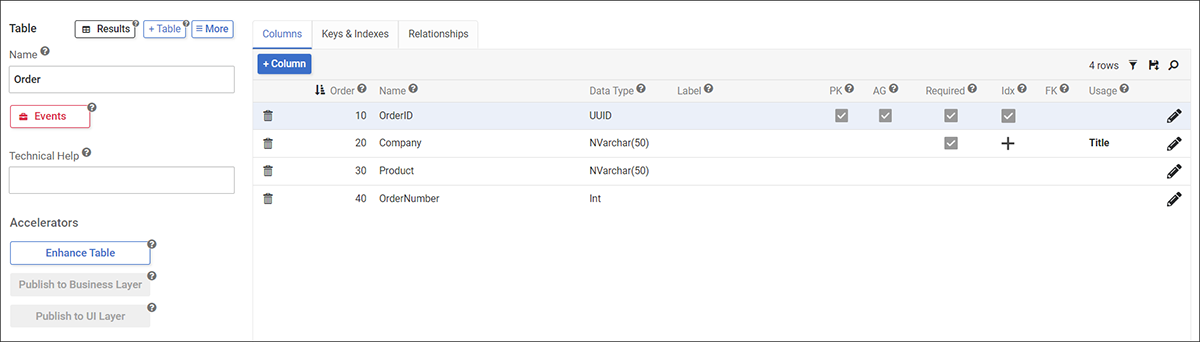
Our Order table has an OrderID (PK), Company name, Product name, and OrderNumber:
Step 1: Add Webhook in Data Servers
-
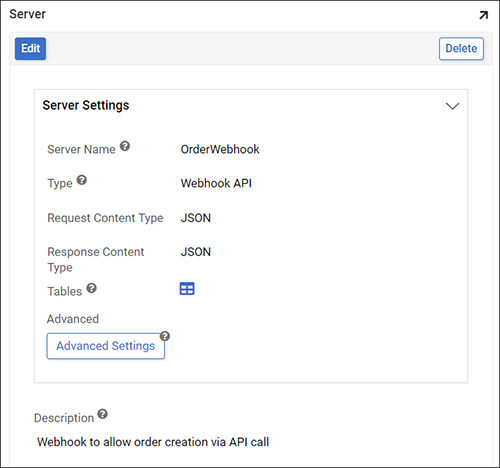
Create Server:
- Navigate to IDE, Data Servers and click on +Server
- Assign a Server Name. For example: OrderWebhook
- Select Type as Webhook API under web services
- Choose appropriate Request/Response Content Type Content, in our example they are both JSON
-
Click Save and close the popup:
-
Create Endpoint:
- Click the Data Server Details button
- Click the Endpoints button
- Click +Endpoint in the Endpoints panel
-
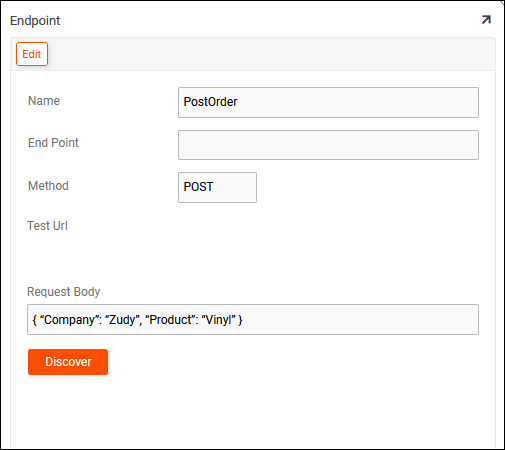
Name your endpoint. For example: PostOrder
Note
This Name will not appear in the Webhook URL.
-
Select the HTTP Method that your Webhook uses. Typically this will be a POST to update information in a table.
- Click the checkmark icon to save
-
Create Endpoint Parameters:
- Click on Discover from the Endpoints panel
-
If the Webhook accepts a body (e.g., a POST using JSON or XML Request content type), provide a sample Request Body. For our example, our JSON is:
{
    "Company": "Jitterbit",
    "Product": "Vinyl"
}
(We will generate the OrderID and OrderNumber as part of the events triggered by the Webhook)
-
Click Save
- Click on Discover. This will automatically add the input Endpoint Parameters.
-
If desired, add the Response endpoint parameter. In our example, it would be type String, Length -1 characters, with no test value, no type selected for Cookie/Header/Query, and Direction is Output.
Step 2: Add Webhook to your Application
- Navigate to App Workbench > Data Sources
- Click + Source
- Select Link to existing source
- Click Next
- Select the REST Webhook API configured in Step 1
- Click the Link button
- Review the summary of what Vinyl will perform and click Done
Step 3: Create a Webhook Business Rule
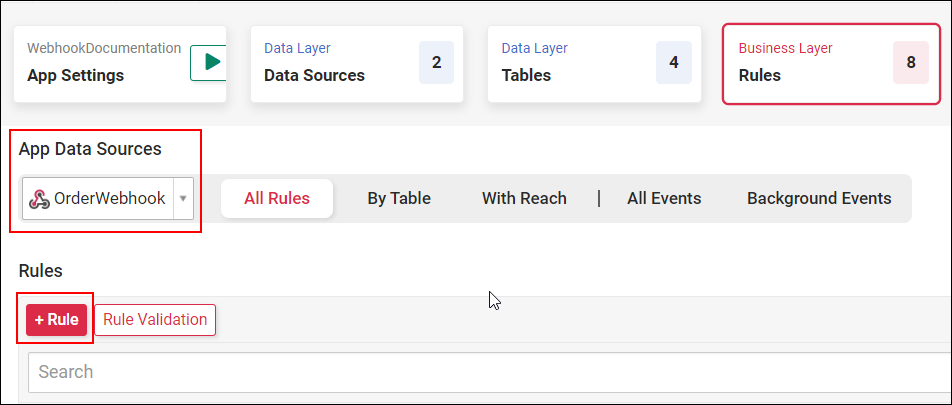
- Navigate to App Workbench > Rules.
- Confirm the selected App Data Source is your newly created Webhook data source and not your application data source
-
Click + Rule
-
Assign a Name. For example: Order (Webhook)
- Select Webhook as Purpose
- Select the Webhook Data Source as Source Data Source
- Set Target to the Webhook endpoint
- Click Save
- Add your Endpoint table and select all columns. In our example this is the PostOrder table.
Step 4: Create XP CRUD Business Rules
Create an XP CRUD Business Rule that Inserts the value received from the Webhook into a table in your Application's Data Source.Create an XP CRUD Business Rule that Inserts the value received from the Webhook into a table in your Application's Data Source. This should be registered to the Webhook data source like the Webhook object we just created. A few notes:
- Order table must allow public Read/Write which is configurable under the Order table's Edge Case settings in the table design
- Target layer must be set to Logic Layer
We will add a column to generate a PK using the newuuid() function and add the Company and Product columns from our webhook object with appropriate targets:


Note
We do not need to add the OrderNumber because this is generated as a part of the Order table's Insert Event
Step 5: Create an XP CRUD Business Rule
Create an XP CRUD Business Rule that Updates and writes a response with the new Order's OrderNumber.
- Create a new XP CRUD rule registered to the Webhook data source. For example, PostOrder (Update Response)
- Set action to Update
- Source Data Source to your application's Data Source
- Target Data Source to your Webhook's Data Source
- Set the Target Layer to Logic Layer
- Set the Target to your Webhook Object. For example, Order Webhook
- Add Order table from application Data Source
- Add OrderNumber Column targeting the Response column
-
Add Where clause that filters based on the newly generated order (we utilize the generated function to retrieve the OrderID generated in this event)

Note
The generated function returns a string so we need to cast the OrderID as a string in order for this to work
Step 6: Add the CRUD Business Rules as Actions
Add the two CRUD Business Rules created to the Data Layer Insert Event of the Webhook Business Rule.

Step 7: Expose Webhook to the World
Create an Endpoint for your Application. This may already have been done for your application.
- Navigate to the Vinyl IDE > REST APIs (Under Connect) > Webhooks
- Click the Manage Endpoints button
- Select the application you want to enter the endpoint value for. For example: WebhookDocumentation.
- Click the pencil edit icon for the application you are configuring
- Enter the Endpoint value into the Endpoint field. For example WebhookDoc
- Click proceed to save
- To configure the Webhook Object, from the Webhooks Panel click on +Webhook
- Select your Webhook Object. It will automatically select an Endpoint Name. This will become the webhook portion of the Webhook URL.
-
Click Save

Step 8: Create an API Key for a user to access this Webhook
We will create a basic API key and assign it to a user to access this Webhook. This can be done once for a Service User, or multiple times for individual users.
- Navigate to the IDE, Security Providers
- Under User Authentication create a record of type HTTP Basic Authentication if one does not exist. If one does, you can skip this step
- Navigate to IDE, User Management
- Select the User that needs a Key
- Under Authentication click Keys
- Click Create
- For Provider select the security provider of type HTTP Basic Authentication from steps 1 & 2
- Click Save
- Write down the generated Identifier and Key as this information will not be available again
Step 9: Test
You can test this Webhook using Postman or Insomnia. Send a POST API call with the Body similar to the Body Sample used to create the parameters in Step 1. You will use basic authentication with the identifier as the Username and Key as the password from the previous step.
For testing, use the link: https://<url>/webhook/v1/<application-endpoint>/<endpoint>
In the scenario where no authentication is required, in lieu of configuring an x-api-key in the header you can potentially adjust the url to one of these options:
-
https://{{user's identifier from Step 8.9}}:{{user's key from Step 8.9}}@{{url from step9}}(to be used if the provider is http basic auth with no parameters)Caution
The HTTP basic method described above requires the Authorization header to be included in the received payload. To bypass this, use the API Key method instead.
-
https://{{url from step9}}?apiKey={{user's key from Step 8.9}}(to be used if the provider is API Key and the Properties include HttpHeaderName 'X-API-Key')