Change Font Size for Entire Panel
You can change the default font size for an entire panel by using a Custom Theme and associating the Theme to the panel. In this example we will create a Custom Theme to control Font, which in turn allows you to configure information for Font Family, Font Size, Font Weight, and Font Height.
How to Configure
Step 1: Configure a Custom Theme
- Navigate to Look & Feel for a Collection your app is associated with. Example: Customer
- Click + Theme
- Assign a Theme Name. For example: Panel Font Size
- Click Save
- Select Panel from the Components
- Click + Style from the Style panel
- Select Content as the Area value
- Select Font as the Style Type
-
Configure any of the Values as appropriate:
- Font family
- Font size
- Font weight
- Line height
-
Click Save
Step 2: Apply Custom Theme to Panel
- Navigate to the page containing the panel
- Go to Action Drawer > Live Designer
- Click the Edge Case tab for the panel
- Expand Look and Feel
- Set the Theme value to the Custom Theme configured in Step 1
- Click Save
- Confirm update from the app view
Step-by-Step Guide
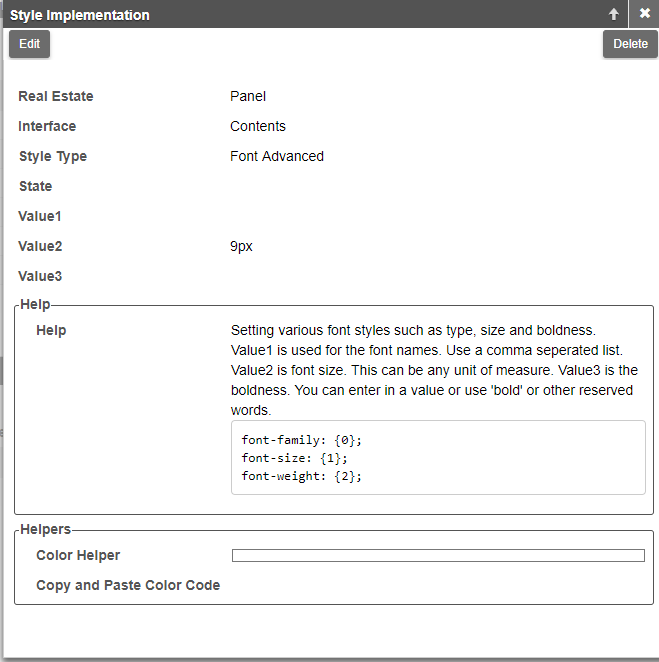
You can change the default size for an entire Panel by using a Theme and creating a Style for the Panel's Contents area and a 'Font Advanced' Style Type. This allows you to set the Font Family (generally the specific fonts or a style like Sans-Serif), the Font Size, and the Font Weight (bold, narrow, etc). To do this:
- Navigate to the main Vinyl IDE page and choose Define your look & feel under the Create menu
- Locate the Name of your Vinyl app, and click on the paintbrush Themes icon
- Find the Theme for the application you are using. If you do not have a theme for this app yet, create a new one from this page.
- Click on the Advanced Settings button for the Theme
- On the left under Real Estate Areas, click on Panel
- In the bottom panel on the right, click Create to create a new style for this part of the theme
- Select Contents section underInterface , which represents the main inner section of the panel
- Select Font Advanced for Style Type . Font Advanced allows you to configure various font styles. Value1 is used for font names. Value2 is font size. This can be any unit of measure. Value3 is the boldness. Example:
font-family: {0}; font-size: {1}; font-weight: {2};

Note: You can also choose Header to change the properties of the Panel's Header bar, or Container to change properties of the Panel's outer box such as border color or thickness