Notification Example Using Dynamic Query to Insert into HTML Table
This article provides an overview on how to use a Dynamic Query to insert information into an HTML table in a Notification Rule in Vinyl. There are multiple steps involved to accomplish this outcome, and the article makes the following assumptions about your Vinyl environment:
- Running SQL 2017+, required to use the
String_Agg()function - Tables and data exist in the Data Layer to support this scenario
- Basic understanding of Notification Rule configuration
Note
While in the test phase of implementing this (or any Notification Rule) we recommend using a test email address as the To() value in the Notification until it is working properly.
Business Use Case
A business wants to use a Vinyl app to manage an approval process regarding server reboots. As part of the requirements, they need to send an email notification containing a list of servers to the respective server owner(s) at a specified time. They are looking to understand how to use a Notification Rule to work dynamically for each server owner.
For Example:
There are 20 total servers. Mary is listed as the owner of 15 servers. John is listed as the owner of the remaining 5 servers. A server can have multiple owners, so John is also the shared owner on 2 of Mary's servers for a total of 7. Mary should receive an email containing her 15 servers and John should get an email containing his 7 servers (5 with him as the owner plus the two that Mary and John are shared owners of).
The Business Layer contains an existing view with all the information needed for the table (e.g., owners of each server, email addresses).
How to Configure in Vinyl
- Create a Subquery Rule that returns 1 record for each instance of a Server Owner and the Server. Include the columns ServerOwnerID, ServerOwner, ServerName
-
Bring the Subquery into a new Subquery Rule and add the Server OwnerID (or equivalent) Column. Add a new expression to do a
count(1). Then add the following additional expressions that will build the HTML table:TableBody
${String_AGG('<tr> <td>' + Subquery.ServerOwner + '</td> <td>' + Subquery.ServerName + '</td> </tr>','')}TableHeader
'<div> </div><table class="requests"> <tbody> <tr> <td>Server Owner</td> <td>ServerName</td> </tr>'TableClose
'</table><div> </div> <div>Thanks,</div> <div>Server Team</div>'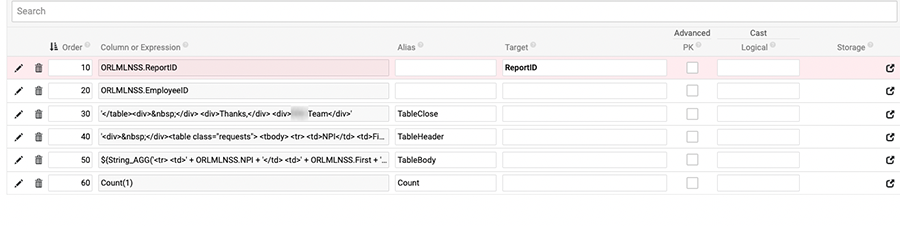
Example of Columns Tab for Subquery
-
Create a new Notification Rule. Bring in the Subquery you created with the table structure.
- Join the Subquery to the table containing the list of ServerOwners and their email addresses.
- Add the email address and target it to the To() field.
-
Add a new expression for CSS to help stylize. Alias as CSS. Example CSS:
'<style> .requests { font-size: 14px; line-height: 20px; font-weight: 400; -webkit-font-smoothing: antialiased; font-smoothing: antialiased; margin: 0 0 40px 0; width: 50%; box-shadow: 0 1px 3px rgba(0,0,0,0.2); display: table; border-collapse: collapse; border: 1px solid black; } .requests tr:first-child { font-weight: 900; background: #D3D3D3; } .requests th { border: 1px solid black; } .requests tr { border: 1px solid black; } .requests td { padding: 6px 12px; border: 1px solid black; } </style>' -
Add the table header, body and close columns. Create a new expression that will concat them together:
{{TableHeader}} || {{TableBody}} || {{TableClose}} || {{CSS}}and Alias as Table.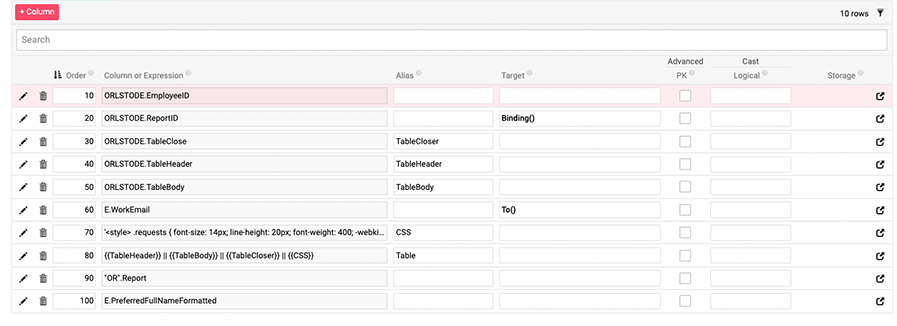
Example of Columns Tab for Notification Rule
-
From the App Workbench > Notifications screen you can further modify and Test the Notification Rule. At this point in the example, you can now add
{{Table|HTML}}to the body. You can add any other message you need to include. In this example we will substitute in the Employee Name and include a binding link: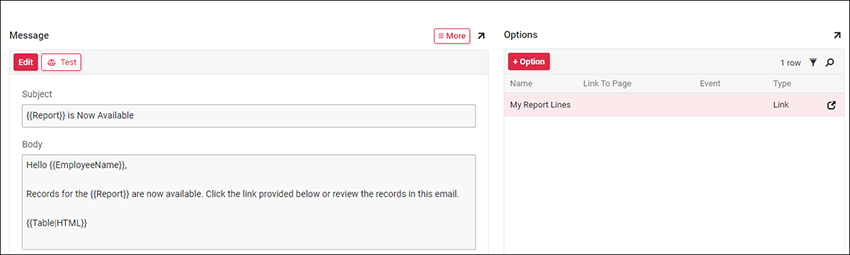
Example of Notification Screen