Create a File System for a Vinyl App
Vinyl does not ship with any default File System configured, this information needs to be manually configured by a User with access to the application server where the Vinyl app resides. Depending on what you're looking to do with the files you'll be storing, you will either setup a Local File System or Network File System. A Local File System will only store files locally on the app server, whereas if you're looking to share files across different computers you would want to setup a Network File System.
Local File System
A Local File System for a Vinyl app is good when using an on-premise setup, or if the app server is permanent. Local File Systems should be configured on a separate drive from IIS and the Vinyl application. The Vinyl app pool will need permission to any created file system in order for Vinyl to interact with it.
Important
Local File System is not a recommended setup for high availability or AWS Cloud Hosted solutions.
To Configure a Local File System
In order to configure a Local File System, you must be a User with permission to work on the app server where the Vinyl app resides.
Setup the Folder on the App Server
- Navigate on the app server to the location where you want to store the Local File System. For example:
C: - Create a new folder with the desired folder name. For example:
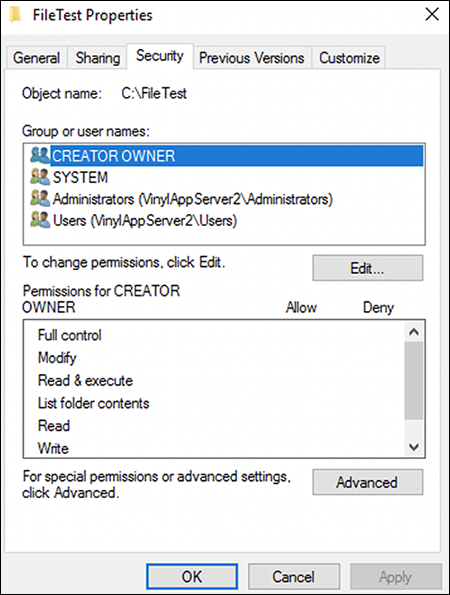
FileTest - Right click on the new folder and select Properties. The Properties dialog box should appear.
- Select the Security tab
-
Click Edit
-
Click Add…
- Search for the Vinyl IIS app pool by typing IIS AppPool\Vinyl into the Enter the object names field (NOTE: If you are unable to find Vinyl using IIS
AppPool\Vinylit may be under a different name due to the creation process, try IISAppPool\DefaultAppPool) - Click on Check Names
- Click OK
- Select the Vinyl User
- Check Allow Full Control for this User to grant full permissions
- Click Apply and OK
- Now the Vinyl application has control over the folder created
Configuration in Vinyl
- Navigate to the IDE > Data Servers
- Click the + Server button from the Data Servers panel
- Assign a Server Name. For example: Local File System
- Select Local File System as the Type
- Click the Save button
- Click the Details button from the Data Sources panel
- Click the Edit button
- Expand the File section and specify the appropriate Path to the folder on the app server. For example:
C:\FileTest\ - Click Save
Network File System
You need to associate an S3 Bucket or EBS Drive to keep the data separate from the actual server when setting up a Network File System. This is a cloud based file store that is separate from the virtual machine. When using Cloud Hosted Vinyl, it is recommended to use this Network File System setup vs. Local File System.
Setup the Folder on the App Server
- Navigate on the app server to the location where you want to store the Network File System – wherever the Network drive is connected to. For example:
D: - Create a new folder with the desired folder name
- Right click on the new folder and select Properties. The Properties dialog box should appear.
- Select the Security tab
- Click Edit
- Click Add…
- Search for the Vinyl IIS app pool by typing IIS AppPool\Vinyl into the Enter the object names field
- Click on Check Names
- Click OK
- Select the Vinyl User
- Check Allow Full Control for this User to grant full permissions
- Click Apply and OK
- Now the Vinyl application has control over the folder created
Configuration in Vinyl
- Navigate to the IDE > Data Servers
- Click the + Server button from the Data Servers panel
- Assign a Server Name. For example: Network File System
- Select Network File System as the Type
- Enter the Host value
- Click the Save button
- Click the Details button from the Data Sources panel
- Click the Edit button
- Select the Data Source Server that is the Local File System. For example: Network File System
- Specify the appropriate Path to the folder on the app server. For example:
D:\FileTest\
Configure a File Browser page in Vinyl App
Optionally, you may want to configure a File Browser page in your Vinal app to provide end Users with visibility and access to files contained in the File System.

Example File Browser page in an App with UI/UX to the file system content
To Configure a File Browser Page
-
Add a new Grid panel page to your Vinyl app to store this content, and assign a Name that's recognizable. For example: File Browser
- The Source Rule for the page should be the File table from the File System you're working with. For example: File
- Add the Controls you want to display on the page. For example: Folder, Type, Name, Size, Modified, Length
- The Column containing the actual file itself should use the File Control Type.
- Position the page in a navigation area that makes logical sense for your app. For example: under Configuration
Resources
- Local File Systems (Microsoft) https://msdn.microsoft.com/en-us/library/windows/desktop/aa364407(v=vs.85).aspx
- Network File System (Microsoft) https://docs.microsoft.com/en-us/windows-server/storage/nfs/nfs-overview