Google OAuth Configuration Guide
Purpose of Document
To describe the configuration steps necessary to configure Vinyl to use Google as an OIDC/OAuth 2.0 external security provider for user authentication.
Introduction
Configuring external authentication requires setup in both the identity provider and the Vinyl instance. In both cases, Administrative rights are required.
Important
The example values provided in this guide are representative, but fictitious, and should not be used in real-world configuration. We are using https://example.zudy.com/Vinyl as the instance root in this documentation.
Steps in Vinyl
Create a Security Provider
- Sign into Vinyl as an Administrator
- Navigate to IDE > Security Providers
- In the User Authentication section, click + User Authentication to add a new Security Provider
-
Populate the following values:
- Name: brief, descriptive name for the Security Provider. Ideally avoid spaces. This becomes part of the Vinyl authentication path.
- Type: External Authentication > OAuth
- Priority: accept default suggestion, or update per your preference
-
Enabled: Check
- Authentication Type: OAuth
- OAuth Grant: Authorization Code
-
OAuth Client Authentication: Basic
- OAuth Resource Authentication: Bearer
- Token Owner: User
- Redirect on Challenge: Check
- Show on login form: Check
- User Provisioning: Check
- Store Claims: Check. This is important when initially setting up and troubleshooting, but can be removed later if desired.
-
Click Save
Steps in Google Workspace/Google Cloud Platform
Note
Note that you must have Administrator-level access to your organization's Google Workspace account to create a new project, or permissions to create and configure OAuth 2.0 credentials for an existing project.
Create a New Project
- Go to the Manage resources page in the Google Cloud Console
- Sign in as an Administrator if prompted
- On the Select organization drop-down list at the top of the page, select the organization in which you want to create a project. If you are a free trial user, skip this step, as this does not apply.
- Click Create Project
- In the New Project window that appears, enter a project name. A project name can contain only letters, numbers, single quotes, hyphens, spaces, or exclamation points, and must be between 4 and 30 characters. It should be a descriptive and unique name that identifies the project. For example: vinyl-authentication
- Select the parent organization in the Organization box
- Optionally, select a folder in the Location box. This resource will be the hierarchical parent of the new project.
- Click Create
For additional reference on creating projects, please see the Google documentation available at: https://cloud.google.com/resource-manager/docs/creating-managing-projects
Configure the OAuth Consent Screen and Create API Credentials
- After you have created the project, open the Credentials page in the Google API Console. Home > APIs and Services > Credentials
- Verify the project name listed in the upper left corner near the logo to make sure that you are using the correct project. Click the drop-down arrow to switch projects, if needed.
- Click Create Credentials → OAuth client ID
-
Unless you have previously set up a consent screen, you will be directed to configure your consent screen first. The consent screen will be presented to the end users when they first access the application (Vinyl) using their Google credentials and will prompt them to accept that access to their Google account. If you have already configured a consent screen and scopes, skip to step 29.
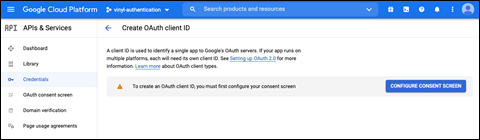
Example configuring consent screen
-
Click Configure Consent Screen
- Select Internal for User Type and click Create
- Complete the App Information section as follows:
- App Name: Enter the name of the custom app. For example: Vinyl Instance. Typically you would specify Dev, QA or Prod, or the purpose of the instance, if different.
- User support email: complete with an Administrator's email address or group email address
- App logo: optionally upload a file to use as the logo
- Complete the App Domain section with the URL of the application home page and a link to your organization's privacy policy and/or terms of service
- Under Authorized Domains, add the domain name that the Vinyl instance is part of. This may be your own domain or zudy.host. Add multiple domains if applicable.
- Enter a support email address for Developer Contact Information
- Click Save and Continue
-
On the Scopes screen identify the information that is being requested about the user, by Vinyl. Click Add Scopes and select the three scopes shown in the following screenshot.
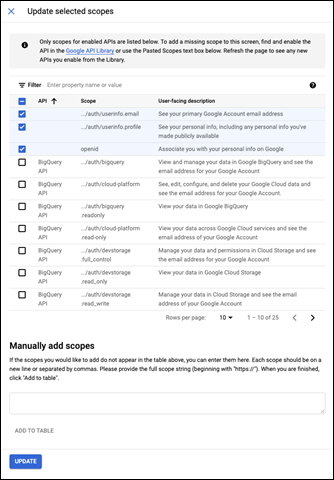
Example configuring Scopes
-
Click Update
Note
Note that these are considered "non-sensitive scopes". No other scopes are required by Vinyl.
-
Click Save and Continue
- Review the summary page and click Back to Dashboard
- Click Create Credentials → OAuth client ID
- Under Application Type, choose Web application
- Under Name, type a descriptive label that identifies the application. This value is not used elsewhere. For example: Vinyl Instance. Typically you would specify Dev, QA or Prod, or the purpose of the instance, if different.
- Under Authorized JavaScript Origins, supply the URI representing the FQDN (fully qualified domain name) of your Vinyl instance. Note that this should not include any path information. For example:
https://example.zudy.com -
The completed screen should look similar to this example:
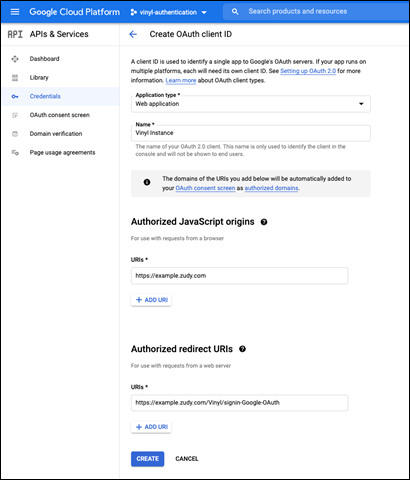
Example OAuth client ID configuration
-
A popup should appear containing your OAuth credentials. These credentials should be kept secret, and will be similar in format to the fictitious examples below. Leave this popup open ready for the next configuration steps.
- Examples:
- Your Client ID:
825669012735-hd1oct8l1yeysoslrvtmf6b4gqkl12om.apps.googleusercontent.com - Your Client Secret:
CRZEXT-zd_Qa_MCZ3rArp5hkRD3B16PPDLN
-
This completes the steps in Google Workspace/Google Cloud Platform.
Steps in Vinyl
Configure Security Provider Properties and Claim Types
- Return to the configuration page for the Service Provider created in steps 1 to 5.
-
Under the Endpoints section, click + Endpoint and Save the following 3 properties as specified below:
- AuthorizationEndpoint: use the following value:
https://accounts.google.com/o/oauth2/v2/auth- Note: this is not an example, it is universal for Google OAuth v2 configuration
- TokenEndpoint: use the following value:
https://www.googleapis.com/oauth2/v4/token - UserInfoEndpoint: use the following value:
https://openidconnect.googleapis.com/v1/userinfo
- AuthorizationEndpoint: use the following value:
-
Under the Credentials section, click + Credential and Save the following properties as specified below:
- Type: Client
- Username: use the Client ID from the previous section, step 32
- Password: use the Client Secret from the previous section, step 32
-
Under the Properties section, click + Property and Save the following properties:
- Scopes: use the 3 scope values shown below. Separate each string with a space:
- openid
https://www.googleapis.com/auth/userinfo.emailhttps://www.googleapis.com/auth/userinfo.profile
- Scopes: use the 3 scope values shown below. Separate each string with a space:
-
Under the Claims section, click + Claim and Save the following Claim Types:
- Identifier: email (lower case, no spaces)
- Usage: Name
- Name: descriptive label. For example: Name
-
Click Save
-
Click Create
- Identifier: email
- Usage: E-mail Address
- Name: descriptive label. For example: Email Address
-
Click Save
Note
The E-mail Address usage Claim Type is optional, but will ensure that the Email Address attribute of the Vinyl user will be populated when the user signs in to Vinyl using the external authentication provider.
-
This completes the configuration steps in Vinyl
Testing
At this point the configuration is ready to test. It is recommended that all tests be performed from new Incognito or Private browser windows, or in an alternate browser.
Testing steps
-
Navigate to the login page of the Vinyl instance and:
- Confirm the new authentication method displays appropriately on the login page.
- Attempt to sign in with the new authentication method and review the result. (This should be done with a separate login to the one used to administer Vinyl.)
-
If errors are reported, review all the configuration and confirm that elements that are required to match are correct – particularly confirming the Client Secret and Client ID were copied over from Google to Vinyl correctly.
- If all settings are present and appear correct, but external authentication is still not working, please contact Vinyl Support.