Google SAML Configuration Guide
Purpose of Document
To describe the configuration steps necessary to configure Vinyl to use Google as a SAML external security provider for handling user authentication.
Introduction
SAML uses the terminology of IdP (Identity Provider) and SP (Service Provider) to describe the two participating systems in a SAML configuration. In this case, Google Workspace is the IdP and the Vinyl instance is the SP.
Configuring external authentication requires setup in both the IdP and the SP. In both cases, administrative rights are required.
Important
The example values provided in this guide are representative, but fictitious, and should not be used in real-world configuration.
Steps in Vinyl
Create a Security Provider
- Sign into Vinyl as an Administrator
- Navigate to IDE > Security Providers
- In the User Authentication section, + User Authentication a new Security Provider
-
Populate the following values:
- Name: brief, descriptive name for the security provider. Ideally avoid spaces. This string, in its exact form, becomes part of the ACS URL.
- Type: External Authentication > SAML
- Priority: accept default suggestion, or update per your preference
- Enabled: Check
- Redirect on Challenge: Check
- Show on login form: Check
- User Provisioning: Check
- Store Claims: Check. This setting is important when initially setting up and troubleshooting, but can be removed later if desired.
-
Click Save
Steps in Google Workspace
Note
Note that you must be a Super Administrator of your Google Workspace in order to perform these steps.
Set up your Custom SAML App
- Sign into your Google Admin console
- From the Admin console Home page, go to Apps > Web and mobile apps
- Click Add App > Add custom SAML app
-
On the App Details page:
- Enter the App Name of the custom app. For example: Vinyl Instance. Typically you would specify Dev, QA or Prod, or the purpose of the instance, if different, as part of the App Name. This value is used solely as a label within Google Workspace and is not used elsewhere.
- (Optional) Upload an App icon. If you don't upload an icon, an icon is created using the first two letters of the App Name.
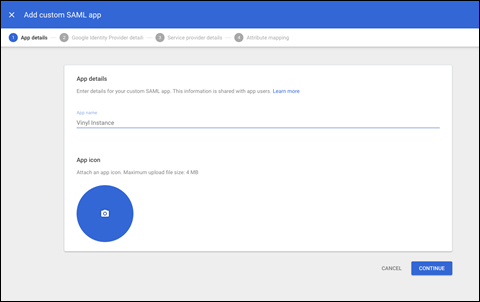
Example custom SAML app configuration
-
Click Continue
-
On the Google Identity Provider details page, note the setup information required by the service provider. These values are specific to the Google Workspace account and not generic:
- SSO URL: For example:
https://accounts.google.com/o/saml2/idp?idpid=C01D02E032 - Entity ID: For example:
https://accounts.google.com/o/saml2?idpid=C01D02E032 - Certificate
- SSO URL: For example:
-
Click Continue. You can get back to these values later by clicking Download Metadata.
- In the Service Provider Details window, enter an ACS URL and Entity ID for your custom app. Note that the path portions of the following URLs are case sensitive (i.e., the part following the FQDN).
-
ACS URL: The URL of the Vinyl instance root, with the following appended:
/signin-<name of service provider>- For example:
https://example.zudy.com/Vinyl/signin-GoogleSAML - Note: The ACS URL must start with
https://
- For example:
-
Entity ID: The root of the Vinyl instance. This must end with a forward slash. - For example:
https://example.zudy.com/Vinyl/ - Check the Signed Response box
- The default Name ID format can be left per the default (primary email).
-
Additional Name ID mapping information may be found here: SAML app catalog. If needed you can also create custom attributes, either in the Admin console or via Google Admin SDK APIs, and map to those. Custom attributes need to be created prior to setting up your SAML app and are generally not needed for Vinyl. Example configuration:
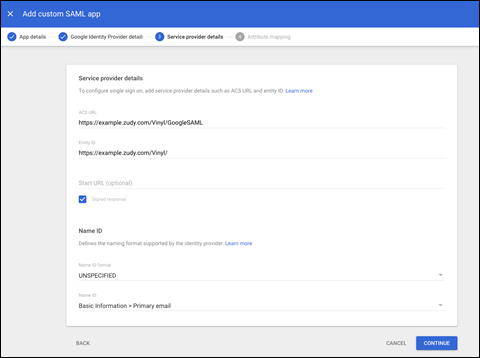
Custom SAML app configuration in Google Workspace
-
Click Continue
- In the Attribute Mapping page, note that additional mappings can be created if needed and click Finish. If any additional mappings are needed, they can be configured later. When configuring mappings, the App Attribute values must match the Identifier values specified in Vinyl under Claim Types.
- Click Finish
- On the Application page (under Web and mobile apps), click the down arrow in the User Access section
-
Access may be configured for Groups, Organizational Units, or for All Users in the account. For simplicity, we recommend turning access ON for everyone. If only a limited number of users should be provided access, refer to Google Workspace documentation for creating and configuring Groups and Organizational Units and for assigning application access at that level.
Note
When access is first configured, Google Workspace reports that it could take up to 24 hours for this change to propagate to all users. When testing, if an error is received indicating that the user does not have access to the application, or it is not enabled for them, then ensure that enough time has passed after configuration before retesting.
-
This completes the steps in Google Workspace. For additional information, reference: https://support.google.com/a/answer/6087519
Steps in Vinyl
Configure Security Provider Properties and Claim Types
- Return to the configuration page for the Service Provider created in steps 1 to 5 of the Vinyl configuration previously outlined
- Under the Properties section, + Property and Save the following properties with the following values specified:
- Audience: the root of the Vinyl instance. For example:
https://example.zudy.com/Vinyl/- Note: this will match the Entity ID configured in Google Workspace
- Recipient: This will match the ACS URL configured in Google Workspace and consists of the URL of Vinyl instance root, with the following appended:
/signin-<name of service provider>- For example:
https://example.zudy.com/Vinyl/signin-GoogleSAML
- For example:
- RequestRedirectEndpoint: This is the SSO URL from Google Workspace, see step 6 from Google configuration steps. For example:
https://accounts.google.com/o/saml2/idp?idpid=C01D02E032 - SigningCertificate: This is the long text string from step 6. When copying the certificate, be sure to exclude
BEGINandENDand remove any line breaks or leading/trailing spaces.-
Example of certificate content that should be copied:
MIIDdDCCAlygAwIBAgIGAXy6QtfkMA0GCSqGSIb3DQEBCwUAMHsxFDASBgNVBAoTC0dvb2dsZSBJ bmMuMRYwFAYDVQQHEw1Nb3VudGFpbiBWaWV3MQ8wDQYDVQQDEwZHb29nbGUxGDAWBgNVBAsTD0dv b2dsZSBGb3IgV29yazELMAkGA1UEBhMCVVMxEzARBgNVBAgTCkNhbGlmb3JuaWEwHhcNMjExMDI2 MDE0MTU0WhcNMjYxMDI1MDE0MTU0WjB7MRQwEgYDVQQKEwtHb29nbGUgSW5jLjEWMBQGA1UEBxMN TW91bnRhaW4gVmlIjANBgkqhkiG9w0BAQEFAAOCAQ8A MIIBCgKCAQEAlwzhMrwH3WO1rbv5Ftkkg7USOhE6bBl7xVPyy3o6HCq1Rcnh/T5zsvmNyLQ3n7GL Q7AomWFRTa8sriXQPqz8xT67fVq5tWpl3t0CiJ36XxM8AUd1u9juaxSTdYFDRQf5JCvE/RK1aqR/ qVIqU/keehoozfhMM9jlrxqNfcwKPiKb3583jHGpu6TvSet4Dmg5NzE0y28ZFDaB2NBa0fE9euEq o3Ulf2uqY2RSGw8x92d8YMLX/1qZtp+/xkYmAQaIUNGe0PhHpLoDhjxNN6RVRESiA/Jkcyc6ZCUd Wn+6B5ZNq0X4OZkdfgkjfgdskrTTSRFASSF3333fgfsg/LZNPSDlbwJId2SX48ejzbcNpGBWCPPKNeSwIDAQABMA0GCSqGSIb3DQEBCwUA A4IBAQBzokabj8aD6/DStvpzuUPn0P/EIu4fKEx8MwsDnKzGC0s/3EcWZuiutKmaTdLbWY2BJhZmaj 5mg8Xs+EtGAQqZ2DxFJDeyWruGMKW3S5NMMtZC+w8fj7kdHRByBTVgEqAGfehCoP7zjf7jAQfLe/ wjeehVlc8Q0nNzueNNrPQABgdyAuknS5Syzkjl8Wmd611uUjMXlBsoLY3gBvSuF8WNzqQXYOUQuL OIJXJ2K/o8dBNRQC015ygcRi57nHaBMTh3BL22jMX
-
- Audience: the root of the Vinyl instance. For example:
Configure Security Provider Claim Types (Optional)
- Return to the configuration page for the Service Provider or minimize the Properties panel
- Under the Claims section, + Claim and Save the following Claim Type. This is optional, but will ensure that the Email Address attribute of the Vinyl user will be populated when the user signs in to Vinyl using the external authentication provider.
-
Click + Claim and use the following values:
- Identifier:
http://schemas.xmlsoap.org/ws/2005/05/identity/claims/nameidentifier - Usage: E-mail Address
- Name: descriptive label. For example: Email Address
- Identifier:
-
Click Save
Testing
At this point the configuration is ready to test. It is recommended that all tests be performed from new Incognito or Private browser windows, or in an alternate browser.
Testing Steps
- In Google Workspace, under Web and mobile apps, click the TEST SAML LOGIN and review the result
-
Navigate to the login page of the Vinyl instance and:
- Confirm the new authentication method displays appropriately
- Attempt to sign in with the new authentication method and review the result. This should be done with a separate login to the one used to administer Vinyl.
-
If errors are reported, review all the configuration and confirm that elements required to match are correct – case sensitive and with matching trailing / , etc.
- If an error is received from a Google page that the application is not enabled for the user, confirm that steps 17 and 18 were completed and that some time has passed allowing access to propagate throughout the Google Workspace.
- If all settings are present and appear correct, but external authentication is still not working, please contact Vinyl Support.