Configuring Microsoft Azure Active Directory using WS-Federation
Vinyl integrates with Microsoft Azure Active Directory (AD) using the WS-Federation protocol, enabling single sign-on. Each Vinyl instance must be individually configured to work with Azure AD and vice versa. There are three main tasks involved:
- Register Vinyl as an Azure AD application
- Configure Azure AD as a Vinyl Security Provider
- Map Vinyl users and groups to Azure identities
Requirements
In order to proceed, you will need the following:
- Administrator access to an Azure account with an Azure Active Directory service
- Administrator access to Vinyl
- Vinyl must be available via HTTPS with a valid SSL certificate
Properties
This document will reference the following properties.
| Example | Notes | |
|---|---|---|
| Vinyl URL | https://example.com/Vinyl/ | Vinyl must be accessible via HTTPS. The URL must include the trailing slash. The path is case-sensitive. |
| Provider Name | Azure | Typically, the provider name should match the Active Directory domain name. Since the provider name will appear in the Sign-on URL (see below), avoid spaces, punctuation and special characters. |
| Sign-on URL | Vinyl root directory/signin-[Name of Security Provider] https://example.com/Vinyl/signin-Azure | Callback URL automatically provisioned when creating the Azure AD security provider within Vinyl. The example provided here assumes that: example.com is the hostname, https://example.com/Vinyl/ is the Vinyl application root directory, and that Azure is the name of the Azure Security Provider. |
Register Vinyl as an Azure AD application
The Vinyl instance must be registered as Azure AD application. The following page documents the process:
In Short:
- Log into the Microsoft Azure Portal
- Navigate to the Azure Active Directory admin center
- Click on Azure Active Directory from the navigation
- Click on App Registrations
- Create a New Registration and provide the Name as Vinyl
-
Type in your Redirect URI as
https://yourdomainname.com/signin-Vinyl(Change 'Vinyl' to whatever name you will use within Vinyl Security Providers.)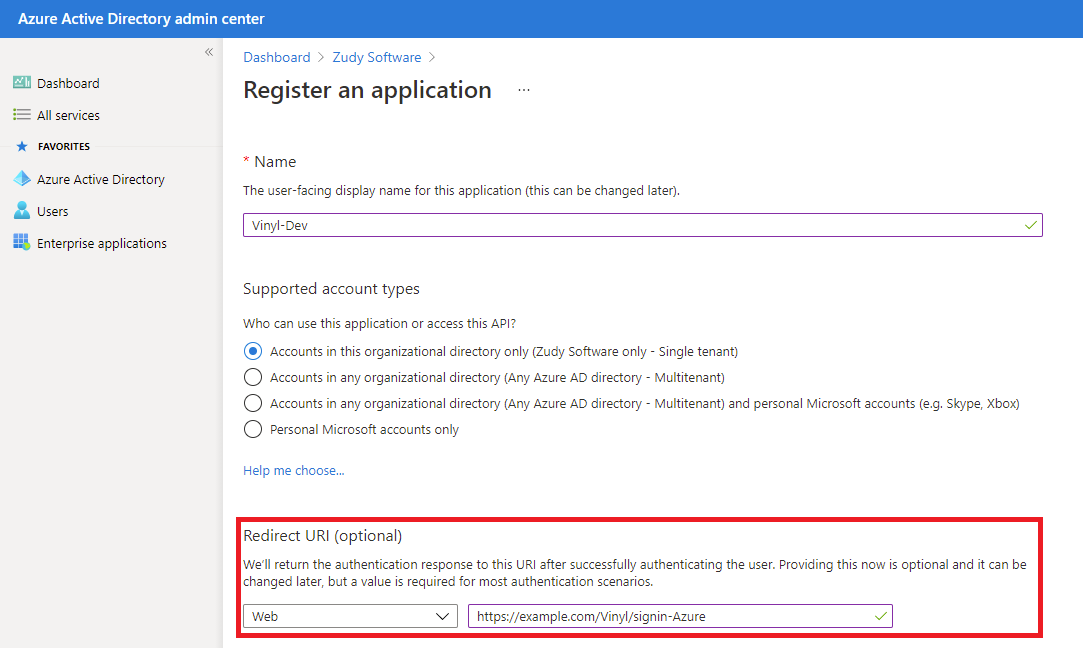
-
Click Register
-
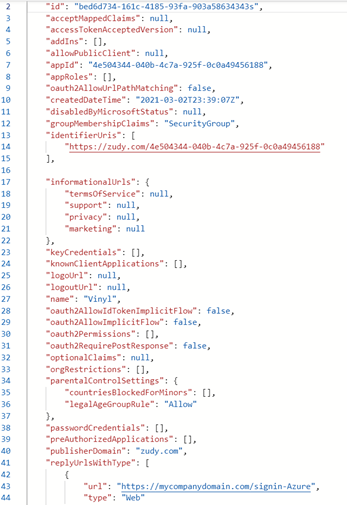
Open the newly create Application you registered, and under the Manage side-bar, select Manifest:
- Make note of the appId string, such as '"appId": "062e3d2f-c200-40bc-b402-5be728bcdd1a",'
- Make note of your primary domain, shown in your AzureAD 'Tenant information.'
-
Edit the following lines as follows:
Edit:
"groupMembershipClaims": null,
    "identifierUris": [],
To be:
"groupMembershipClaims": "SecurityGroup",
    "identifierUris": [
        "https://[yourprimarydomain.com]/[appId]"
    ],
Example: If primary domain for Azure Tenant is zudy.com:
-
Click Save
- Click on Overview from the navigation
- Click the Endpoints tab
- Where it reads Federation metadata document, click on the copy to clipboard icon and paste the value somewhere you can reference later (e.g., Notepad)
Connect and Setup new Security Provider in Vinyl
In this step you will define the new Security Provider for Azure AD. This includes defining the Type as WS- Federation services, define Audience, MetadataAddress and Wtrealm parameters (provided by Microsoft) and configuring the Claim Types issued from Microsoft to align with any Group mapping inside of Vinyl.
- Navigate to the IDE
- Select Security Providers
- Click + User Authentication under User Authentication
- Select Type as WS-Federation
- Provide a Name that matches what you used to configure the Redirect URI. For example:
Azure -
Options to change: (Leave as-is for unlisted)
- Name: ('Azure' in example)
- Type: WS-Federation
- Enabled: Yes
- User Provisioning: Yes ; This will allow Azure to create Users into Vinyl.
- Supplies Group Membership: Yes
- Store Claims field: Optional ; This allows visibility into the meta claims data coming from Microsoft into a Vinyl User.
-
Click Save
- Note that upon Save Vinyl will issue a unique Identifier value for this Provider
Configure the Properties Parameters
In this step you'll configure 3 Parameters that represent values provided from Microsoft Azure.
-
From the Properties panel, create the following claims:
-
Audience:
https://**YourAzureprimarydomain.com**/**App-id-from-azure-app-reg**Example:
https://zudy.com/062e3d2f-c200-40bc-b402-5be728bcdd1r -
MetadataAddress:
https://login.microsoftonline.com/***Your-Tenant-ID***/federationmetadata/2007-06/federationmetadata.xml - Wtrealm:
https://**YourAzureprimarydomain.com**/**App-id-from-azure-app-reg**
-
-
Under Claims create the following:
- Search for the word "groups" and select the first entry that appears which is
http://schemas.microsoft.com/ws/2008/06/identity/claims/groups
- Search for the word "groups" and select the first entry that appears which is
-
For Usage, select Group
- Click the checkmark icon to save
Map Vinyl Users and Groups to Azure Identities
From the Identities area of Secure, you will now see an entry for the Security Provider created. When Users authenticate into Vinyl using this Security Provider all of the associated identities will flow through and you'll see records appear in the Provider Groups and Identities by Provider panels accordingly.
From the Provider Groups panel you can provide mappings between any Vinyl Groups and Azure Groups that you would like to, using the Groups field. The Groups field here is a drop-down menu listing all Groups configured in Vinyl. This will enable just in time provisioning.
With User Provisioning
If you've enabled user provisioning as described above and attempt to log in, you may be redirected back to the Vinyl login. The login form will display a message similar to the following:
The user account (arthur.dent@example.onmicrosoft.com) has not been granted access to an application.
Though Vinyl was able to successfully provision the user, the user does not have access to any Vinyl applications by default. Assuming the Azure AD user has been added to one or more groups and that Supplies Group Membership is enabled (as described above), you will need to map the Azure AD security groups to Vinyl security groups. To do so:
- Log into Vinyl as an Administrator
- Navigate to the IDE
- Click the User Management button
- Click the Identities tab
- In the Providers panel, highlight your new Azure AD security provider
- In the Provider Groups panel, click + Group
-
Enter the name of a group you have within AzureAD, along with its Identifier (This can be found by opening a Security Group type within AAD Groups, and making note of its Object Id.)
Then choose the Vinyl group they will be automated added to as a member upon logging in.
-
Click the Save button
Without User Provisioning
If you have not enabled user provisioning, authentication will have failed with a message similar to the following:
Although you've successfully authenticated with Azure, the account arthur.dent@example.onmicrosoft.com (arthur.dent@example.onmicrosoft.com) is not associated with a local account.
In the message above, "arthur.dent@example.onmicrosoft.com" is the user name (called "name" in claims authentication). The part in parenthesis is the unique identifier (called the "name identifier" in claims authentication). You'll need these two pieces of information for the next step.
- Log into Vinyl as an Administrator
- Navigate to the IDE
- Click the User Management button
- Click the Users tab
- In the Users panel, select the user would like to map
- In the Identities panel, click the + Identity button
-
Provide the following:
- Provider: Provider Name (see above)
- Name: The Azure user name (see above)
- Identifier: The Azure user name identifier (see above)
-
Click the Save button.
Sign-out of Vinyl
Confirm that now on the Login page there is a "Sign in with …" button that now appears, and it will read the Name you provided when configuring the Security Provider

Example Sign in button for new Security Provider on Login Page
Test logging in, you should be redirected to authenticate with an Azure account