Server-Side Pivot Table
New in Vinyl 2.5, you have the ability to configure server-side pivot tables. Prior to this release, you had the ability to create pivot tables through the client-side, using the Pivot Panel Type. This feature extends the capabilities of working with pivot tables in Vinyl.
What is a Pivot Table?
A pivot table is a table of statistics that summarizes the data of a more extensive table (such as from a database, spreadsheet, or business intelligence program). This summary might include sums, averages, or other statistics, which the pivot table groups together in a meaningful way.
Pivot tables are a technique in data processing. They enable a person to arrange and rearrange (or "pivot") statistics in order to draw attention to useful information.
Three Ways to Pivot Data in Vinyl
There are essentially three different ways to pivot data in Vinyl. This article will discuss using server-side pivot. The three available options are:
- Client-side pivot (using a panel type of pivot)
- Server-side pivot (doing the pivot as a rule on the server)
- Manually constructing the pivot in a rule – non dynamic columns:
select
    EmployeeId,
    sum(case when year(OrderDate) = 1996 then 1 else 0 end) as [1996],
    sum(case when year(OrderDate) = 1997 then 1 else 0 end) as [1997],
    sum(case when year(OrderDate) = 1998 then 1 else 0 end) as [1998],
    count(OrderId) OrderCount
from Orders
group by EmployeeId
order by EmployeeId
Server-Side Pivot Table Capabilities
Benefits of using a server-side pivot table vs. a client-side pivot table include:
- Pivot table gets generated on the server, and then gets connected to a standard Multi-Row Panel
- Works with Panel Filter and Download CSV options
- Conditional Formatting is supported with server-side
How to Create a Server-Side Pivot Table
Configuring a server-side pivot table is similar to creating other Charts in Vinyl, however, a Pivot Table requires the following three Column Usage Types be defined within the mvSQL Pivot Rule logic:
- Pivot Row
- Pivot Column
- Pivot Value

Step 1. Create a Pivot Rule containing mvSQL logic for the Pivot Table
- Navigate to the Business Logic Layer
- Click the + Business Rule button
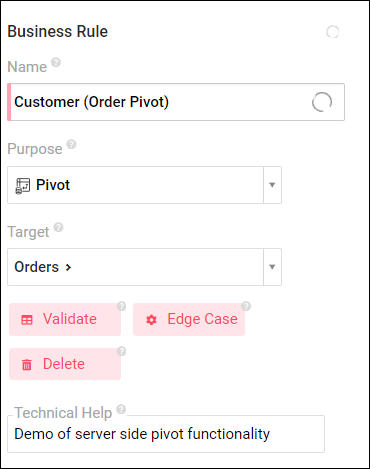
- Assign the Rule a Name. For example: Customer (Order Pivot)
- Select Pivot as the Purpose
- Select the Target Table. For example: Order
-
Click Save
-
Confirm the Tables tab displays the required Table(s) needed for your logic
-
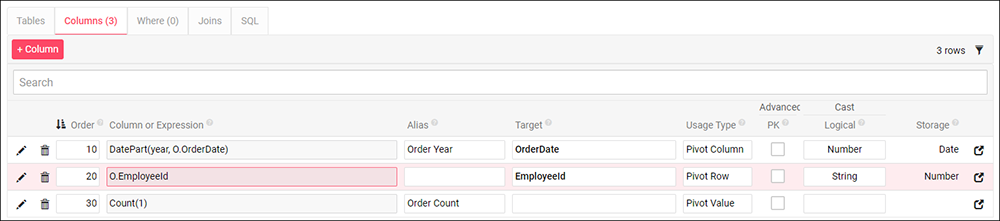
Click the Columns tab and create three entries along with their associated logic to represent the Row, Column, and Value
-
Confirm the appropriate Usage Type has been set for each of the following values:
- Pivot Row
- Pivot Column
- Pivot Value
-
Click the Where tab and add any additional logic, if required

-
Save the Rule and Validate the results to make sure they're as expected, and no errors are encountered
Step 2. Create a Page using the Pivot Rule
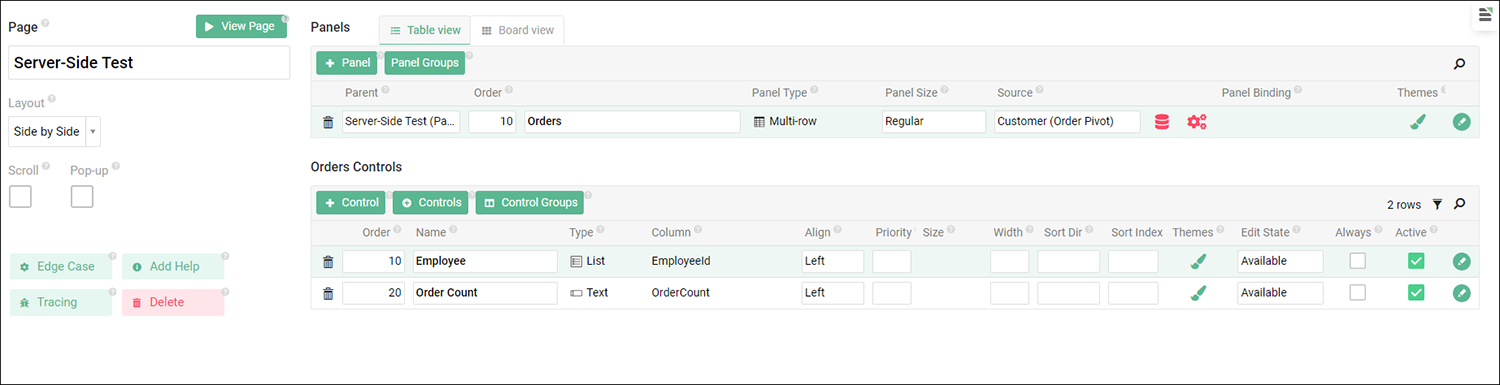
- Add a new Page to hold the pivot table (or you can add a Panel to an existing Page)
- Add a Panel, here you will select Multi-row Panel as the Type
- Select the Pivot Rule created in Step 1 as the panel Source
- Click Save
- Click to Select the Controls representing the Pivot Row and Pivot Value
- The first Control should be the value associated with the Pivot Row
- The second Control should be the value associated with the Pivot Value
-
Add any Conditional Formatting logic to the Control(s)
-
Run the page