Table wizard
Feature overview
In Vinyl, Tables are created in the Data Layer and store a collection of related data in a structured format. Naming of Tables should follow Vinyl naming methodology and guidelines, and a Table should have at least one defined Primary Key.
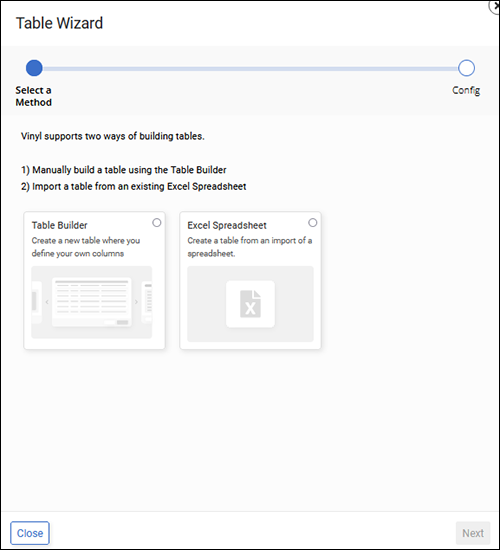
The Table Wizard is a workflow introduced in Vinyl 3.3 that allows you to create a new table using one of two supported paths, Table Builder or Excel Spreadsheet. In addition to defining a table, the workflow also steps you through the Create Page wizard where you expose pages based on the table data.
- Table Builder = manually create a table and define columns
- Excel Spreadsheet = import an Excel Spreadsheet to create a table. File type can be .csv, .txt, .xls, .xlsm, or .xlsx
Tutorials
Prerequisites
- Ensure you're running an environment with Vinyl 3.3 or later
- Ensure you're a user with permission to create tables in the Data Layer
How to access the table wizard
- Navigate to a page in a Vinyl app
- Go to Action Drawer > Design Center
- Click the + Add Table button
Use table builder to manually define a table
- After accessing the Table Wizard, select the Table Builder option
- Click Next
- Enter a Table Name. This must be unique for the data source. Example: Category
- Click Next
- Vinyl automatically adds the Table Primary Key column
-
If the table should contain a Title column, click the Add Title button, and Proceed
In Vinyl, a Title column translates a record's Primary Key UUID to a user-friendly named value. Example: Dairy. When defined, Title supports the ability to auto build list objects.
-
If additional columns are required, click the Add Column button
- Provide a Name for the Column. Example: Description
- Select the Logical data type for the Column. Example: NVarchar (50)
-
Click Next
-
Review the updates Vinyl will make based on the information provided.
- Vinyl will append additional system columns for managing your data as well as create views to access your data
- Click Previous if any modifications are required
-
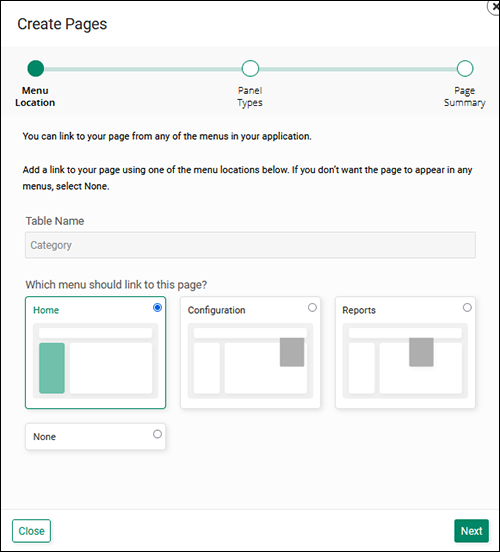
Click Next to proceed to the Create Pages Wizard
-
First select a Menu to link the new page to. Options:
- Home = new page will be linked from the Home page
- Configuration = new page will be linked under the Configuration menu
- Reports = new page will be linked under the Reports menu
- None = no navigation link will be generated for the new page
-
Click Next
-
Review the available Panel Types and select the desired option
- Click Previous if any modifications are required
-
Click Next to proceed
-
Review the updates Vinyl will make based on the information provided
- Click Previous if any modifications are required
-
Click Create Pages
Use Excel spreadsheet to import a table
- After accessing the Table Wizard, select the Excel Spreadsheet option
- Click Next
- Click the Browse link and locate the file to upload
- Select the file and click Open
- Confirm the upload is complete and click Next
-
Review the data mapping settings Vinyl will use to import the file and make any changes necessary:
- Table Name = name that will be assigned to the Table
- File Type = represents the file extension for upload. Can be .csv, .txt, .xls, .xlsm, or .xlsx
- Delimiter Type = used for CSV and is typically a comma, if you are importing Excel this will be ignored
- Contains Header = Boolean field that indicates if file contains a header row
- Header Row = Numeric field that indicates the row representing the Header values
- Starting Data Row = Numeric field that indicates the row where data values start
-
Customize Columns = Options include Auto or Customize. Defaults to Auto.
- If you select Customize, then click Next, you can verify column names and data types are correct as well as preview the first few rows of the import. Click Previous to correct any issues with columns and data types, otherwise, click Import.
-
Click Import
- Click Create Page to initiate the Create Pages wizard
-
First select a Menu to link the new page to. Options:
- Home = new page will be linked from the Home page
- Configuration = new page will be linked under the Configuration menu
- Reports = new page will be linked under the Reports menu
- None = no navigation link will be generated for the new page
-
Click Next
-
Review the available Panel Types and select the desired option
- Click Previous if any modifications are required
-
Click Next to proceed
-
Review the updates Vinyl will make based on the information provided
- Click Previous if any modifications are required
-
Click Create Pages