Agents page in Jitterbit Management Console
Introduction
To manage and monitor private agents and private agent groups, and see information about cloud agents and cloud agent groups, use the Management Console Agents page. It has the following tabs:
-
Private: Select this tab to manage private agent groups and private agents:

Note
Your subscription plan determines how many private agent groups and private agents you can have.
-
Cloud: Select this tab to see the available cloud agent groups and their status:
-
Metrics (Beta): Select this tab to view agent and agent host metrics:

To open the Agents page, use the Harmony portal menu to select Management Console > Agents.
Private agent groups
To manage private agent groups, select the Private tab:

The Private tab contains the following:
-
A toolbar, with these controls:
-
Search: Search for private agent groups by ID, name, or description.
-
Refresh: Refresh the table.
-
Filter Columns: Open the Columns drawer, to rearrange columns, or change their visibility.
-
Create: Add a private agent group.
-
-
A table of private agent groups, with the following columns:
-
Agent group ID: The private agent group ID number. To copy the ID to your clipboard, hover on the column, then click the Copy icon.
-
Agent group name: The private agent group name. To copy the name to your clipboard, hover on the column, then click the Copy icon.
-
Description: The private agent group description.
-
Cloud logging: When on, you can access detailed log messages in the Runtime Operations Messages tab, and download agent logs. When off, the Messages tab provides a link to the operation log details on the agent host. If your firewall permits, the log opens in a separate browser tab. Important
You must restart all private agents in the group whenever you change this setting.
-
Actions: This column contains the following icons:
-
Details: Open the Agent group details drawer. When open, the following controls appear on the top right edge of the drawer:
-
Previous: Select the previous private agent group.
-
Next: Select the next private agent group.
-
Expand: Expand the Agent group details drawer to the size of the page. When expanded, click the Minimize icon to return it to its original size.
-
Close: Close the drawer.
-
-
Update connectors: Update Integration Studio Connector SDK-based connectors on all agents in the group. (This overrides the Disable Auto Connector Update organization policy setting that inhibits automatic updates.)
-
Edit: Edit the private agent group.
-
Delete: Delete the private agent group. You cannot delete a group until all environment associations are removed.
-
-
Cloud logging
The Cloud logging switch does not enable or disable operation logging, nor affect whether component input and output data (generated when operation debug logging is enabled) is stored in the Harmony cloud. The switch affects only whether operation logs and detailed log messages are stored in the Harmony cloud.
Add a private agent group
To add a private agent group, follow these steps:
-
Click the Create icon in the Private tab's toolbar. A New agent group row appears in the table:

-
Enter a value in the Group name field.
-
(Optional) Enter a value in the Description field.
Tip
The group name and description must contain only alpha-numeric characters, underscores
_, parentheses(), dashes-, and spaces. -
Set the Cloud logging toggle on or off:

-
Click the Save button.
-
When the new group (Agent Group C in this example) appears in the table, you can add agents to it:

Edit a private agent group
To edit a private agent group, follow these steps:
-
Hover on a private agent group, then click the Edit icon in the Actions column. The Edit agent group drawer opens:

-
Edit the Group name or Description fields, or change the setting for Cloud logging.
-
Click the Save button.
Delete a private agent group
To delete a private agent group, follow these steps:
-
Hover on a private agent group, then click the Delete icon in the Actions column. The Delete agent group dialog opens:

-
To continue the action, enter the word DELETE where indicated, then click the Delete button:

Tip
You can delete a private agent group only when it is disassociated from all environments.
Private agents
To see the details of a private agent group, you can either click a row in the table, or hover on a row and click the Details icon in the Actions column. The Agent group details drawer opens at the bottom of the page containing the following tabs:
If the private agent group has at least one running agent, and remote agent configuration is enabled in the Organizations Agent Management tab, the following tabs also appear:
View group details
To manage the agents in a private agent group, select the Agents tab:

The tab contains the following:
-
A toolbar, with these controls:
-
Search: Search for private agents by name, ID, IP address, operating system, agent version number, or status.
-
Refresh: Refresh the table.
-
Filter Columns: Open the Columns drawer, to rearrange columns, or change their visibility.
-
Create: Add a private agent to the private agent group.
-
-
A table of private agents, with the following columns:
-
Name: The private agent name.
-
ID: The private agent ID number.
-
IP: The private agent host IP address.
-
OS: The private agent host operating system.
-
Version: The private agent software version number.
-
Status: The status of the private agent.
-
Actions:
-
Download agent logs: To download private agent log files, open the menu, select which private agent logs to download, then click the Download button. You can select any or all of the following:
-
Jitterbit logs: All files in the private agent host's
JITTERBIT_HOME/logdirectory. -
Apache logs: All files in the private agent host's
JITTERBIT_HOME/apache/logdirectory. -
Transformation logs: All directories and files in the private agent host's
JITTERBIT_HOME/DataInterchange/Temp/LOGdirectory. -
Tomcat logs: All files in the private agent host's
JITTERBIT_HOME/tomcat/logsdirectory. -
Debug logs: All directories and files in the private agent host's
JITTERBIT_HOME/DataInterchange/Temp/Debugdirectory.
Individual logs are zipped, combined, zipped again, then downloaded with the filename
log.zip. -
-
Download Jitterbit Agent: Download the private agent software. Select the version and operating system, then click the Download button.
-
Drain stop: Active only when the agent is running. A dialog opens for you to confirm the action.
-
More actions: Click to reveal the following options:
-
Edit agent: Edit the private agent's name. Active only when the agent is stopped or unregistered.
-
Delete agent: Delete the private agent, removing it from the private agent group and your organization.
-
-
-
Agent status
The status of a private agent is one of the following:
-
Unregistered: The agent was added but is not ready to execute operations.
-
Starting: The agent is registered, and is becoming ready to execute operations.
-
Running: The agent is ready to execute operations.
-
Stopping: The agent is responding to a drain stop request. Running operations are allowed up to
agent.drainstop.api.waitseconds (by default, 180) to finish before they are canceled. -
Stopped: The agent remains registered but does not execute operations.
-
Unknown: The agent is registered but there was no heartbeat within the last 5 minutes (the default interval).
The following diagram shows how a private agent's status can change:
Add agents
To add a private agent to a private agent group, follow these steps:
-
Open the Agent group details drawer for the private agent group where the new private agent should go.
-
Click the Create icon in the drawer's Agent tab toolbar. A New agent row appears in the table:

-
Enter a value in the Name field:

-
Click the Save icon:

-
You can now register your private agent using the new agent name and ID.
Delete agents
To delete a private agent from a private agent group, follow these steps:
-
Open the Agent group details drawer for the private agent group containing the private agent you want to delete.
-
In the Agent group details drawer, hover on a private agent, then click the More actions icon.
-
From the menu, select Delete agent. The Delete agent dialog opens:

-
To continue the action, enter the word DELETE where indicated, then click the Delete button:

Tip
You cannot delete an agent unless its status is one of Starting, Stopped, Unregistered, or Unknown.
Manage plugins
To manage a private agent group's plugins, select the Plugins tab:

To associate or disassociate plugins with the selected private agent group, use the toggle in the Association column.
To jump to the plugin entry in the Management Console Plugins page, hover on the Actions column, then click the Go to plugin icon.
View environment associations
To see which environments the private agent is associated with, select the Environments tab:

To change the association status, hover on the Actions column, then click the Go to environment icon. The Management Console Environments page opens for the environment.
Manage agent configurations
If the selected private agent group has active private agents, you can remotely configure all agents in a group without having to log into each individual agent host. To do this, you must satisfy these conditions:
-
There must be at least one private agent in the group that has a Running status.
-
You must enable remote agent configuration in the Organizations Agent Management tab.
When these conditions are met, the Jitterbit configuration and Database Drivers tabs are also visible in the Agent group details drawer.
Jitterbit configuration
This tab reproduces the default private agent jitterbit.conf file in tabular form:

Between the tab bar and the table is a toolbar with the following controls:
-
Search: Search for configuration items by section, enabled status, key, value, or description.
-
Reset to default: Reset the configuration for all agents in the group to their default values. To do this, follow these steps:
-
Click the icon.
-
Read the information in the Reset configuration to default dialog.
-
Enter the word RESET where indicated, then click the Reset button.
Tip
Default values for each key are shown in tooltips on the Value column.
-
-
Refresh: Refresh the table.
-
Edit configuration: Edit configuration items for all agents in the group. To do this, follow these steps:
-
Click the icon.
-
Read the information in the Edit Jitterbit Configuration dialog, then click the Continue button.
-
Make changes to the configuration items, then click the Save icon.
-
Read again the information in the Edit Jitterbit Config dialog, then click the Save button.
-
-
Add configuration: Add a configuration item for all agents in the group. To do this, follow these steps:
-
Click the icon.
-
Read the information in the Add a new Jitterbit Configuration dialog, then click the Continue button.
-
A new row appears in the table. Set values for Section, Key, and Value, set the Enabled switch on or off, then click the Save icon.
-
Read again the information in the Add a new Jitterbit Configuration dialog, then click the Save button.
-
Note
When you enable remote configuration, the values in a private agent's jitterbit.conf file are overridden but not overwritten. The warning messages are for your information only.
Database drivers
This tab contains a text field with the contents of the [DbDrivers] section of the jitterbit.conf file:

To edit the database driver configuration for all agents in the group, follow these steps:
-
Click the Edit icon.
-
Read the information in the Edit Database Driver dialog, then click the Continue button.
-
Edit the file, then click the Save icon.
-
Read again the information in the Edit Database Driver dialog, then click the Save button.
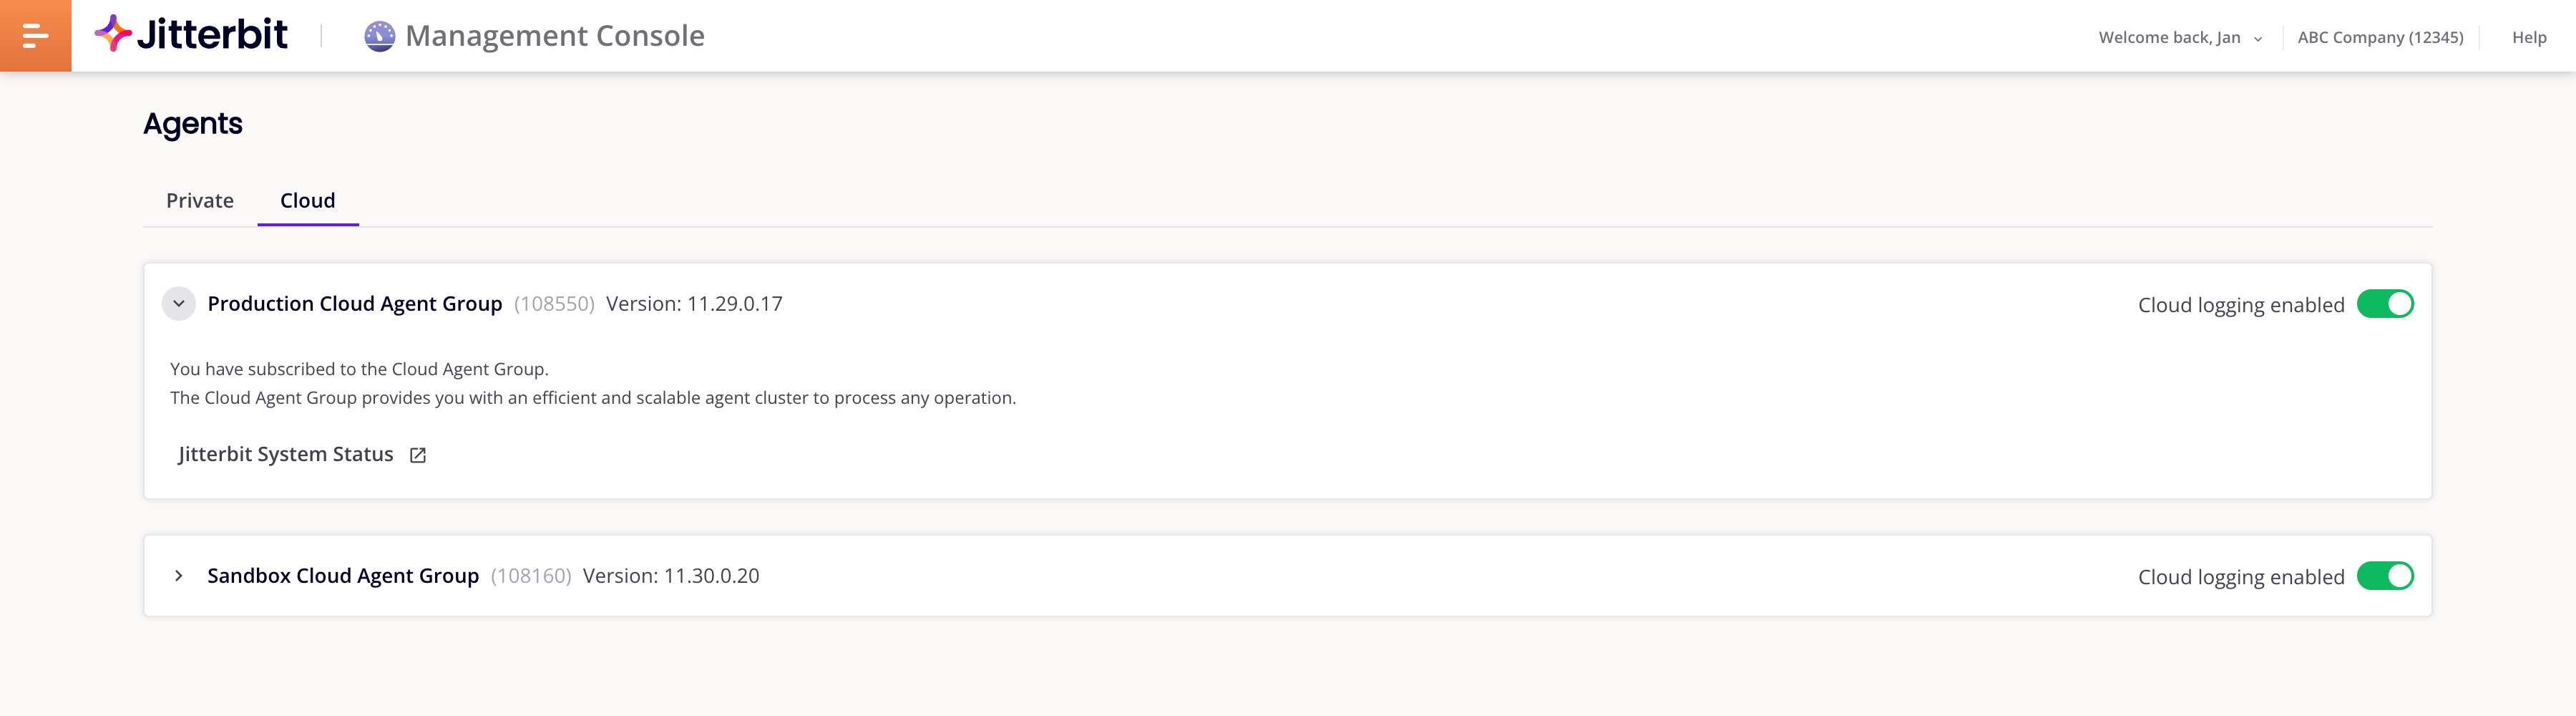
Cloud agent groups
To see cloud agent groups, select the Cloud tab:
The Status column shows the status of the agent group reported on Jitterbit's system status site, accessible via the Go to Jitterbit System Status icon.
Tip
Cloud logging is always enabled for cloud agents.
Metrics (Beta)
To monitor private agents and groups, select the Metrics (Beta) tab:
Note
You must enable Jitterbit private agent metrics on every private agent you want to monitor.
The Metrics (Beta) tab contains the following:
-
A toolbar with these controls:
-
Metrics selector: Select which metrics charts to show.
-
View selector: Select Agents to view metrics for individual agents, or Agent Groups to view metrics for whole agent groups:
Example chart in Agents view Example chart in Agent Groups view 

-
Date range selector: Select the date range to show metrics for. The default date range is the past 24 hours. To increase the time resolution of charts, either change the date range, or click on a colored segment. Subsequent clicks decrease the range until the limit (1 minute resolution) is reached. Your browser's locale determines how dates are shown.
-
Statuses selector: Select which of the following statuses to show:
-
Healthy: The agent or a member of the group is accepting operations for processing.
-
Degraded: The agent or a member of the group is in an unknown state.
-
Unhealthy: The agent or a member of the group cannot process operations.
-
-
Agent group selector: Select which agent groups to show metrics for.
-
Agent selector: When the view selector is set to Agents, select which agent to show metrics for. (When the view selector is Agent Groups, this control is inactive.)
-
You can expand or move charts with these controls:
-
Expand: Click to expand the chart to fill the window. Click to return the chart to its original size.
-
Move: Click and drag to move the chart to another position.
For some charts, you can switch between bar and line charts using the and icons. Line charts have shaded regions showing the threshold values for each agent health status, Healthy, Degraded, or Unhealthy:

For charts that have them, line charts are the default view when the Management Console Agents page is first loaded.
Reference
Page settings
You can sort tables, resize column widths, and rearrange columns:
-
To sort a table in ascending order, click a column heading. Click again to reverse the sort order.
-
To resize a column, drag a column's Resize bar.
-
To rearrange columns, click the Filter Columns icon. The Columns drawer opens with the following controls:
-
Search: Filter the list of columns. The search is not case-sensitive.
-
Show all: Click to show all columns. By default, all columns are shown.
-
Hide: The column is visible. Click to hide it.
-
Show: The column is hidden. Click to show it.
-
Move: Click and drag to adjust the order the column appears in.
-
Save: Click to save any changes.
-
Cancel: Click to discard any changes.
-
Metrics charts
The Metrics (Beta) tab contains the following charts.
Capability metrics
-
API Capability: Agent can handle APIs.

-
Overall Health: Agent's overall health capability.

-
Run Operation Capability: Agent's operation execution capability.

-
System Resource Capability: Agent host's resource capability.

Service metrics
-
Agent Services Client: Status of the agent services.

-
Apache: Status of the Apache server.

-
Apache Threads: Apache server thread usage.

-
Cleanup: Status of the cleanup service.

-
Local Rest Client: Status of the local REST service.

-
Pending Log Sync: Status of the pending log synchronization.

-
Pending Run Operations: Status of operations pending execution.

-
PGBouncer: Status of the PgBouncer connection pooler service.

-
PostgreSQL: Status of the PostgreSQL database server.

-
PostgreSQL Connections: Status of the PostgreSQL database server connections.

-
Process Engine: Status of the process engine.

-
Rest Client: Status of the REST client.

-
Scheduler: Status of the scheduler service.

-
Tomcat: Status of the Tomcat application server.

-
Tomcat Threads: Tomcat application server threads usage.

-
Verbose Log Shipper: Status of the verbose log shipper service.
